27 Incredible Entryway Shoe Storage Ideas You’ve Got to Consider: The Most Innovative Shoe Racks!

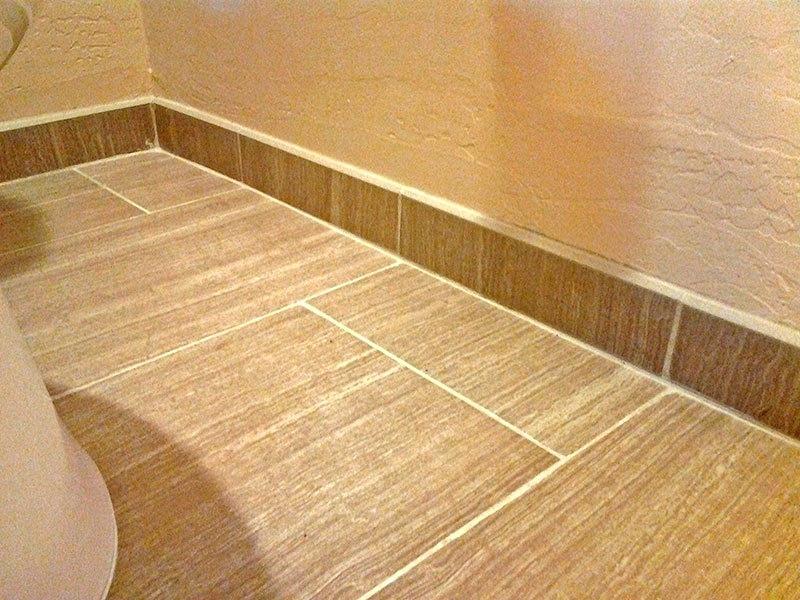
What would you think if you see shoes scattered around anywhere in your house? ‘Staggering’ is probably the first word that crosses your mind if that happens.

It’ll all be a lot worse if the shoes are scattered about all over the entryway. The entryway is the first thing your guests see and if they’re welcomed by this kind of stuff, they’ll be turned off fast.

Plus, they won’t be able to at least put their shoes somewhere nice so they look like they’re being taken care of well. But all of these can be prevented, don’t you worry!

Placing entryway shoe storage at your entryway should be the most effective way to achieve the purpose. But should you simply place a shoe rack without care or go all out and try to make it a part of an artwork?

The latter is better, obviously! And here are 27 entryway shoe racks you should take a close look at if you’d love to place a shoe rack at your entryway for both a practical and aesthetical purpose!

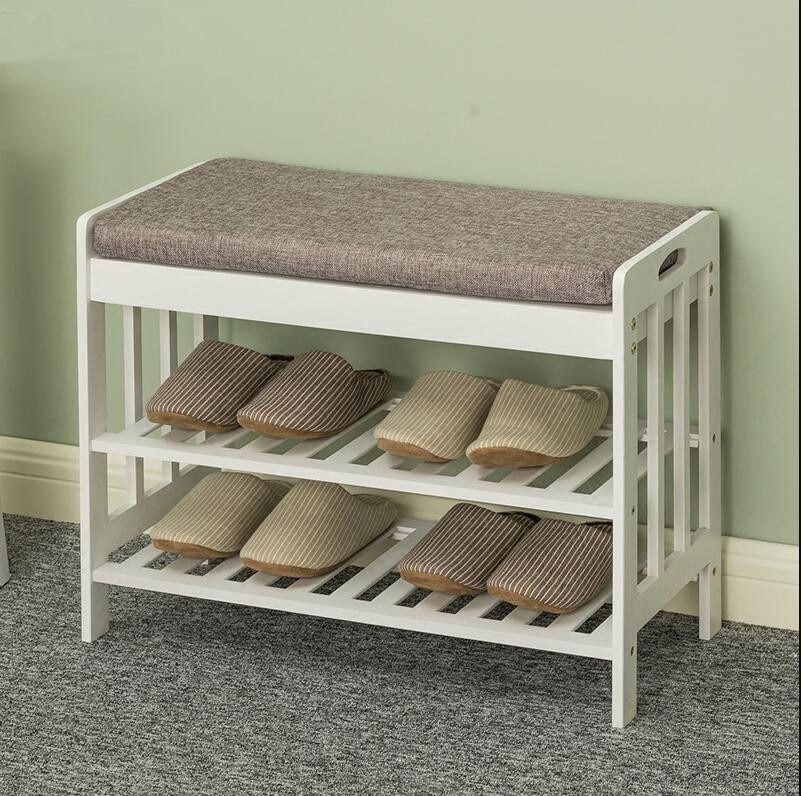
1. A Small Shoe Rack, Also Serves as a Cushioned bench

entryway shoe storage ideas

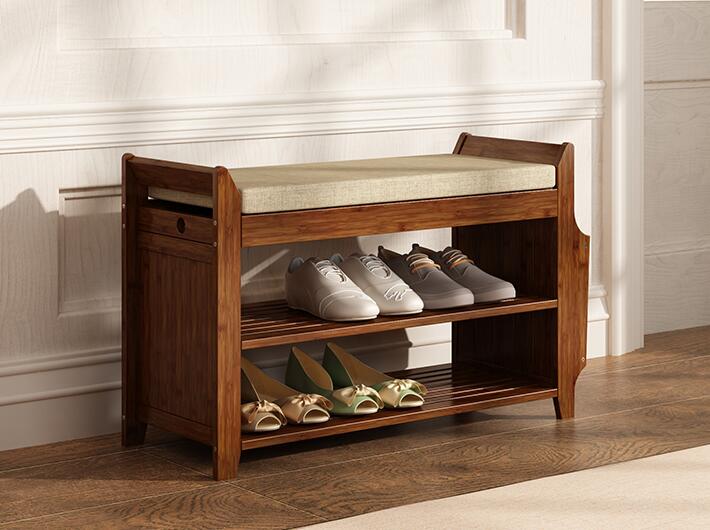
Let’s start with a simple one! If you’re not intrigued to have a big shoe rack at your entryway, you could always opt for a small one.

But small doesn’t always mean limited! After all, you can prove this point by having a small shoe rack that can also function as seating at your entryway.

very small shoe rack with two shelves and a cushioned top will be good enough. Choose a wooden one so you have a small but classy shoe rack at your entryway. Don’t wait too long! Go and get one!

2. A White Shoe Rack for a Modern Look

entryway shoe storage cabinet

A fan of modern designs? Then you should pick a shoe rack that meets your preference. Color is obviously one of the things you should consider when it comes to picking something for a modern room.

For your modern entryway, clean white is one of the best options you could get. Clean white reflects modernity, elegance and luxury.

If you’re placing a white shoe rack at your entryway, don’t forget to decorate its top. Two white vases with green-leafed plants will be enough for the task.

3. Wicker Shoe Baskets for Fresh Rustic Look

entryway shoe storage ikea

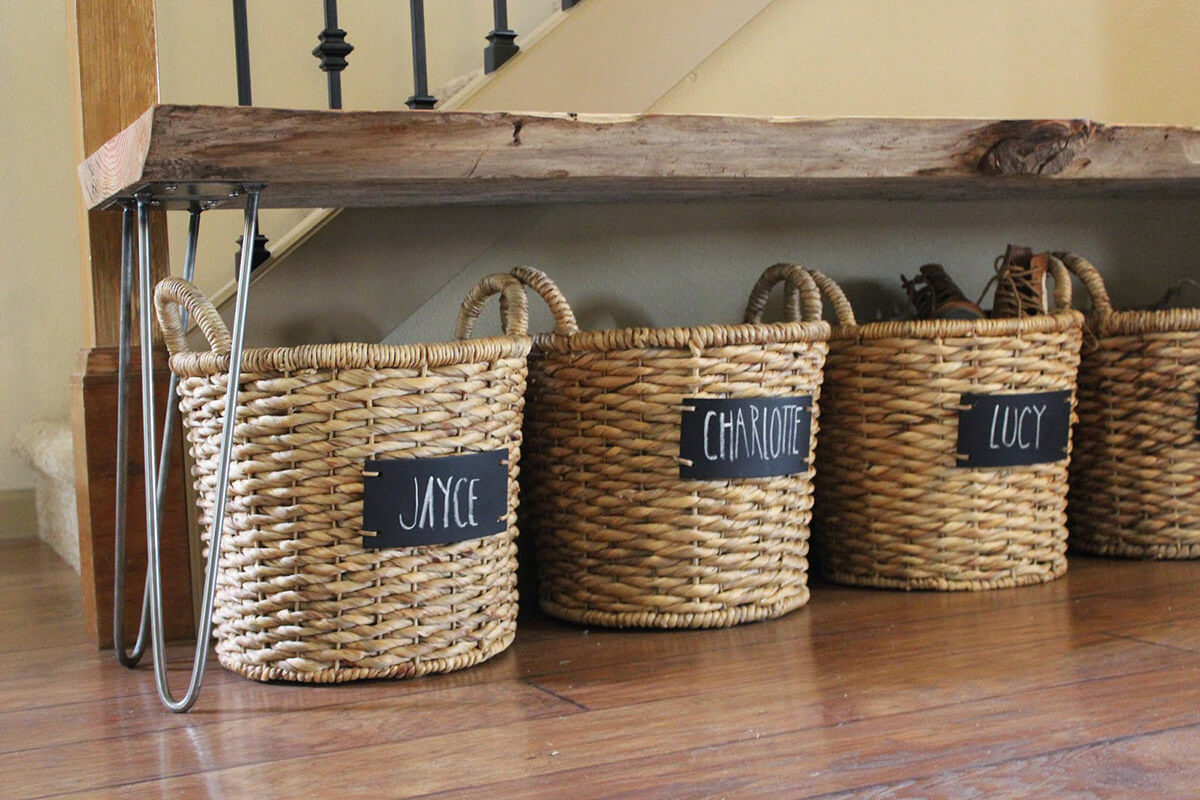
Open for everything unique? Why don’t you use baskets instead of racks? Just place some shoe baskets under a bench at your entryway!

This will give your entryway a really interesting look your guests will surely have a smile looking at. Shoe baskets are awesome choices for rustic rooms.

That’s why, pairing them with an unpolished rustic wooden bench should help you turn your entryway into a space that looks wonderful. Try it!

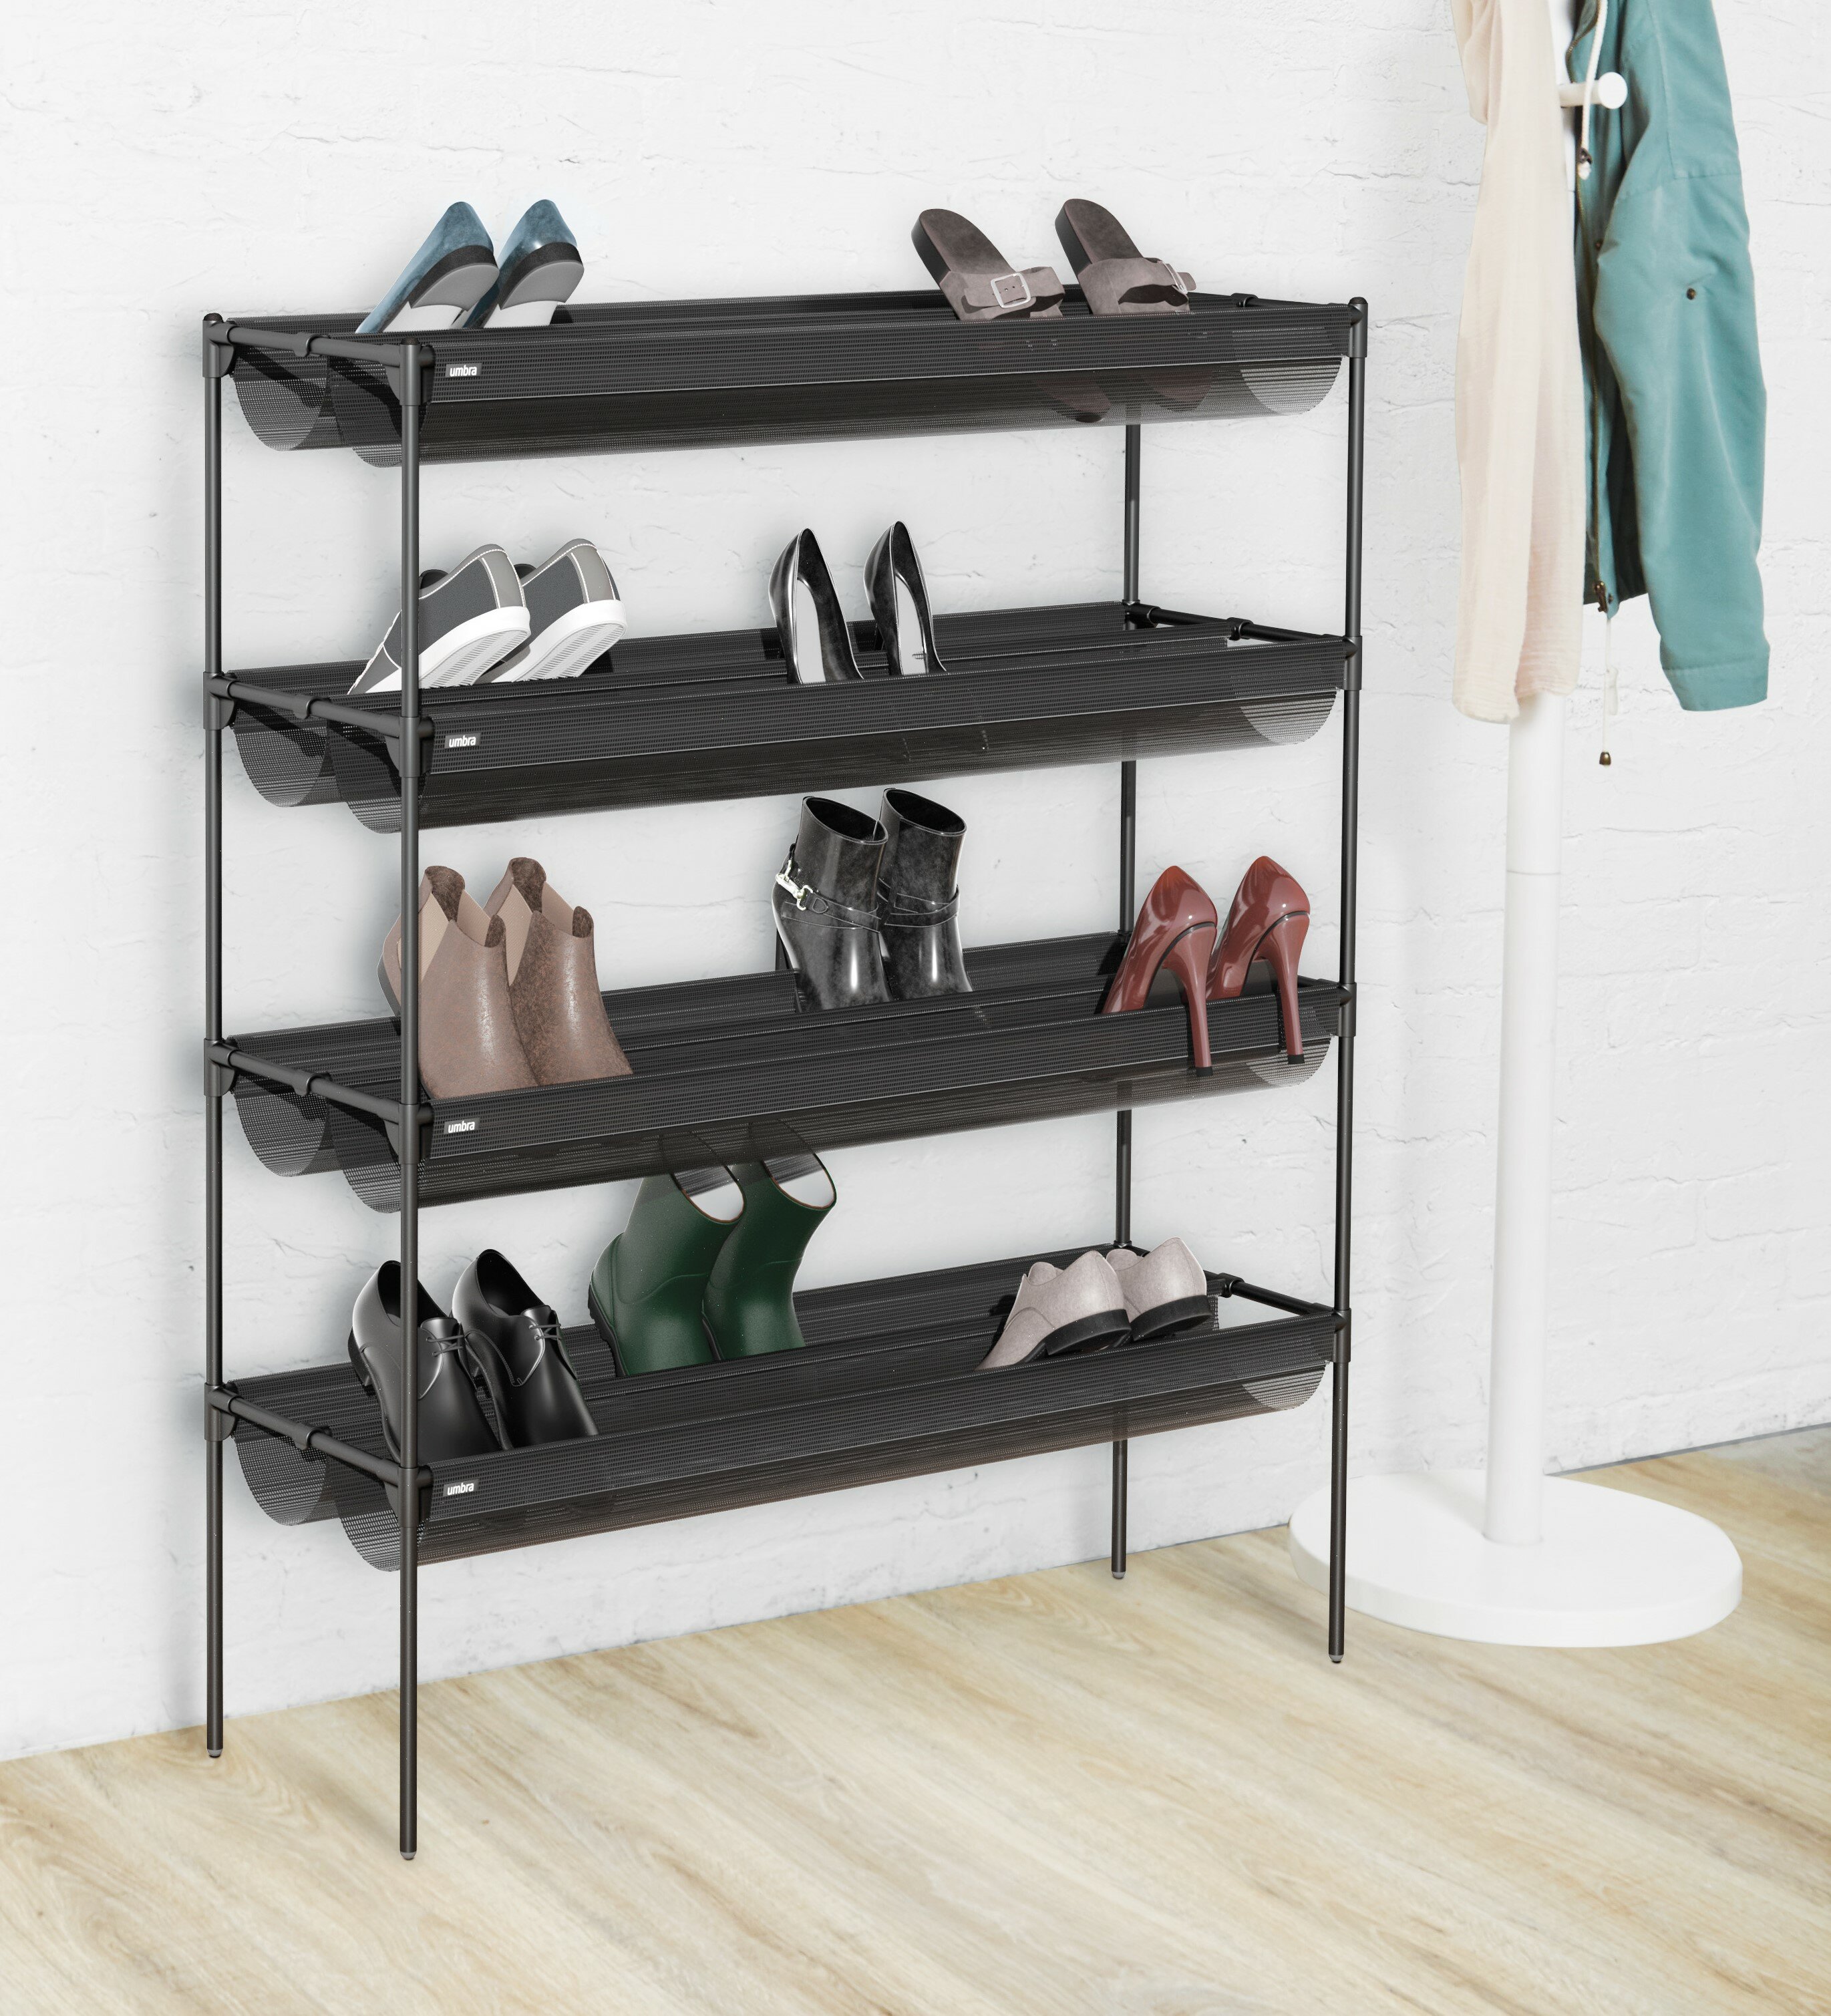
4. A Wide and Tall Shoe Rack for Girls

entryway shoe storage walmart

If you’ve got lots of friends and they often come over, you should consider your shoe storage choices well! You don’t want some of your guests to run out of space to store their shoes in.

Thus, it goes without saying that you need to consider a bigger shoe rack. A wide and tall shoe rack should be perfect for you.

When trying to find your own wide and tall shoe rack, make sure you choose one divided into parts that each can hold a pair of high heels. Obviously, not all of your guests are men, right?

5. A Rugged and Masculine Concrete Shoe Rack

entryway shoe storage small

In the mood for something unusual? Then get a, or create your own, concrete shoe rack. It’s not that hard to create your own concrete rack.

After all, all you have to do is pile up some concrete blocks, organizing them into a rack with shelves. This kind of rack is great for a rustic entryway.

Also, a rack like this will be perfect for you if you’re a fan of DIY racks. Just make sure that your concrete rack is firm enough to store shoes without crumbling.

6. A Carcoal Black Shoe Rack for a Modern Entryway

entryway shoe storage furniture

Just like white, very dark colors are also perfect for modern rooms. That’s why, considering a dark shoe rack is a good idea when it comes to incorporating furniture into a modern entryway.

If a very dark rack is what you’re looking for, anchor is one of the perfect colors of you. A very dark shade of gray, it suits modern rooms incredibly well.

If you can help it, get an anchor shoe rack that also comes with drawers. This way, your shoe rack can also function as something else, maybe key storage, thanks to the drawers.

7. A Slim White Minimalist Metal Shoe Rack

entryway shoe storage table

Another option for your modern entryway is a slim metal rack. Metal suits modern rooms very well and virtually everybody knows that.

If this kind of rack is what you’d love to place at your entryway, choose one that has slim legs. It suits the modern theme you choose for your entryway.

As for color, white should be a pretty good choice. It goes well with modern styles and pretty much anything. The perfect color, dare I say.

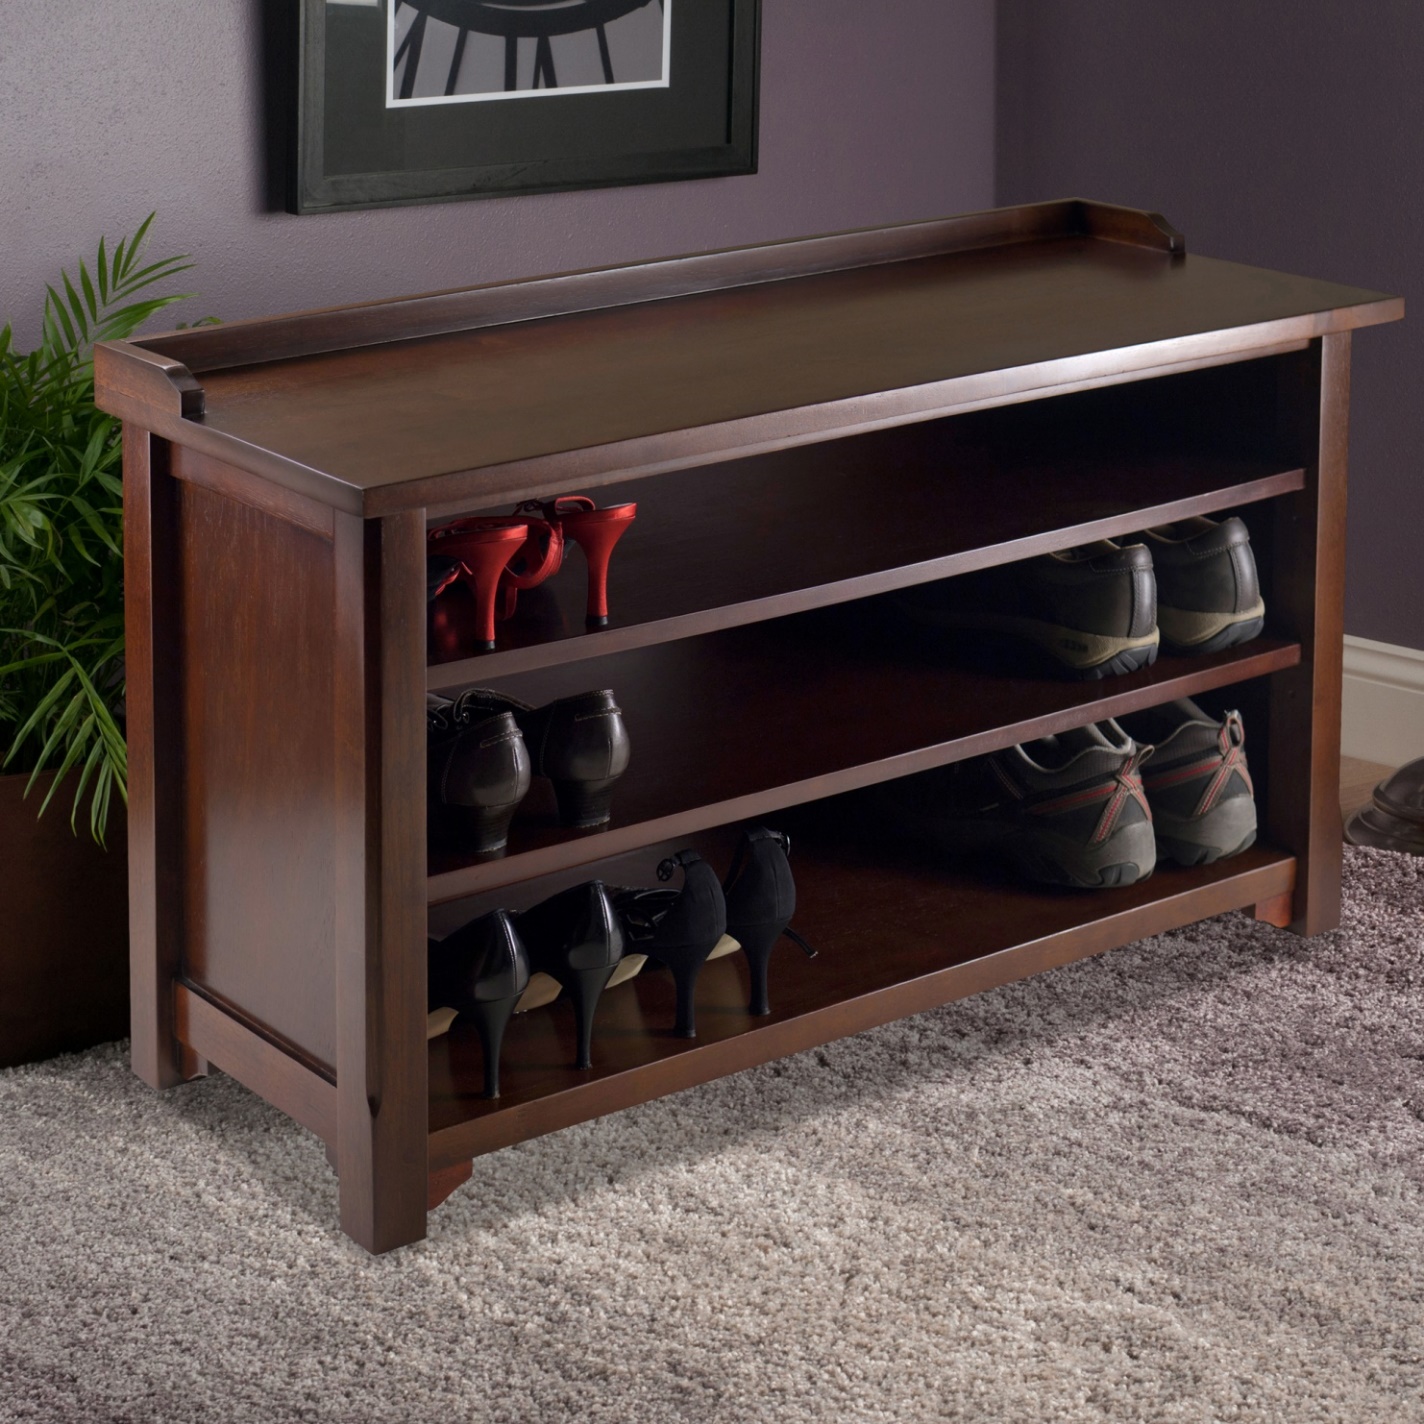
8. Dark Brown Shoe Storage for an Elegant Entryway

entryway shoe storage target

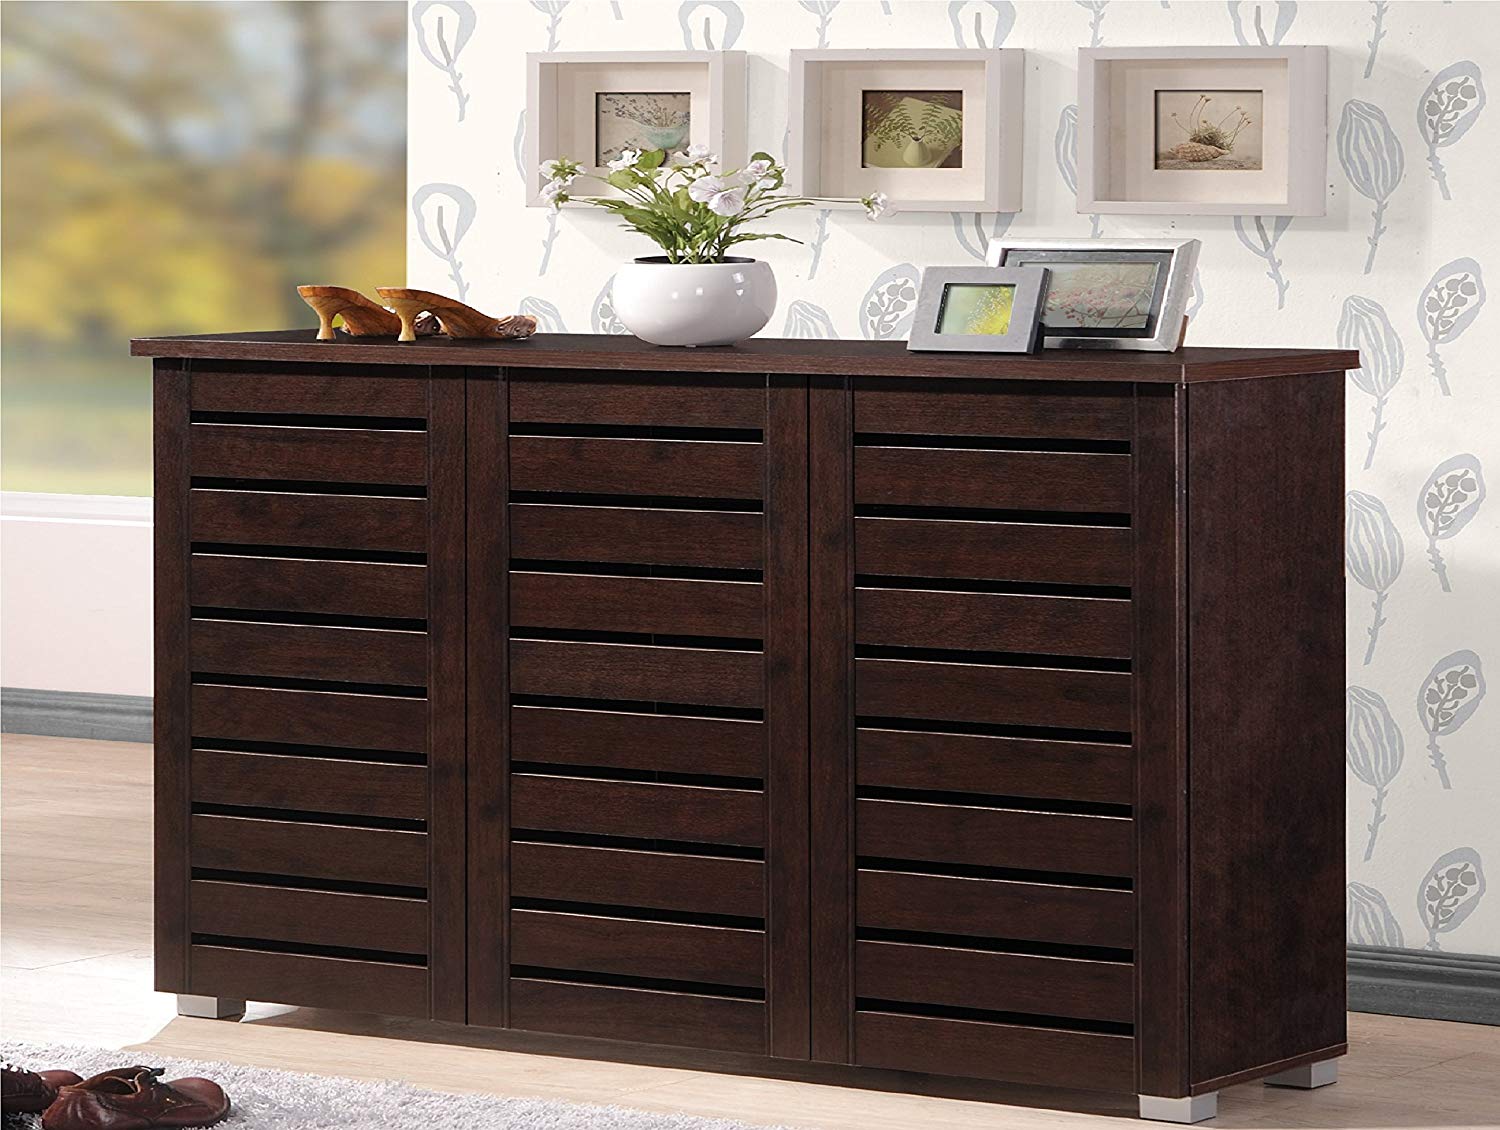
Is elegance something you put a heavy emphasis on when it comes to designing your rooms! If so, dark brown should be amongst the colors that you always include in your lists.

It means that a dark brown shoe rack is perfect for your entryway if you’d love it to become a beautifully elegant entryway.

If it’s possible, choose a shoe rack that has doors. This way, your guests’ shoes will not pop up and disturb the flow of the elegant aura present at your entryway.

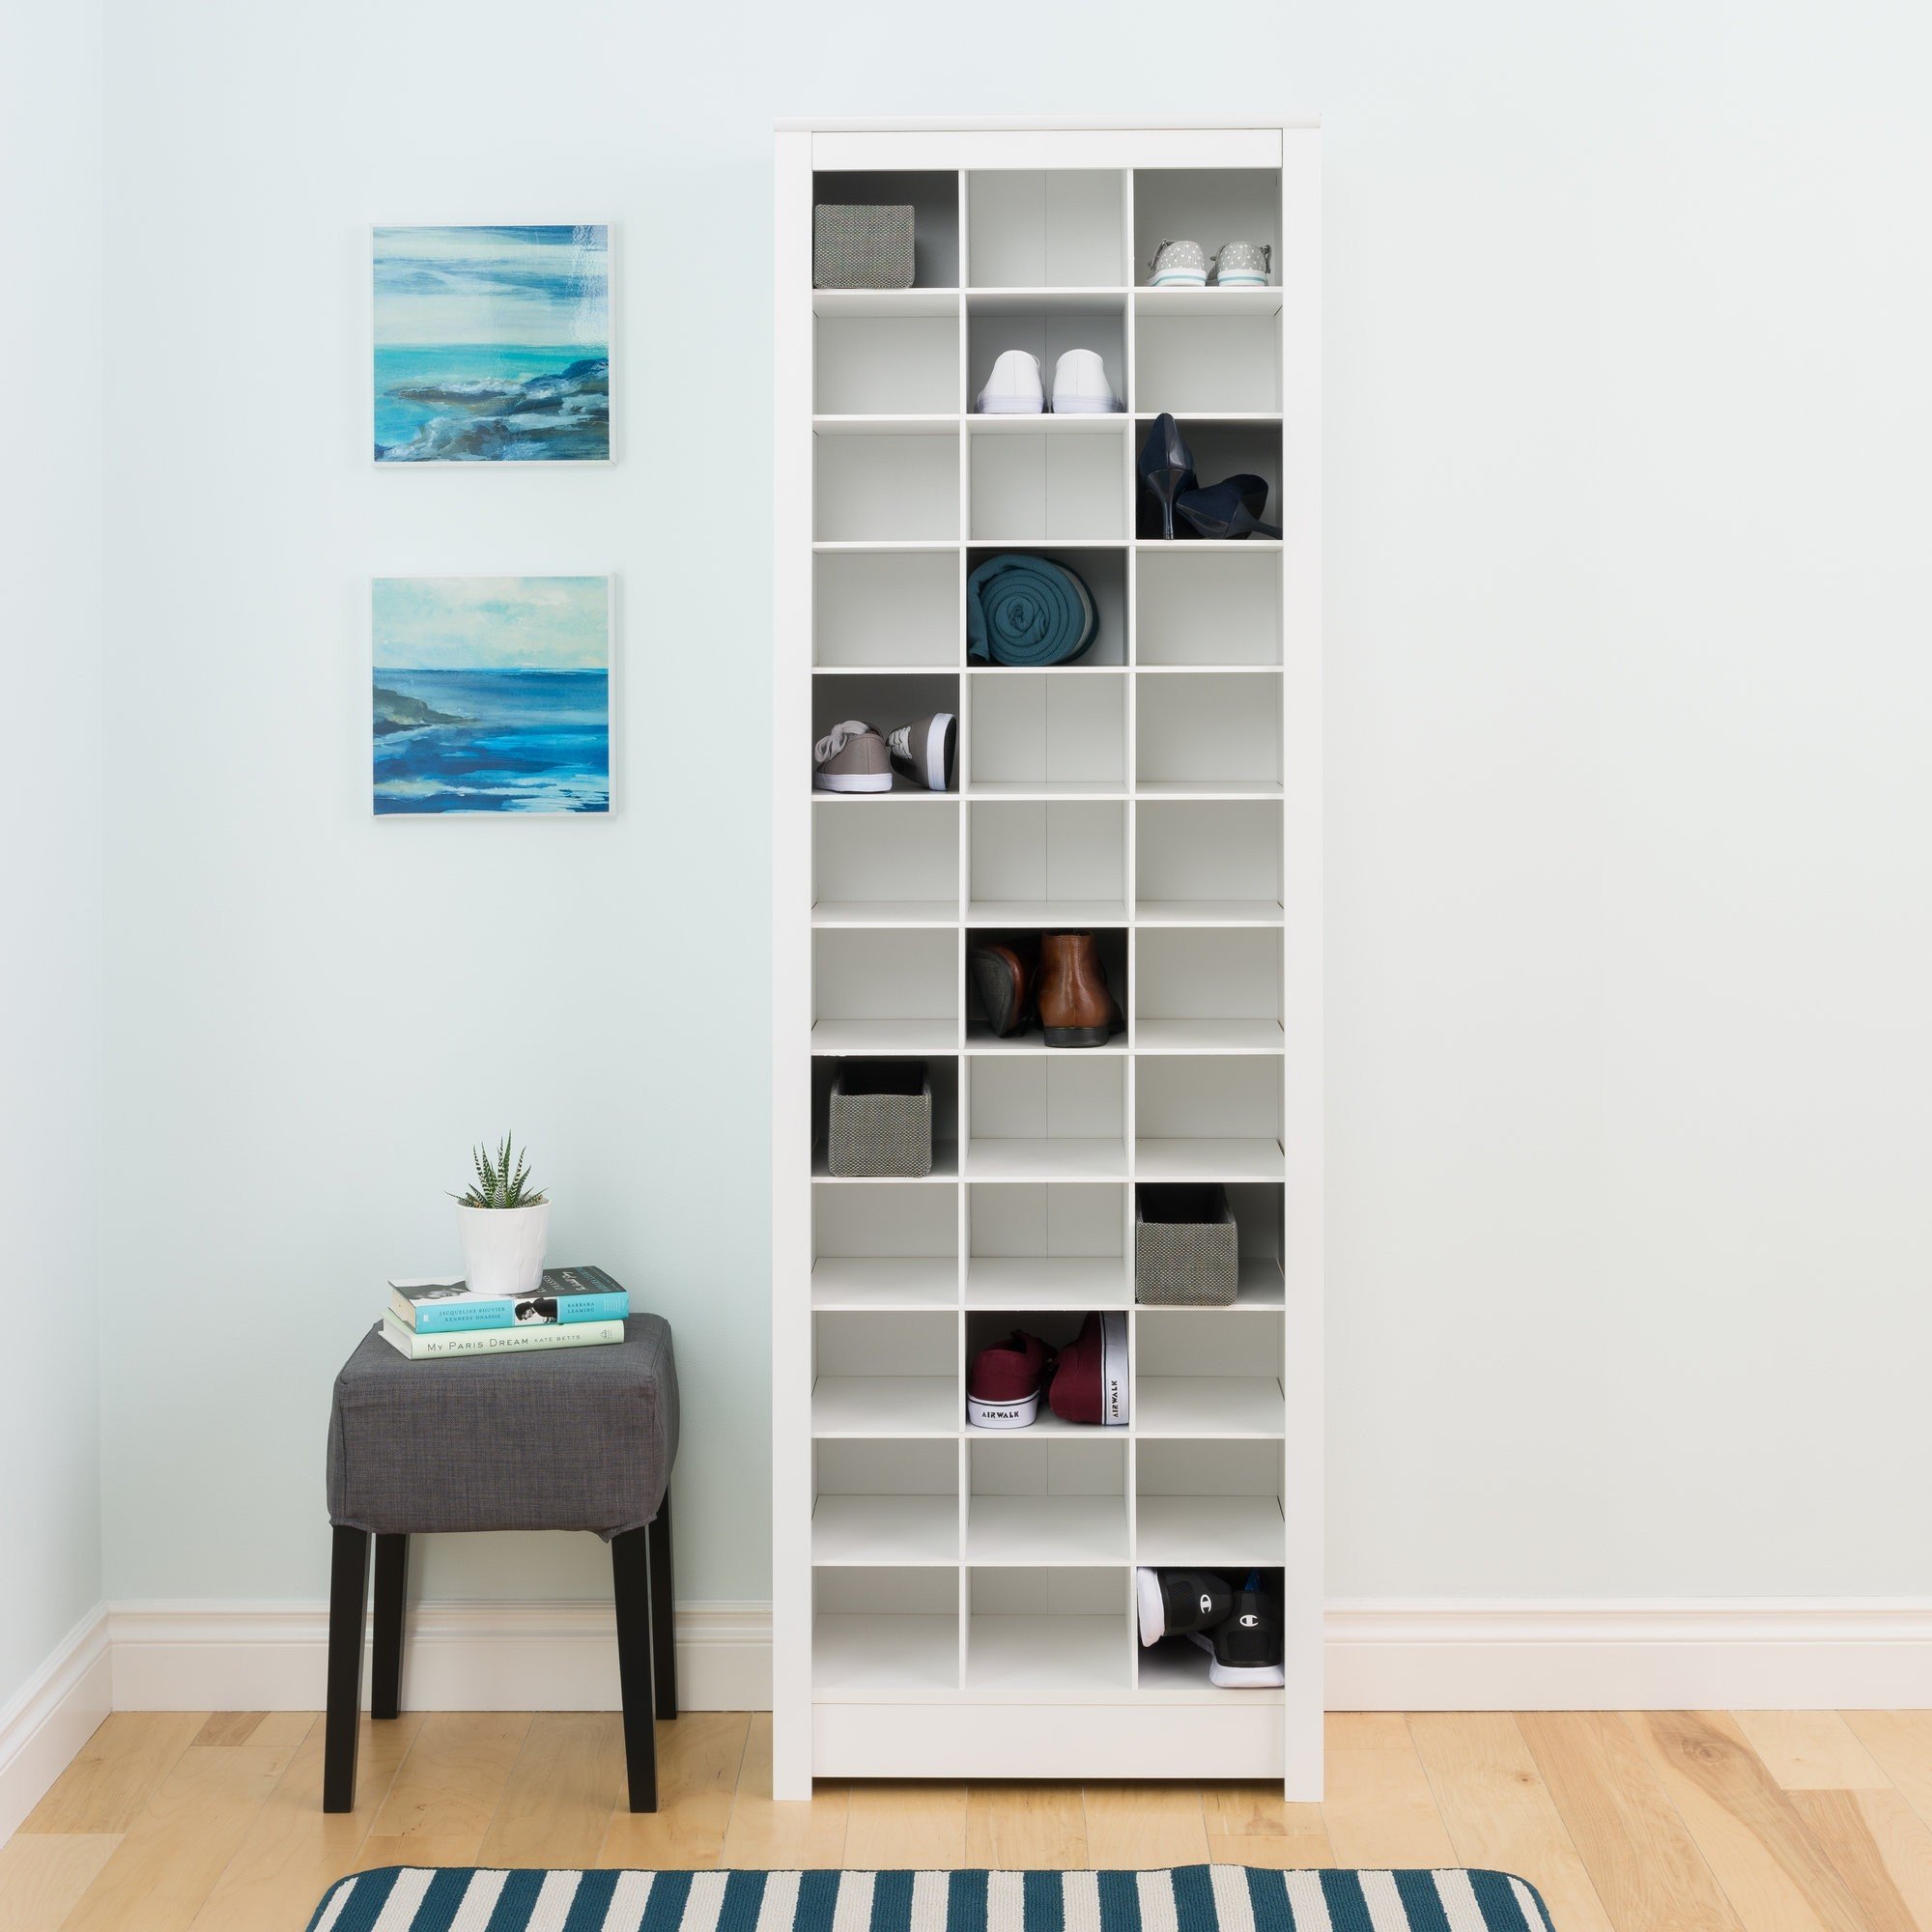
9. A Classic White Shoe rack, One for Each Shoe

entryway shoe storage amazon

Do you like tiny things? If you do, why don’t you add something special to your entryway? What could it be? Well, it most likely comes in the form of a special shoe rack!

A shoe rack with storage spaces that sometimes is only big enough for a shoe is a rack that falls into this category.

This kind of rack suits virtually any style so don’t worry too much about styles. Also, it’s really nice that this is the kind of rack that’s perfect for small entryways. If your entryway is small, it’s perfect for you.

10. Hidden or Unhidden? Open And Covered Shoe Rack For You

entryway shoe storage and bench

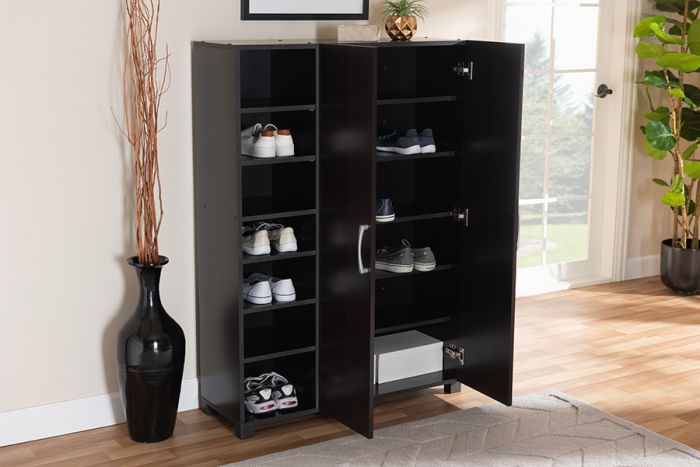
Do you want to hide the shoes stored at your entryway? Or do you not want to? Or do you want to do both?

Well, you can do both, really! All that you need to do is getting a special shoe rack that has doors but only on one side.

The other side is doorless. What does it mean? It means you can hide some shoes and let some others be visible using this kind of rack. The trick is, of course, to show only the nicer shoes, right?

11. A Slim and Innovative Shoe Rack for Girls

entryway shoe storage and coat rack

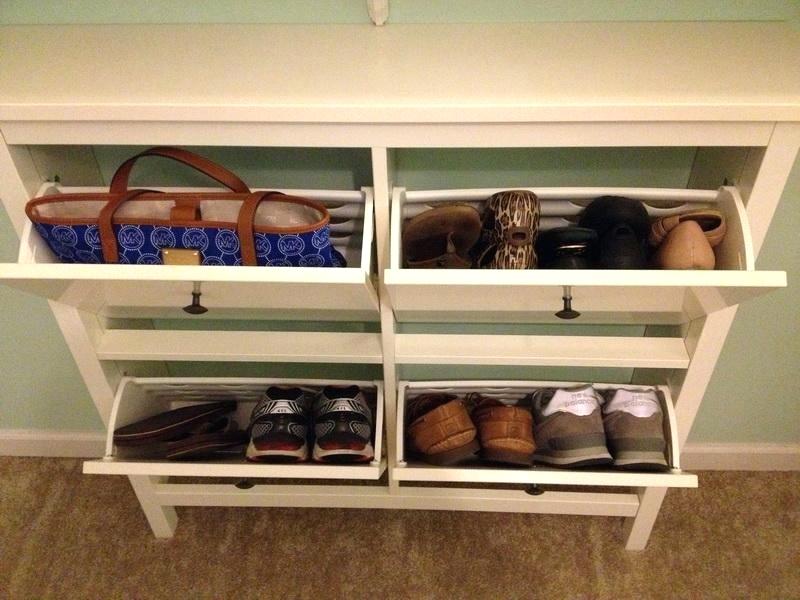
Well, innovation happens everywhere and shoe racks also become victims of it. There are many innovative shoe racks out there.

The idea is to get one for your entryway. Innovation can come in many forms and in shoe racks, it comes in the form of cool doors.

A shoe rack with doors that open vertically, instead of horizontally, should be a very nice addition to your entryway. That is if an innovative shoe rack is what you’d love to place at your entryway for your guests.

12. A Neat DIY Shoe Rack for Small Rooms

entryway shoe storage australia

Are you a creative homeowner? Then creating your own furniture pieces should be amongst your top priorities.

Interested in creating a DIY shoe rack? Well, if that’s the case, wood is your number one material choice because it offers you flexibility.

Unlike metal or plastic, wood can easily be formed into anything. Thus, it gives you more freedom. If you want to create your own wooden shoe rack, make sure you leave it unpolished just to let people know that it’s your very own creation.

13. A Elegantly Polished Shoe Rack for a Classic Home

entryway bench with shoe storage australia

A fan of luxury and elegance? Then wood is yet another best material choice for you. This time, don’t create your own shoe rack.

Make the effort to purchase the rack if luxury and elegance are what you focus on. As for color, chocolate is probably a shade of brown you should pick.

When polished, chocolate can exude an aura that makes wood look luxurious and elegant. Definitely a perfect choice for your purpose.

14. A Simple Minimalist Shoe Rack

entryway shoe storage west elm

If your house has a pure soul, choosing a shoe rack that suits it is key to decorating it. A pure shoe rack might come in the form of a very simple rack.

A tortilla wooden shoe rack with doors falls into this category. The color is not to extravagant and it suits the overall theme of your pure house.

If this kind of rack is what you’d love to have, it won’t hurt to place a cushion on top of it. This way, it offers more than one function to you and your guests.

15. A Chic Open Rack, A Shoe Rack That Offers a Contrast

shoe storage at entryway

If a nice modern look is what you strive to achieve, creating a contrast is probably a trick you should try. And guess what, it’s easy to do this trick.

For instance, if your entryway walls are bright, you can place a dark shoe rack at your entryway. If your walls are dark, you know what to do.

One thing to consider is the color of the floor. If it’s possible, make sure that the floor’s color also contrasts that of the shoe rack just to make it stand out.

16. If You Like Chocolate Dark, This Shoe Rack is Yours

attractive entryway shoe storage

Is dark chocolate your favorite thing to digest? Then why don’t you show your love for it to all of your guests?

How do you do it? Place a dark chocolate shoe storage at your entryway! Make sure the rack faces the door so each one of your guests sees it right away after entering your house.

Also, it’s better if you don’t use too much of the space on its top. This way, people can place their hats or bags on it, too. A shoe rack doesn’t always need to focus only on shoes, you know!

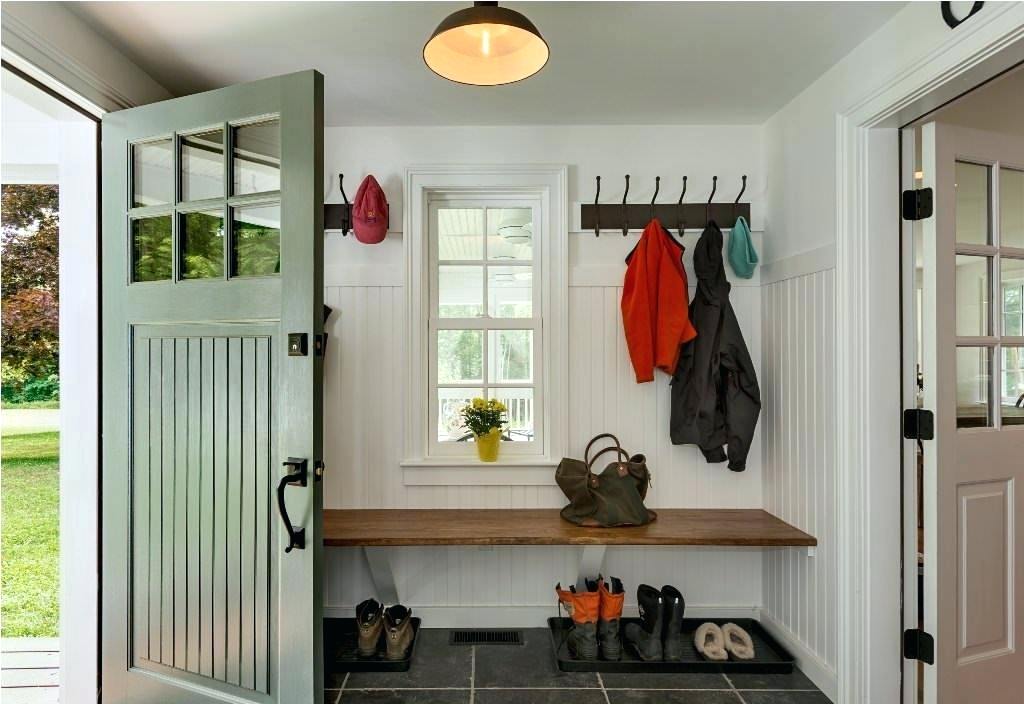
17. A Cool Shoes Storage and Bench for a Clutter-free Room

entryway shoe storage bench diy

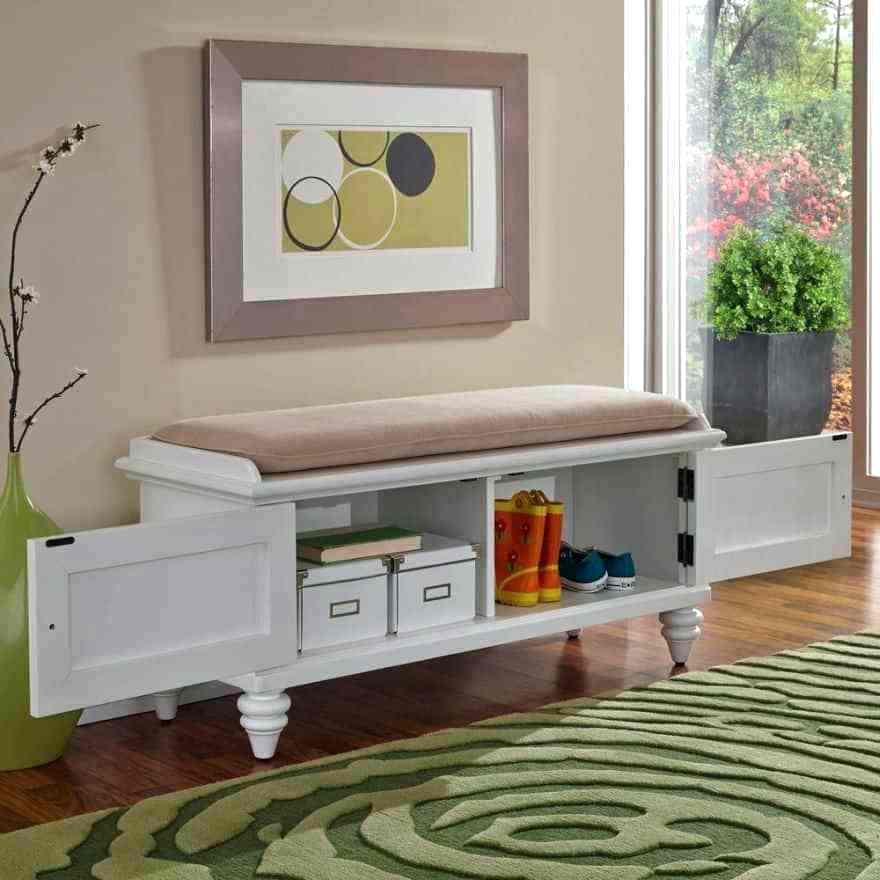
What’s better than a multifunctional furniture piece? If it’s possible, choose this kind of furniture piece for your entryway.

A seating item that comes with storage is one of the easy choices for you if a multifunctional shoe rack is your target.

If you can manage to get a low seating item that also functions as a shoe rack with doors, it’ll be a lot better. After all, this kind of seating item easily becomes an interesting addition in many kinds of rooms and the entryway isn’t an exception to this rule.

18. A Gorgoeus White Shoe Rack Paired with a Wall Rack

entryway shoe storage black

Your shoe rack doesn’t have to come alone if it’s not confident enough to do so! After all, you can have another item accompany it should you want to.

You can, for example, pair your shoe rack with a wall-mounted rack. What to consider when trying to do this, though?

Well, simply make sure your shoe rack is in the same color as your wall rack. If they match, they’ll look awesome together.

19. A Movable Shoe Rack for You Can Build Yourself

entryway shoe boot storage

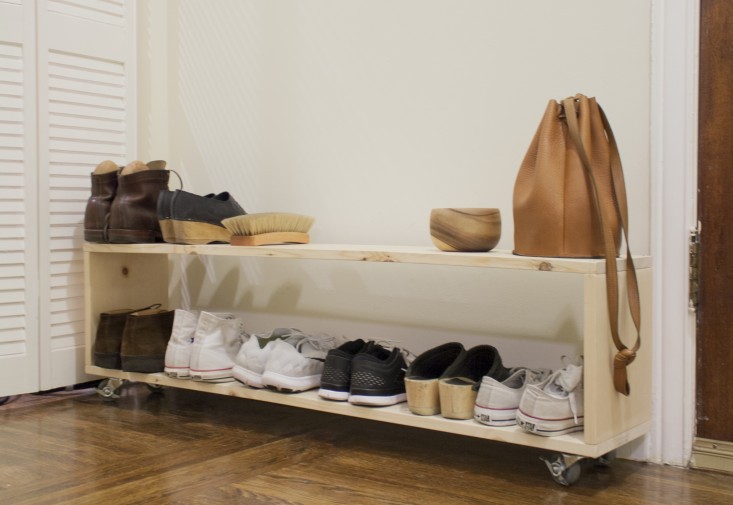
If you like furniture that’s easily movable, wheeled furniture pieces are undeniably the best for you. Make sure you place one of this kind of furniture at your entryway if you really like it.

What do you need to note when trying to place this kind of furniture at your entryway? Make sure the furniture doesn’t have too many shelves.

If it has too many shelves, you’ll have trouble moving it as some of the shoes on the upper parts might start to fall down as you push the rack.

20. A Curving Door Shoe Rack for a Sophisticated Look

entryway shoe storage cubbie bench

If a classy entryway with a touch of innovation is what you’d love to create, a shoe rack with a curving door is what you should place at the area.

Well, what’s curving here isn’t the door itself. It’s the part inside the door that allows it to open in a very unconventional way.

Placing this kind of rack at your entryway can give the area a sophisticated look. Go get one if a sophisticated look is what you’ve been trying to achieve.

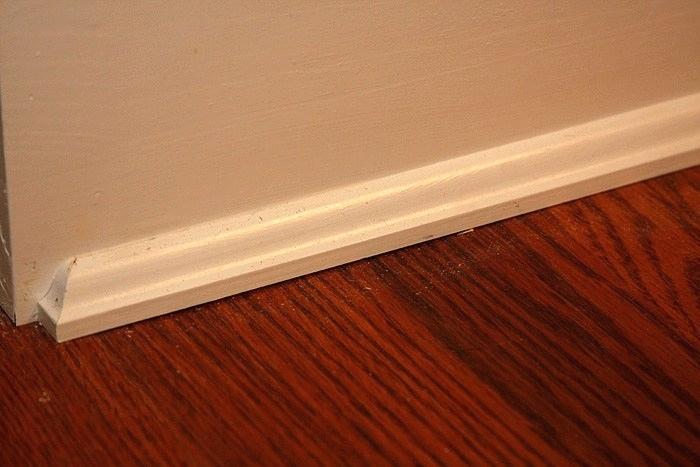
21. Shoe Storage That Kisses the Floor

entryway shoe storage canada

Speaking of shoe racks, you don’t actually have to purchase a shoe rack everytime you want to create a shoe storage space at your entryway.

After all, you can simply build a bench that sticks to the wall and have enough space underneath. This space below the bench will act as a shoe storage space.

This kind of shoe storage kisses the floor and thus, doesn’t care about how dirty your shoes are. This, by itself, is a good thing, of course.

22. Black Minimalist Shoe Trays Under a Multipurpose Rack

entryway shoe storage container store

If you’re interested in shoe racks that kiss their floors but you don’t want your floor to be dirty, rest assured! There’s a very simple but brilliant trick for you.

Simply put some shoe trays under your entryway bench. These trays will prevent your floor from getting dirty from the all the dust and other things sticking to your shoes.

Don’t use trays in bright colors because it’ll stand out and make your entryway look rather uninteresting. So what color to pick? Well, black is good enough, especially if your floor is dark.

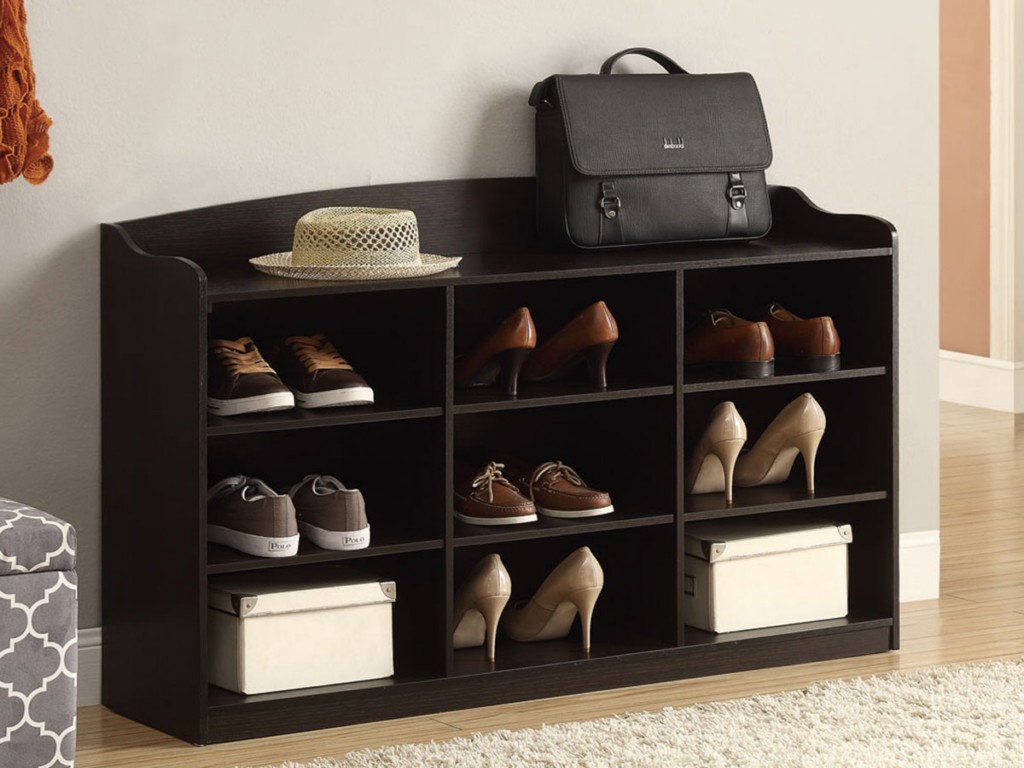
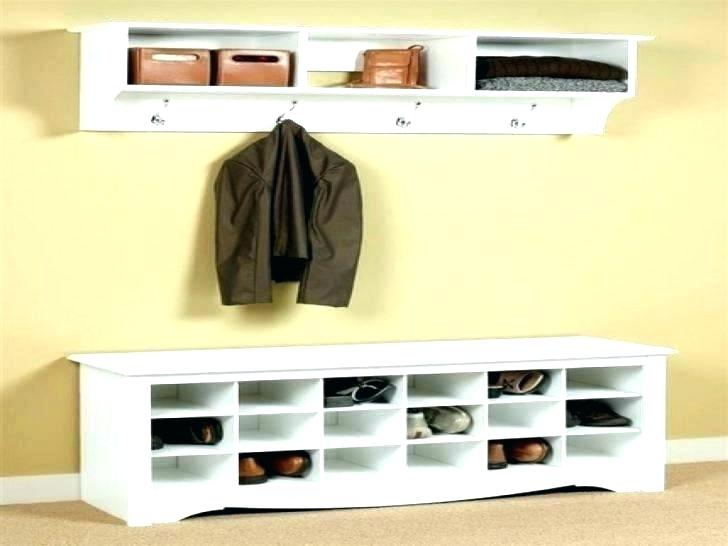
23. A Shoe Rack with Shelves for The Family’s Shoes

entryway shoe coat storage ideas

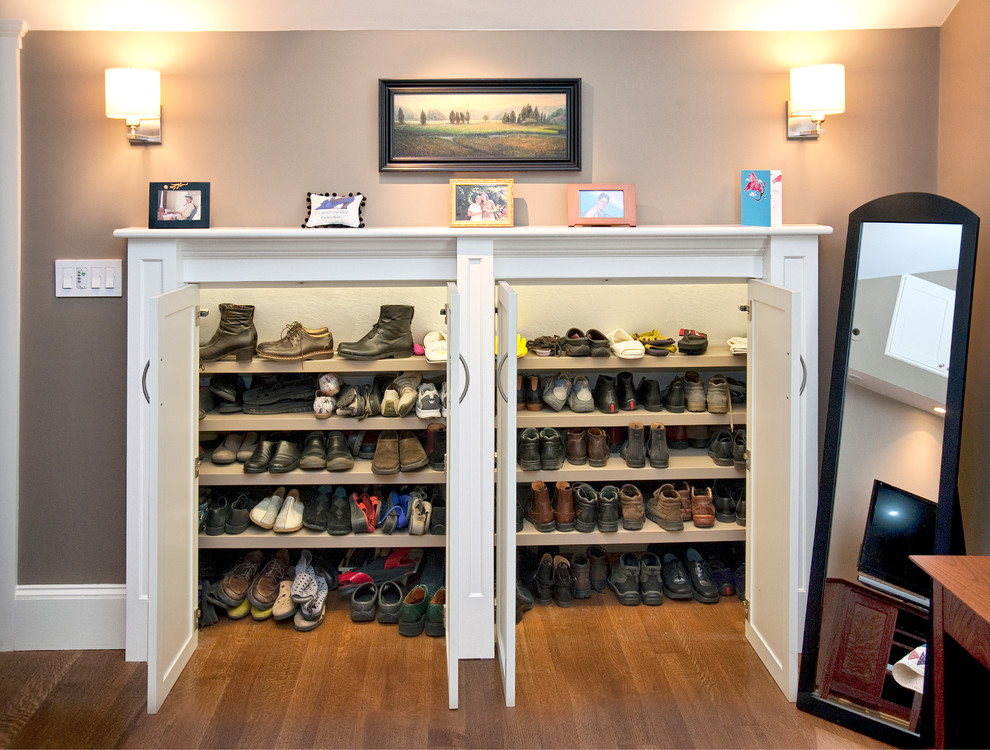
If you’re someone with so many good friends, a shoe rack that has many long shelves might be perfect for you.

If this kind of shoe rack is the one that interests you, it’s probably better for you to pick one that comes with doors. This way, you can conceal the so many pairs of shoes stored on it so your entryway still looks clean and tidy.

Never forget to decorate the rack. Even some framed photographs are enough to beautify a rack so make sure you always make the effort to decorate your entryway shoe rack.

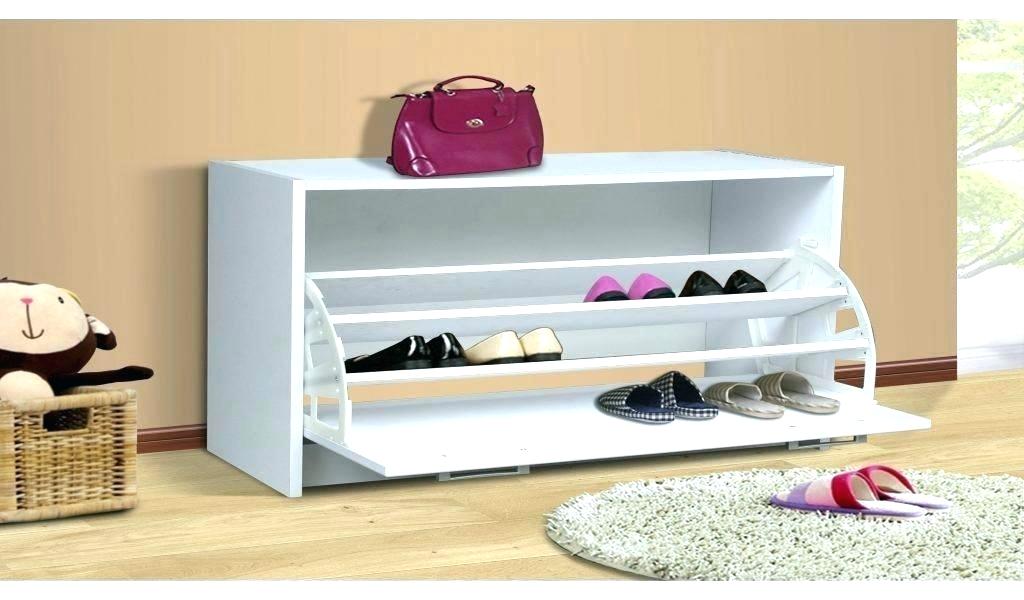
24. Sloping Wire Racks for Easy Access

entryway shoe storage coat rack

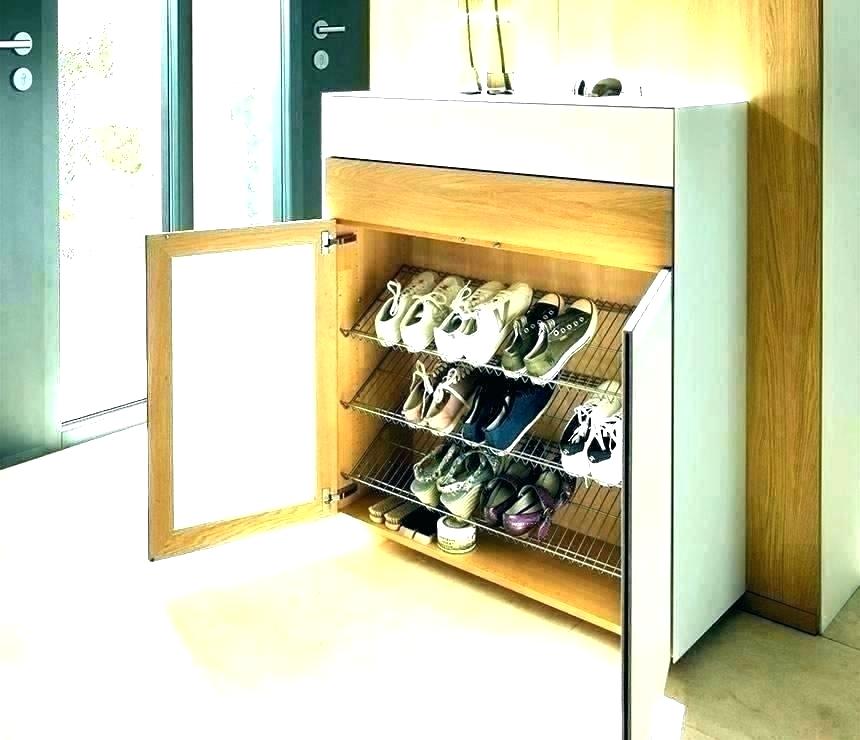
Are unusual racks your favorites? If they are, sloping racks might be good options for you! These racks are like no other because they have sloping shelves.

If this kind of rack is what you’d like to place at your entryway, you’d better choose one that comes with doors.

Why? Because your sloping shelves are special, it’d be better if people only find out about them when they proceed to open the door. Give each one of your guests a nice surprise every time they visit your house.

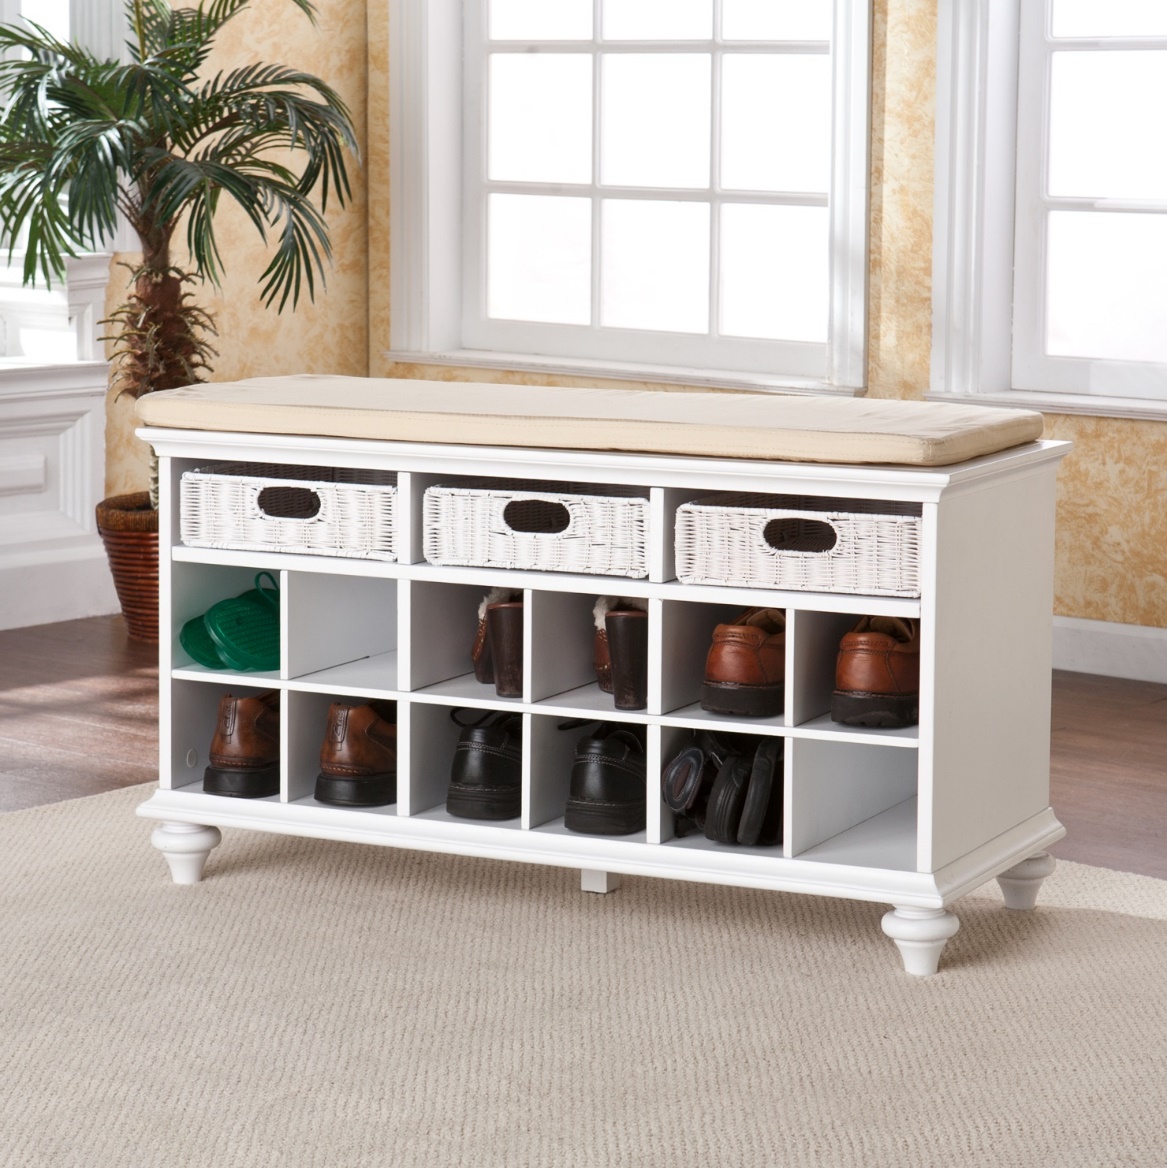
25. A Storage Bench with a Unique Drawer with Wicker Baskets

entryway shoe storage with doors

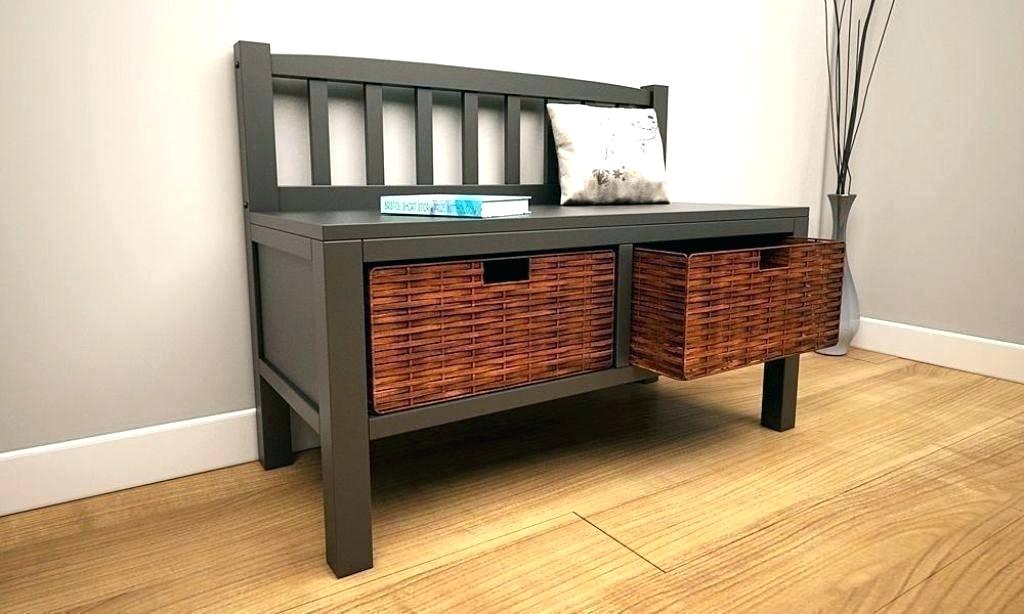
Here you have another example of multifunction shoe rack: you have a bench in combination with shoe containers. Thus, you have a bench to sit while pulling the shoes, before getting into the house.

The bench itself is in soft black color, it blends nicely with the natural color of the wicer baskets. It’s minimalist and rustic at once.

26. A Metal Shoe Rack with Dark Ornaments

small entryway shoe storage diy

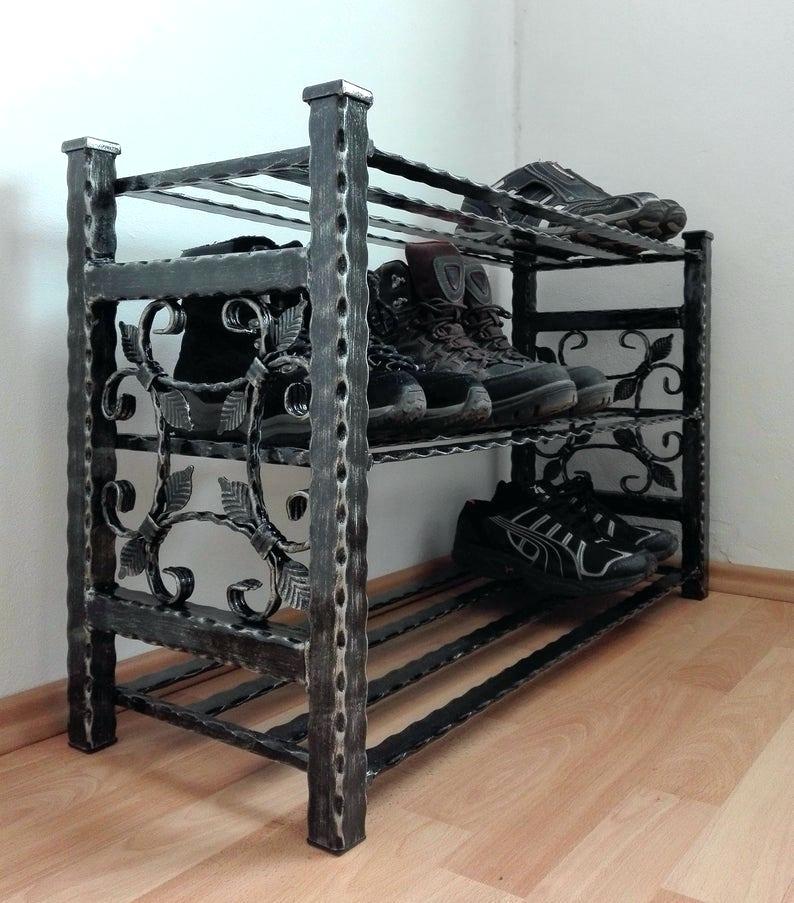
If metal racks are ones you fancy, why don’t you get one that’s eye-catching instead of one that simply functions as a storage item.

A metal shoe rack with feet that look like carved wood would be a nice addition to your entryway. It’ll be a lot better if the rack is dark in color.

Also, it’ll be lots better if the rack has some ornaments on it. This way, the rack can give a very classy look to your entryway, making it look like it has high value on top of looking gorgeous.

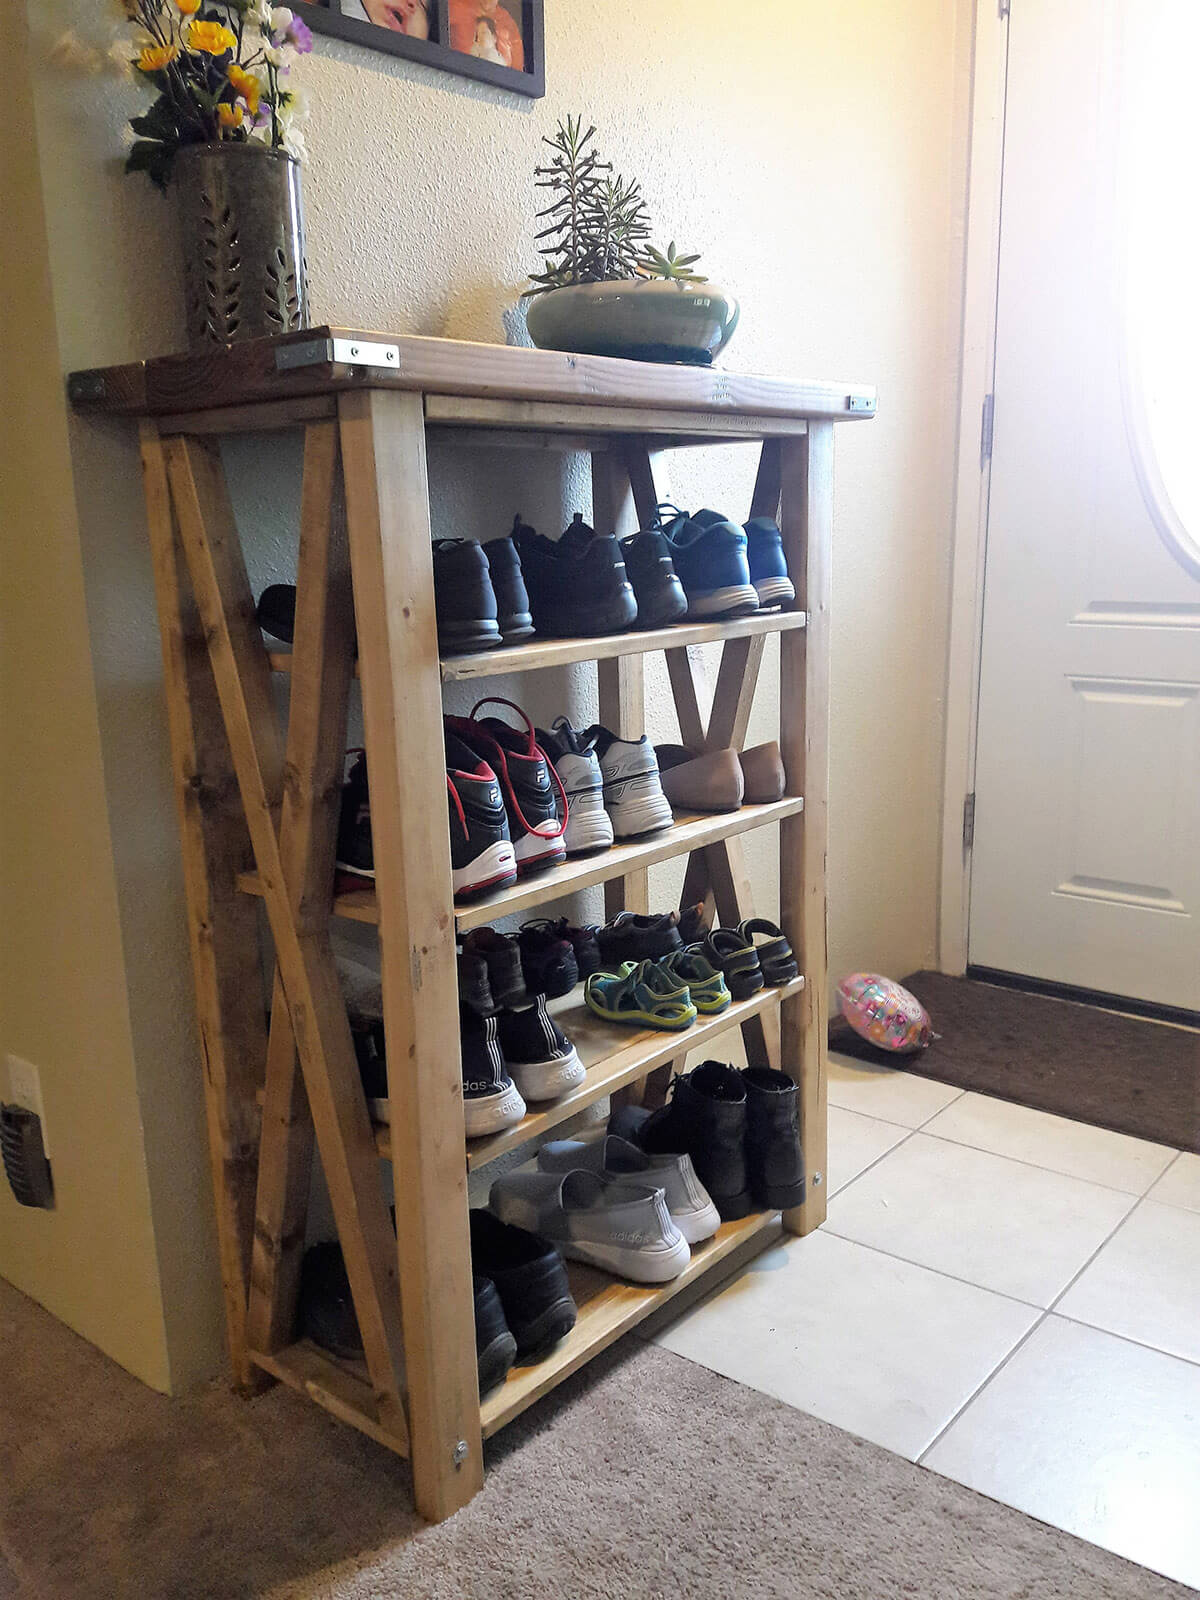
27. A Solid Wooden Bench with a Wide and Long Shelf

diy entryway shoe storage ideas

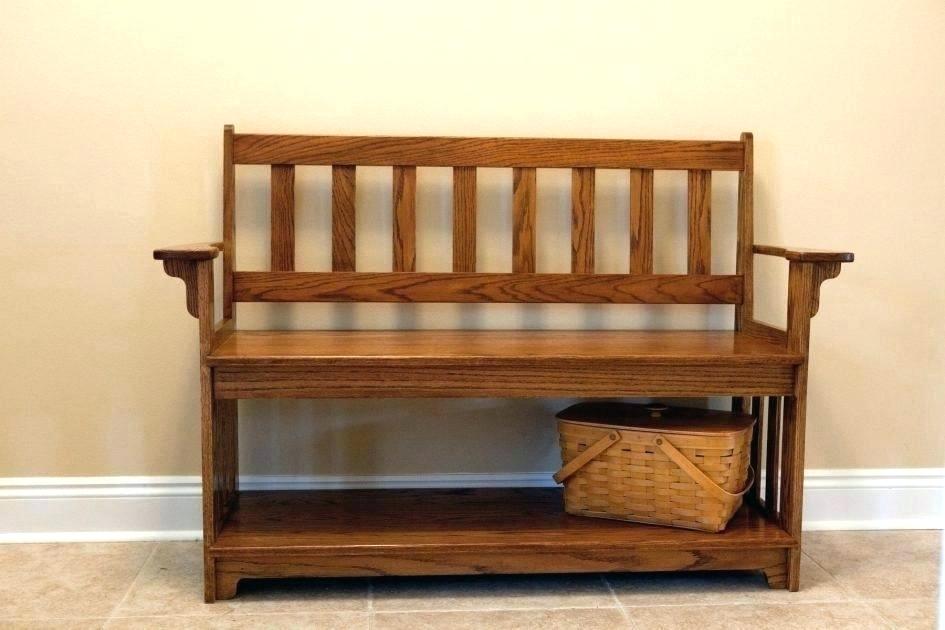
Is wood your top-choice material? Then consider a 100% wooden storage bench for your entryway, especially if your entryway has a rustic soul.

What kind of wooden storage bench looks the best for an entryway? Well, there are many kinds that meet the description but one with a wide and long shelf under the seating area is among the awesome choices.

This kind of bench allows you to store many pairs of shoes. On top of that, it’s naturally beautiful so it adds beauty to your entryway, making it beautiful. What’re you waiting for? Go get one for your entryway!

Those are beautiful entryway shoe storage items you could get for your entryway to make it eye-catching. Whether you love wooden, metal or even concrete racks, there’s at least one that meets your wish.

Read More: 27 Enchanting Coffee Station Ideas for Every Type of Kitchen

No matter what kind of style your entryway has, you can find a shoe rack that complements it here. Whether your entryway is a modern or a DIY one, you can find solutions for decorating it here.

So, what are you waiting for? Get your own beautiful entryway shoe rack! Beautify your entryway so that all of your guests are pleased whenever they visit you. Happy rack hunting!

27 Enchanting Ceiling Texture Types to be Amazed by: The Most Beautiful Ceiling Textures!

The ceiling, though frequently overlooked, plays a very vital role in pretty much every room. It doesn’t just provide protection from debris that might fall down from the roof. It’s offers more.

After all, a ceiling also makes the upper part of your room more beautiful. It’s a decoration, when used right. That’s why, you should treat your ceiling as one: a decorative piece!

But how do you turn your ceiling into a decoration? Well, the answer is easy! You can do it by giving your ceiling a texture that looks nice.

Sure, a perfectly smooth ceiling is very popular but a textured ceiling looks tons of times better. Here’s a number of ceiling texture types you could draw inspirations from if you’re thinking of applying makeup to your ceiling and textures are the forms the makeup take. Check them out!

1. The Spray Sand Texture

ceiling texture roller

Speaking of creating textures on a ceiling, it’s wise to start from the simple ones. One of the simple ceiling textures you could try applying on your ceiling is spray sand.

To create this texture, you just need to grab a handful of sand, which has been mixed with cement and water, and then throw it as strong as you can to your ceiling. Well, that’s the traditional method!

If you want to do it more easily, you can just use a spray tool. Be very careful when doing the job because carelessness might result in your ceiling surface becoming uneven and you surely don’t want that to happen!

2. The Fish Scale Texture

ceiling texture patterns

If you like fish scales, maybe you should consider turning your ceiling into one that represents your love for them. It’s actually a very simple job to do to create fish scales on a ceiling.

First, you just need to grab a brush, or something that you can swirl. Now with your tool in your hand, just make a swirling movement to create the scales on your ceiling.

Here’s one thing to note! Make sure you don’t make a full circle when creating the scales. Make them simply half circles and make sure that they overlap so you have that perfect overlapping fish scale look. Try it!

3. The Knockdown Texture

ceiling texture ideas

If you like textures that look like they’re the product of the nature itself,you should consider creating a knockdown texture on your ceiling.

The knockdown texture is a very popular one and there are many ways to create it. One of them is using water.

To create a knockdown texture using water, you just have to use your water spray and shoot it towards your ceiling while it still hasn’t harden. The water spray will create a very natural-looking pattern that looks beautiful.

4. The Ornamental Texture

ceiling texture scraper

Are ornaments amongst the decorations that you like the most? Then try bringing it into your room but be a little bit innovative. Use it on your ceiling!

A ceiling with an ornamental surface looks elegant and luxurious at the same time. There’s one thing to note, though!

You can’t create an ornamental ceiling on your own. You need to have your ornamental ceiling installed by professionals. Regardless of how you have it installed, this kind of ceiling will bring elegance and luxury into your room. Awesome!

5. The Crows Foot Texture

ceiling texture brush

Intrigued by the idea of having a ceiling that looks like it has been stomped by crows? Then consider the crows’ foot texture!

This texture is characterized by the presence of crows’ footprints on the surface. Crows’ footprints are long and slim and that’s what you should put in mind.

To create this texture, you can simply use a roller paint, if you can find one, or even a brush. But if you have plenty of time, you can draw your own crows’ foot so the texture has more value to it because it’s a DIY project.

6. The Popcorn Texture

ceiling texture types

If rough looks are what you love, the popcorn texture is what you should pick. It gives you a look that makes it seem like popcorns are sticking on your ceiling.

There are plenty of ways to create this texture. One of them is simply applying a mixture of sand and cement with the ratio of the sand being a lot higher than that of the cement.

What’s important to note is how vital it is to make it rough enough that the ‘corns’ pop. If it’s not rough enough, it’ll turn into another texture, even a totally different one, maybe. So, be thoroughly careful!

7. The Light Popcorn Texture

ceiling texture options

If you don’t mind having ‘corns’ that don’t really pop on your ceiling, consider this texture. It’s the lighter version of the popcorn texture.

Because it’s lighter, it’s easier to create. It’s because it doesn’t require you to pay as much attention as you do the popcorn texture.

It means that you don’t need to make it as rough as the popcorn texture. It’s okay even if you make it a bit thick and dense. Well, consider this texture if you’d love to create a popcorn texture that requires a lot less effort to create.

8. The Rosebud Texture

ceiling texture styles

A lover of beautiful things called flowers? Then try stating your love for the beautiful things using your ceiling.

How to do it? Create a rosebud texture on your ceiling! This texture doesn’t give you a perfectly-visible floral patterns on your ceiling.

However, the fact that they’re not perfectly visible is a good thing because you have rosebuds that somehow look like paintings, works of art, on your ceiling. Artistic!

9. The Skim Coat Texture

ceiling texture asbestos

Having a ceiling that needs recoating? You can kill two birds with one stone if this kind of opportunity presents itself to you?

Why is that? Because while you recoat your ceiling, you can create a new texture on your ceiling. It’s called the skim coat texture.

It’s a texture that emerges when you try to recoat an old ceiling to make it as smooth as possible but you end up being unable to make it perfectly smooth because the old ceiling itself has become quite rough as time has consumed it.

10. The Wave Texture

ceiling texture applicator

If an imaginative ceiling is what you’d love to stare at every night, this texture is for you. It gives your ceiling the image of waves surging through the sea.

This texture is quite complicated to create. Thus, it’s better for you to hire professionals and have a wave ceiling installed instead of trying to creating one yourself.

The texture itself works best when well-lit so make sure you provide ample lighting for it once it’s been installed. Make it the best version of itself so your room benefits a lot from it!

11. The Woven Bamboo Texture

ceiling texture and paint cost

Are traditional stuffs your favorite? If so, woven bamboo is something you should incorporate into your design. Try, for example, creating a wooden bamboo ceiling texture.

There is a very effective way to incorporate this texture into your room. It’s by simply purchasing woven bamboo for your ceiling.

Install the woven bamboo on your ceiling and now your ceiling’s got a woven bamboo texture on it. Better yet, it’s got real woven bamboo on it, giving it a traditionally beautiful appearance.

12. The Hawk and Trowel Texture

ceiling texture at home depot

If you love ceiling textures that look like reliefs, this texture is perhaps one you should pick. Called the hawl and trowel texture, it looks bold but it doesn’t look submissive.

It’s got its own patterns, ones that defy order, ones that love to rebel. It’s a texture that’s perfect for you if you don’t like being ordered around by others.

What’s more? This texture also looks quite artistic so if your ceiling loves something artistic, it’ll give it the aesthetics it so longs for. Perfect!

13. The Stomp Texture

ceiling texture amazon

Speaking of unique ceiling textures, the stomp texture is surely amongst the most unique textures there are. There’s a very good reason for it, of course.

This texture makes your ceiling looks like it’s been stomped. It means that the ceiling looks damaged, but not for real, obviously.

If you’d love to create this texture, make sure you create some rifts on the surface. The purpose is to make it look as if the surface has taken damages caused by stomping.

14. The Carved Wood Texture

ceiling texture after popcorn removal

If a texture that’s not only beautiful but also luxurious is what intrigues you, why don’t you go all out and create the most grandeous ceiling possible?

How? By simply installing a carved wood ceiling! The carved wood texture guarantees you to have a room blessed with beauty and luxury.

Here’s what you should keep in mind! The more complex the patterns are, the better your ceiling looks. So don’t settle with simple patterns. Only go for the best and you’ll get only the best!

15. The Santa Fe Texture

ceiling texture additive

Having deep affection for Santa Fe? How about incorporating the thing you love so much into your ceiling design?

It’s easy to create the Santa Fe texture on your ceiling! There’s a principle that you need to follow and you’re going to be fine.

When creating a Santa Fe texture, you just need to make the texture look like an unfinished painting. So it’s better if you make the surface look a bit inconsistent in color. You don’t have to but it’ll be better if you do.

16. The Linear Wood Texture

ceiling texture and paint

Planning to install a wooden ceiling? There’re many options available when it comes to wooden ceilings so you need to choose carefully.

If a modern look is your target, you should consider the linear wood texture. It’s a simple yet beautiful texture that makes your ceiling look modern.

Despite looking awesome, this texture isn’t that complicated to create since it only consists of linear stripes made of wood. Try incorporating it into your design!

17. The Swirl Texture

ceiling texture at lowes

The fish scale texture is the complex version of this texture. This texture is simpler but it doesn’t mean that it looks bad. It undeniably looks great!

It’s extremely easy to create. You just need to grab a brush and then, while your ceiling coating hasn’t hardened, move your brush in a swirling motion.

If well-organized, the swirls on your ceiling can give you a very tidy look that makes it look well-designed. What does it mean? You need to put all your hearing when swirling your brush on your ceiling!

18. The Styrofoam Texture

ceiling texture and drywall

Interested in giving a very unique addition to your room? Just try this texture! Called the Styrofoam texture, you can tell how it looks from its name.

This texture makes it look as if you have feeble Styrofoam on your ceiling. The ceiling itself, of course, not feeble at all.

A Styrofoam ceiling isn’t just a uniquely good-looking ceiling since it’s also a ceiling that can entertain anyone entering the room. After all, some might definitely laugh a bit hearing the name and then seeing its appearance. Innovative!

19. The Slap Brush Texture

matching a ceiling texture

If you’re excited to see your ceiling looking like it’s been on the receiving end of your quarrel, the slap brush texture is the perfect one for you.

This texture is also perfect for you if you like slap brushing things. This texture doesn’t look half bad, either, of course.

If you do a good job slap brushing the surface, you’ll get a result in the form of a ceiling with artistically enchanting surface. So make sure you give your very best shot slap brushing your ceiling!

20. Stipple Brush Texture

painting a textured ceiling

If you love stipple brushes more than slap brushes, this texture should be your number one choice. This texture is characterized by very thin lines that roam freely on the surface.

It’s a bit similar to the crows’ foot texture but it’s a bit less organized. It’s a very nice texture to put on the surface of a ceiling.

Having this texture on your ceiling makes it look very well-decorated. It’s a texture that can beautify your ceiling pretty easily.

21. The Skip Trowel Texture

patching a textured ceiling

Wanting to hide imperfections on your ceiling? Try creating the skip trowel texture on it. The very purpose of this texture is to hide imperfections on surfaces.

To create this texture, you can apply a joint compound, but a very thin one, in random areas on your ceiling.

Depending on how thoroughly you apply the joint compound all over your ceiling, you can get results that might not look too similar with other ceilings with this texture. It’s up to you to turn your skip trowel ceiling into a work of art or to just bottle it and make it look dull.

22. The Modern Ceiling Texture

removing a textured ceiling

Always in love with anything modern? Ever considered incorporating something modern into a design of a big part of your room?

Then try giving your ceiling a very modern texture it’s going to be extremely proud of. A modern texture can come in many different forms. One of the simplest ones is a combo of lines, circles and lots of triangles.

When put together, these shapes can give birth to a very modern texture that doesn’t associate itself with almost any types of ceiling textures; a uniquely modern texture, a texture that’s its very own.

23. The Lace Texture

repairing a textured ceiling

Blessed with enough budget to create an luxurious ceiling that’s also artistic and elegant at the same time? Then choose the lace texture!

It’s a texture that lets you turn your ceiling into something that looks like a wedding gown. When it comes to creating a lace texture on a ceiling, the more complex the laces are, the better the ceiling looks.

Make a good use of your budget and hire professionals to create this kind of ceiling for you! It’s more effective both in terms of costs and energy and the results are guaranteed to be perfect.

24. The Tree Bark Texture

smoothing a textured ceiling

If things that you see in the nature always captivate you, try creating a texture that you can find in the nature for your ceiling.

One of the textures that fall into this category is the tree bark texture. A tree bark texture is quite interesting and has gained some popularity as of now.

If you’re thinking of creating a tree bark ceiling, you don’t have to make the bark texture look as realistic as possible. Even simpler bark looks are awesome enough to make your ceiling look charming. Just try creating one for your ceiling!

25. The Sheetrock Texture

fixing a textured ceiling

The sheetrock texture has been around for more than a century and it can give a ceiling a very artistic look.

This texture can be achieved without the help of any brushes, which is awesome. The end product? It’s a ceiling that looks like crumpled paper. It’s undeniably interesting.

Better yet, this texture works with pretty much anything from wooden furniture to elegant decor or even modern stuffs. It’s a consistently awesome texture you must consider at all costs.

26. The Orange Peel Texture

cleaning a textured ceiling

You can tell how this texture look from just the name. Yes, it looks like an orange skin. However, the orange peel is not its only name as it’s called the eggshell texture by some people.

Application of thin mud utilizing the spray gun is the method used to create this texture. When using the spray gun, you need to set it at a high pressure, though. A low pressure just won’t do it.

This texture can give your ceiling an artistically handsome appearance. Consider this texture if you want to incorporate many artistic stuffs into your room.

27. Your Very Own Ceiling Texture

scraping a textured ceiling

Wishing you could make your ceiling your own? Then make it look like no other ceilings! Create a very unique ceiling texture that means your ceiling can’t be associated with any other ceilings.

You can achieve this by, for example, mixing more than one type of ceiling texture. You can, for instance, apply one texture on a third of the ceiling and apply two different textures on the other two thirds of the ceiling.

Of course, you could always simply draw something beautiful on your ceiling surface if you don’t want to follow any styles. Just be creative and make your ceiling your very own, one whose style other homeowners can’t claim.

There undeniably are numerous ceiling texture types you can choose for your ceiling today. The options range from knockdown to modern and even diy textures and more.

Read More: 27 Mind-blowing Driveway Ideas You Absolutely Have to Try

Whether you’d love to incorporate simple or complex patterns into your ceiling design, you won’t run out of texture choices to choose from. We have so many presented to you.

So don’t hesitate! Draw some inspirations from the ceilings shown above and be surprised to see your ceiling turning into a work of art. Happy designing!

27 Astonishing Baseboard Molding Styles to be Inspired By: Baseboards You Have to See Before You Die!

Every house has numerous different parts and all of them are equally vital to the building. It just means that every part needs to be attended to including even parts that are frequently overlooked. One of these parts are baseboards and that’s pretty sad, to be frank.

How the fact baseboards are often overlooked is because baseboards actually have potentials to be parts that improve a house’s overall looks. Why is it? There are numerous baseboard molding styles you can play with to beautify the building you reside at.

It would simply mean that you’ve got so many molding styles to choose from when applying makeup to your baseboard. These styles don’t just involve colors or designs but also materials and more.

Well, if you think that your baseboard also plays a role in adorning your walls to make them more astonishing, here’s a gift for you. These awesome baseboards are the stuffs you totally have to check out if you’re in need of baseboard designing inspirations.

1. A Corner Block Style Baseboard

baseboard molding ideas

Nobody denies the fact that a baseboard needs to stay away from a plain look to appear gorgeous. Well, if you want your baseboard to look gorgeous, you’re going to need to give it something.

It doesn’t have to be something too complicated to create, though. Some of the simplest yet the most useful things to give to baseboards are corner blocks.

Corner blocks don’t just act as signs showing that the areas they’re on are indeed the corner of the walls. They also act as decorations but that’s when you choose cool corner block designs that meet the purpose, of course.

2. A Craftsman Style Baseboard

baseboard molding ideas pictures

If crafts are amongst your favorite stuffs, choosing baseboard designs that shows how you like crafts should sound good to you. Well, why is that?

I bet you’re familiar with the words craftsman baseboards. Well, if you aren’t, though, here are some nice explanations you might need to carefully note.

Craftsman baseboards are ones that suit people who love crafting something like you. They’re usually made of hardwood. They’re perfect for homeowners who are fond of wood. Are you fond of wooden crafts? If yes, then a craftsman baseboard should be perfect for you.

3. An Overstacked Baseboard

baseboard molding design

Baseboards often come stacked but normally there aren’t too many stacks on a baseboard. But are there baseboards that have so many stacks. You bet there are!

There are even baseboards that you can call overstacked baseboards because they’re just so stacked you don’t really want to count how many stacks are there. Why do these kind of baseboards exist?

Well, there are just so many reasons are there are purposes related to using these kindof baseboards. Anyway, if you’d love to design an overstacked baseboard, it’s better if you connect one of its parts to your window.

An overstacked baseboard that reaches a window will give a special look to an area where your window is. Try it because it’s definitely worth trying!

4. A Bi-color Style Baseboard

baseboard molding examples

Who says that you have to stick to one particular color when designing your baseboard? Don’t believe anyone who dares to say those words. It makes very little to no sense at all.

In fact, you can try building a bi-color baseboard if a simple modern look is what you’d like to achieve. How to do it? It’s not that hard, really!

For instance, you can have white marry gray. Create a very baseboard that consists of three parts. Paint the lowest part in white, the middle one in gray and the top part in white. The trick’s simple but it can improve your wall’s looks quite significantly.

5. A Free-flowing Baseboard

modern baseboard molding styles

A baseboard is like the son of your wall because it just follows the wall like a son follows his father around. That’s why, a baseboard can be pretty flexible because it complies with whatever design the wall has.

What if you have a walls that fall into the category of irregular walls? Well, there’s no problem at all.

Just create a free-flowing baseboard, one that suits the shapes of the walls. The problem with creating this kind of baseboard is how it consists of parts whose length vary greatly. But it matters not since if there’s a will, there’s a way, right?

6. A Tall Baseboard

wood baseboard molding styles

In need of something different? Well, opt for a tall baseboard. This type of baseboard doesn’t look too normal and that’s a good thing.

A tall baseboard can easily function as a decorative piece since you can embelish it with whatever patterns you want.

If this kind of baseboard is what you’d love to build, consider coloring it in white. White looks good with any wall colors and it stands out so your baseboard will get noticed pretty easily.

7. A Modern Baseboard

colonial baseboard molding styles

Ever heard of baseboards that are built without using wood or other materials routinely used to create baseboards?
Well, there are many of these kind of baseboards in this modern era. Metal is usually the material routinely used to create these kinds of baseboards; modern baseboards.

Here’s one idea you could try if a modern baseboard is what you’d love to have. Just create a baseboard combining unpainted silver colored metal with metal painted in white. It’s a combination that easily promotes a modern look.

8. A Rustic Baseboard

oak baseboard molding styles

Are you in love with wood? With some that don’t look polished enough? Well, maybe you’re a fan of rustic style because you show signs that indicate you are.

If that’s true, you can try creating a rustic baseboard. The trick’s simple. Just prepare some unpolished wood, some that looks like it comes straight from the nature.

Then create a baseboard using your wood but never polish it. Leave the wood’s raw look alone and you’ll achieve your purpose easily. If it’s possible, choose wood whose patterns are quite visible so your baseboard looks distinctively rustic.

9. A Tile Baseboard

baseboard and crown molding styles

A fan of the principle simple’s better? Then you should try staying simple when designing your baseboard.

How do you stay simple when designing a baseboard? Well, for instance, instead of doing it the complicated way, you can simply use tiles to create your baseboard.

Tile baseboards are perfect, and useful, for the bathroom. They look good and they don’t easily suffer damages when coming into contact with water. Just perfect!

10. A Vinyl Baseboard

baseboard molding color ideas

When it comes to practicality, vinyl is probably a material you should pick when designing a baseboard. Vinyl isn’t that hard to install and it’s among the most pleasant materials to work with.

When designing a vinyl baseboard, of course, you’ll need to take some things into consideration. They’re colors and materials to pair your vinyl with.

Speaking of colors, white should do quite well since it’s a neutral color. As for the material, ceramic is amongst the top list performers especially if it’s dark in color.

11. A Rounded Baseboard

styles of baseboard molding

An unusual look would do well in a room where everything is just simple and plain. This kind of look can be achieved using various tricks. One of them is using a rounded baseboard.

This kind of baseboard doesn’t look like regular baseboards so it gives a room an unusual look but in a good way.

It also gives a room an atmosphere that prevents it from feeling tense to spend time in the room. There are a lot of positives to take from using this kind of baseboard, which is great.

12. A Quarter Round Baseboard

baseboard molding color ideas

Interested in having an even more unusual baseboard? Well, try a quarter round baseboard. It doesn’t curve when reaching a corner but the whole length of its body is a beautiful curve.

This type of baseboard is usually wooden and it gives a sophisticated look to the room it’s installed in.

Considering purchasing one? Get one that comes in a light color with visible wood patterns. It gives a semi-modern look that suits several different room styles. Awesome, isn’t it?

13. A Composite Baseboard

8 inch tall baseboard molding

If you love both wood and othe materials, marrying them can be an easy way out for you. And it’s easily possible.

If you’d love to marry wood with another material, you can choose a composite baseboard. It’s a baseboard that combines two materials together.

Achieving a simple yet marvellous look is simple when you use a composite baseboard. What’s more? It’s not that hard to install this kind of baseboard. Simply incredible!

14. A Heater Cover Baseboard

8 inch baseboard molding

If multifunctional stuffs are your favorites, you should go out and incorporate them into your home design. Don’t even try to exclude your baseboard from the list.

One of the multifunctional, and the most interesting, baseboards you can pick is a heater cover one.

It’s a baseboard that doesn’t just sit there at the bottom of your wall but covers a heater. Of course, you know the function of a heater. This kind of baseboard makes something useful look artistic from the outside. Marvellous!

15. A Baseboard with Its Very Own Soul

8 baseboard moulding

Needing to create a baseboard on your stairs? Well, everybody agrees that it’s a tough job to handle.

However, you can make it simpler should you want it to be. Just create a baseboard that has its own personality, its own identity to the area that connects to your stairs.

Simply creates a baseboard however you want. Follow your artistic sense. Give the wall touching your stairs a unique look. Do just that and be prepared to be amazed!

16. A Back-profiled Baseboard

8 baseboard molding

A fan of something that conceals another thing beneath? Well, if so, opt for a back-profiled baseboard. It’s a type of baseboard that consists of a smaller and a bigger one.

Here, the smaller baseboard is concealed by a bigger, and taller, one in a way that it doesn’t let the smaller one to get damaged.

This kind of baseboard is quite innovative and if you love innovative stuffs, install one at your residence and admire it once it’s finally installed.

17. The Two were Never Meant to Be

7 baseboard molding

Bored with baseboards that just gives you a large chunk of a particular color? You could always create a baseboard with a slash of a different color in the middle.

One of the easier ways to create this kind of baseboard is by installing a tall baseboard and painting it in, let’s say, white.

Then, in the middle of the baseboard, you can add something made of wood, to separate the lower and upper part of the baseboard. The difference of color will give the baseboard a sophisticatedly beautiful look. Simply gorgeous!

18. A Cool Metal Baseboard

baseboard moulding 7 inch

Needing a cool baseboard for one of your walls? How about using a cool 100% metal baseboard?

If a metal baseboard is what you’d love to have and you’d love it to look cool, choose a thin metal baseboard wth patterns.

The reason is because this kind of baseboard seamlessly blend into the surrounding, easily giving the wall it’s on a cool look but never in an unnatural way. Astonishing!

19. An Easy to Install Plastic Baseboard

6 inch high baseboard molding

Plastic is a really flexible material and in addition, it’s also a material that’s so easy to install and use despite the danger it might pose on basically everything it touches.

If you don’t mind using plastic, though, you can consider installing a plastic baseboard on some of your walls.

One easy way to make your walls look cool using this kind of baseboard is choosing a plastic baseboard that contrasts the color of the walls. Try it!

20. An Unpolished yet Gorgeous Wooden Baseboard

6 vinyl baseboard molding

If raw looks are ones you’re trying to achieve, wood is probably the best material for you to use.

Here’s a trick for you if you choose wood and you’d love to create raw looks that are simply gorgeous. Simply use unpolished wood!

If unpolished wood is the kind of wood you’d love to use, don’t carve it because carvings are for polished wood. Let it be simple because unpolished wood looks the most beautiful when kept simple.

21. A Sturdy and Beautiful Hardwood Baseboard

3/4 inch thick baseboard molding

Is a sturdy baseboard what you’d love to have, hardwood should be your number one choice of material.

Hardwood is undeniably sturdy and moreover, it also offers elegance. You’ll have to options if you opt for hardwood; to polish it or let it stay unpolished. Both look awesome.

If hardwood is the material you choose, oak is probably one you should pick. Oak is incredibly hard and it looks good. What’s more? Some say that it stays a very long time.

22. An Artistic Baseboard

3 inch baseboard molding

If you love art, why don’t you turn your baseboard into a work of art? Don’t worry, it’s not going to be a hard task.

How to adorn your baseboard to make it appear artistic? One of the easier tricks is giving its corner an unusual look. When it comes to giving an unusual look to the corner of a baseboard, a symmetrical look would do a really good job to help you achieve the purpose.

23. A Baseboard with a Rift

3 baseboard molding

Having a rift on the corner of a baseboard doesn’t always mean failure in installing it. After all, a rift can otherwise give a unique look to a baseboard.

If you’re installing a baseboard and you’re interested in giving it a rift, you should make it look like you create the rift intentionally.

This way, people won’t think that you failed in installing the baseboard. Instead, they’ll appreciate the looks of your baseboard, thinking that they look uniquely artistic.

24. A Flat Baseboard Made Awesome

2 piece baseboard molding

It doesn’t matter if you choose a flat baseboard because you could always make it awesome with simple tricks.

One of the easiest tricks to use to make flat baseboards look awesome is to play with different colors that look unsurprisingly good together.

You can paint your flat baseboard in yellow, then paint parts of the floor that touch the baseboard in red and then give yellow edges to the red parts of the floor. It’ll look fantastic, trust me!

25. A Tall Hardwood Baseboard

2 inch baseboard molding

Hardwood is a precious material and if you love it, you can try to make it the main character of a room at your house. How do you do it? Install hardwood flooring and create a tall hardwood baseboard. Your hardwood will surely steal the show if you do so.

A tall hardwood baseboard means a quite large, and beautiful, chunk of hardwood that’s easily visible to the eyes. Moreover, it’s not simply visible as it’s also naturally eye-catching.

26. A Baseboard That Never Makes It

baseboard molding 2018

Intrigued to create a baseboard that looks cute? Well, try creating a baseboard that just seems to never make it.

It’s pretty simple. Just create a baseboard that follows the base of your wall but then stop before you reach the end of the wall.

This way, you can make it look as if your baseboard never reaches its destination. This will give your wall a pretty cute look some might even laugh at when taking a good look at it.

27. A Plain Baseboard

3 1 2 baseboard molding

If you’re bored with all the complicated looks, you could always opt for a plain baseboard. Remember, though, that plain doesn’t mean dull.

How do you make a plain baseboard look awesome? First, let it be clean. everything clean looks good, even the ones that are pretty simple in nature.

Then, give your baseboard a slash of brilliance by adding a small line of beautiful wood. You see, even something plain can still look beautiful if you just know how to handle it. Handle it with care! That’s the key to everything!

Long story short, those were awesome baseboards you can draw inspirations from if astonishing baseboard molding styles are things you just love to think about.

Basically, you can create very eye-catching baseboards in any styles using various materials from wood to plastic or even vinyl.

Read More: 27 Marvelous Gray Kitchen Cabinets for Every Type of Kitchen

If you’re busy trying to create a wonderful baseboard, we hope that the baseboards we’ve shown you are enough to give you some baseboard design ideas, and good ones, hopefully.

Just remember that everything looks beautiful if you just handle it with care and baseboards are no exceptions to this rule. With that said, have a good time designing your baseboard!

27++ Unique Makeup Storage Ideas for You (That Are So Easy You Can Make them In Minutes)

Makeup has become a part of us, ladies or even gentlemen. It helps us present ourselves far more confident. And that’s the reason we need makeup storage system badly.

Now if you want to find suitable storage system for your makeup tools or accessories, we present you here 29 loveliest makeup storage. Let’s check them out.

1. An Acrylic Makeup Storage

Makeup Storage IdeasA small and efficient organizer box for the makeup tools is cool, mainly for limited spaces. But, sometimes, the problem is finding the right box. Some of us not just want those the traits.

But we want something different and chic for the storage place.

And here’s you nicest alternative, an acrylic container with coffee beans in it. To store the makeup tools, just drive in each of the tool into the beans, like the example.

2. Makeup Vanity

Makeup Storage
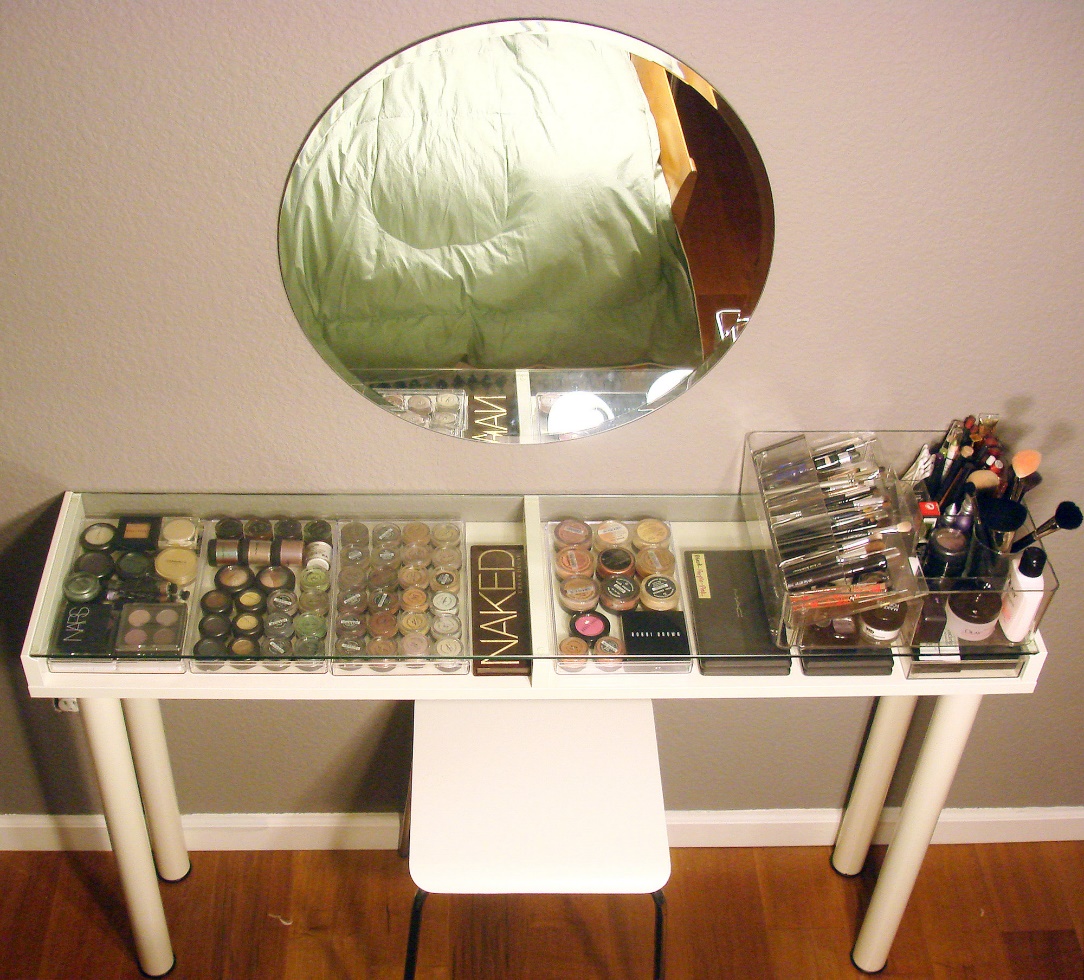
For all your favorite of makeup tools and accessories, here we offer a makeup vanity large enough your collection.

Here you have a mirrored minimalist makeup table with a clear case. If you want to do a DIY project for this table, it consist of an Ikea table and shelf.

As for the clear top, you need a sheet of acrylic. The makeup tools holders on the shelf also of the material.

3. A Cup of Makeup Tools

Makeup Storage Ideas
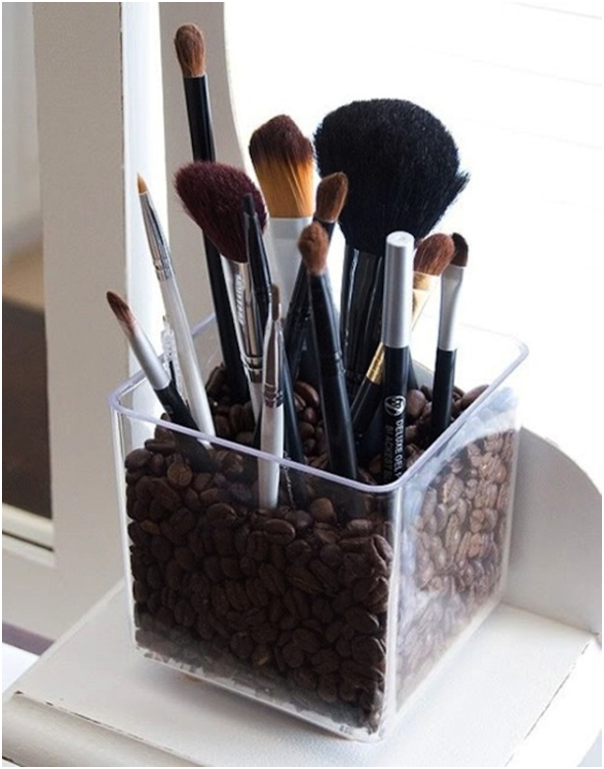
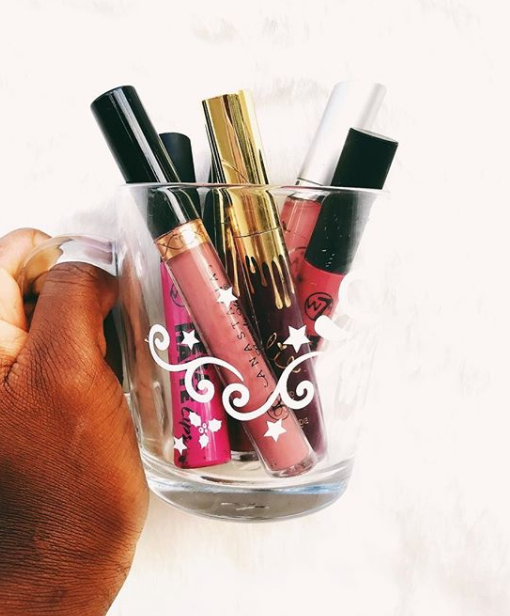
Need a small makeup storage again? And why we don’t we use a stuff around us as the storage system? Like this idea, for example.

You only need to go to the kitchen cabinet and find the right material. Yes, for this storage you need a cup. A big cup is most preferred.

Now you get our point? Your storage is ready. Put the makeup tools/accessories into the cup. That’s all. Quick and easy.

4. Dark Industrial Makeup Holder with Buckets

Makeup Storage
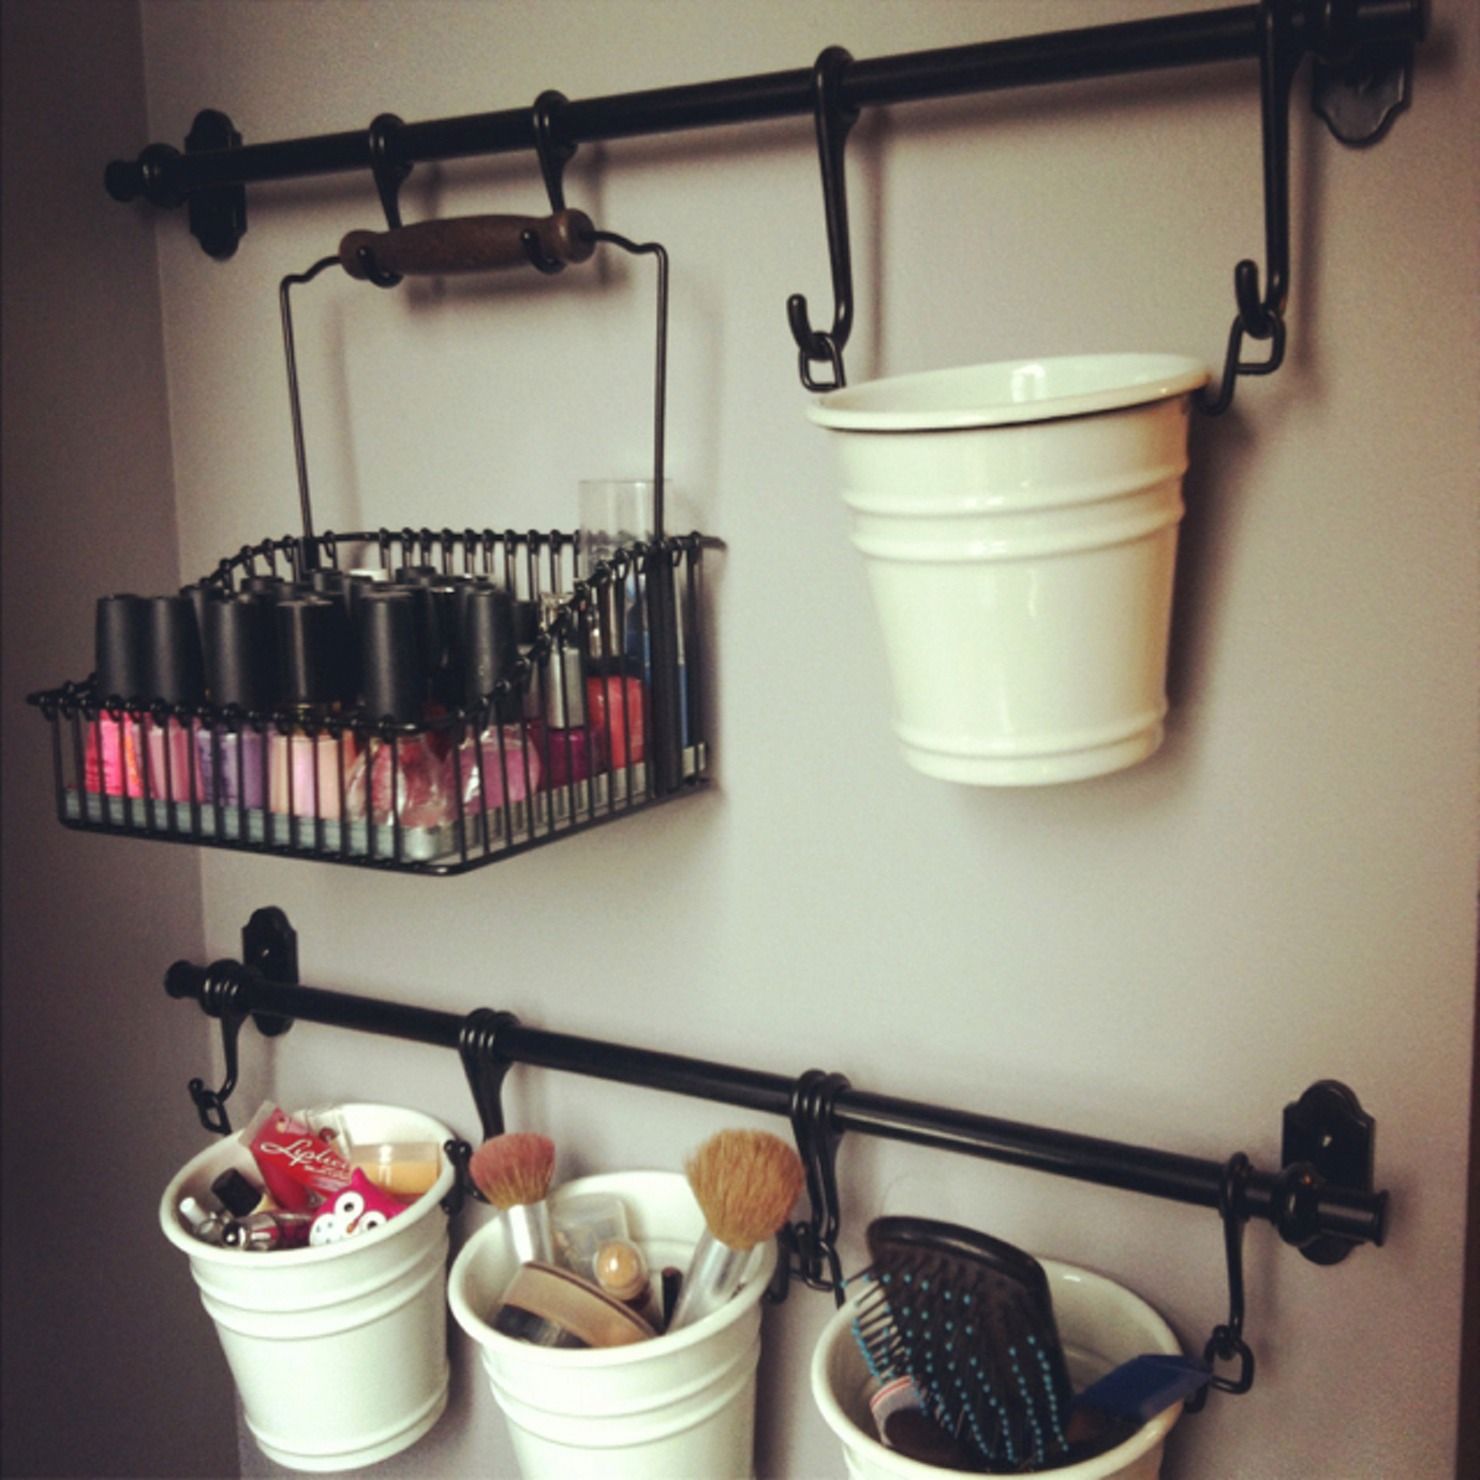
Itchy for a DIY project? You should consider this makeup holder. It’s wort a try. And, most of all, it will be an easy project –even if you’re a beginner.

Here what you need:

  • Iron bars
  • Retro Iron holders (hook types)
  • Iron wall clips (don’t forget with the screws)
  • Several white buckets
  • A hanging wire rack

Tools:

  • A driller
  • A Screwdriver

How to make:

  • Make the support with iron bars and wall clips, don’t forget to insert the holders first.
  • Now that you have the supports and their holders, it’s time to put on the buckets and wire rack.
  • The makeup tools holders are ready.

5. Hanging Shoe Organizer for a Makeup Organizer

Makeup Storage Ideas
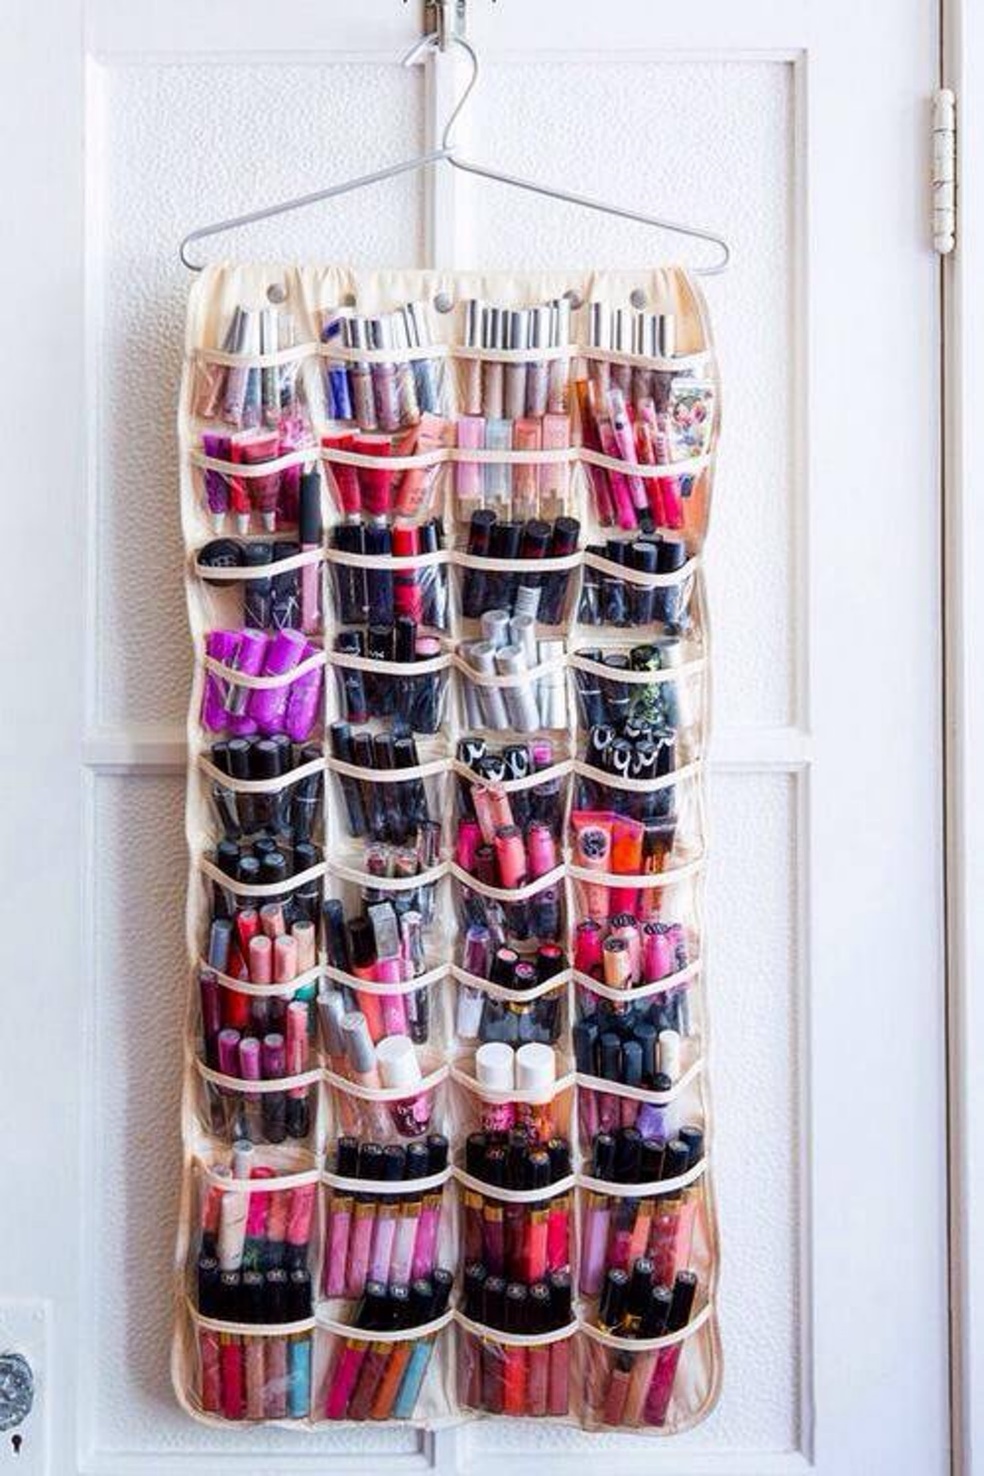
If a makeup cabinet is out of reach, then find something else for the substitute. Something other with the same capacity, but with a more friendly to budget.

How? Find a hanging shoe organizer. It’s affordable and durable. It also works well for small spaces, for you need only hang it on a cloth hanger, on the door.

This way, you can solve the storage problem for your collection of makeup tools and accessories.

6. Wall Makeup Storage Magnetic Board

Design Makeup Storage
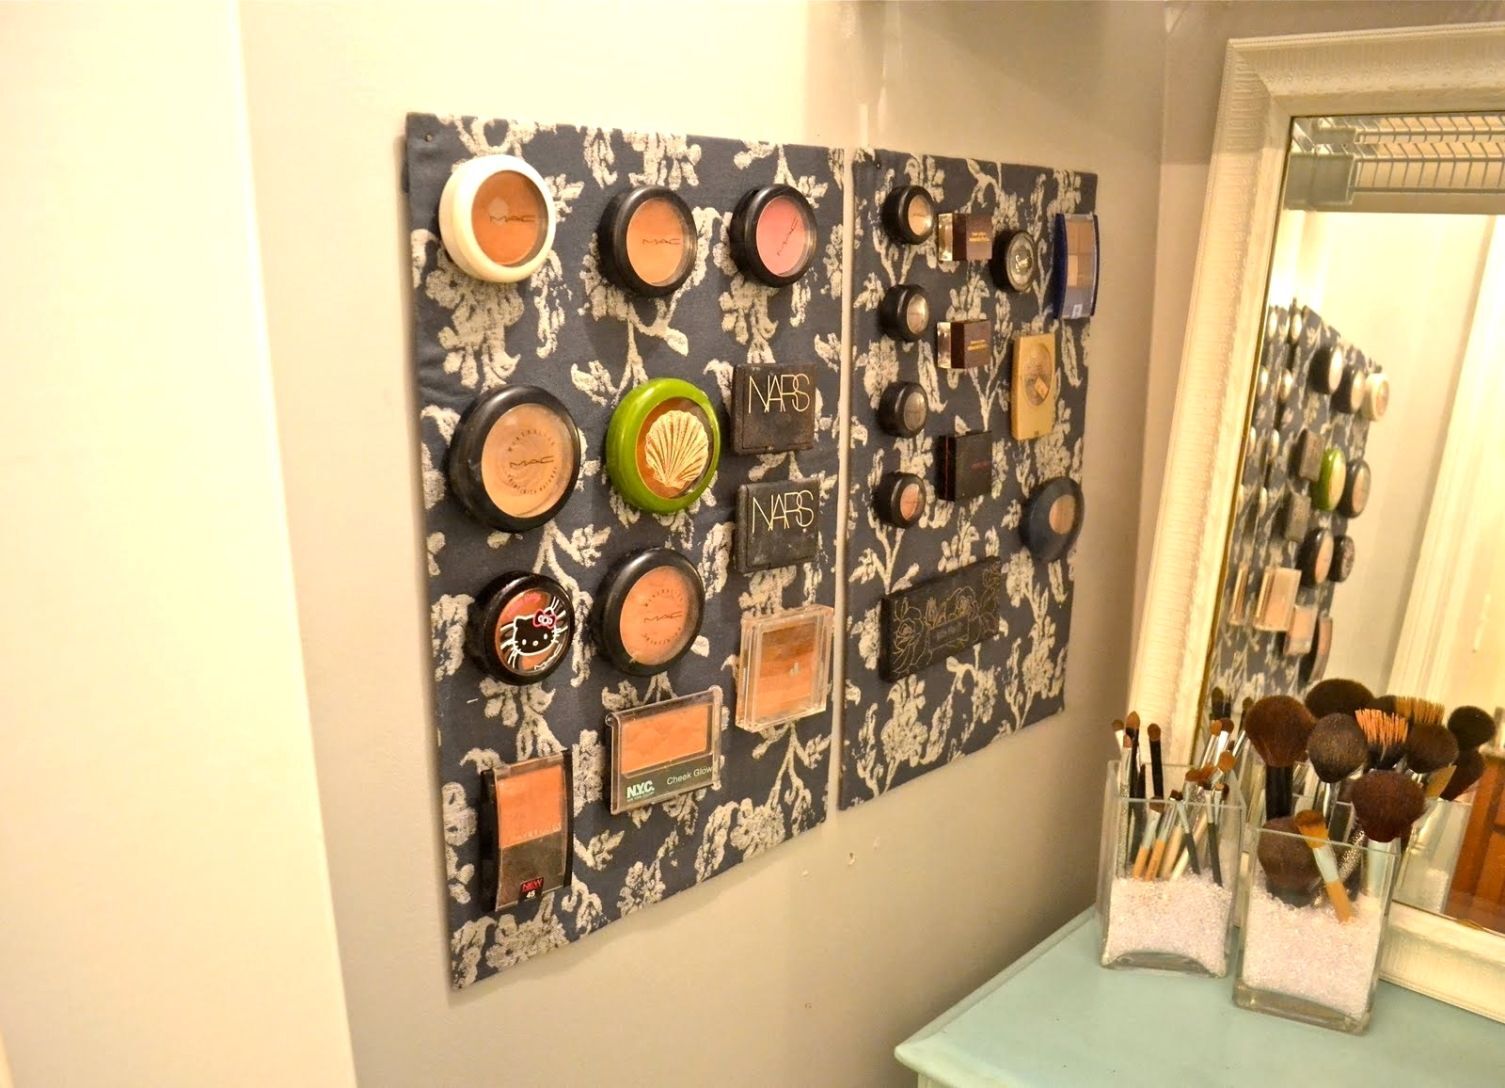
Let your favorite beauty makeup be the accents to your wall. And here’s how you do it.

Materials:

  • A sheet of shower curtains (for durability)
  • Metal sheets
  • Magnets
  • Double tape or hot glue
  • Tools:

Metal cutter

  • Scissors

How to make:

  • Cut the metals and arrange into a square board(for a magnetic board)
  • Layer the metal board with curtain sheets, and hang on the wall.
  • Select the beauty products you’d like to show on the board.
  • Put a magnet on each of their bottom.
  • Now your beauty products are ready to stick on the board.

7. Makeup Holders with Repurposed Mason Jars

Makeup Storage
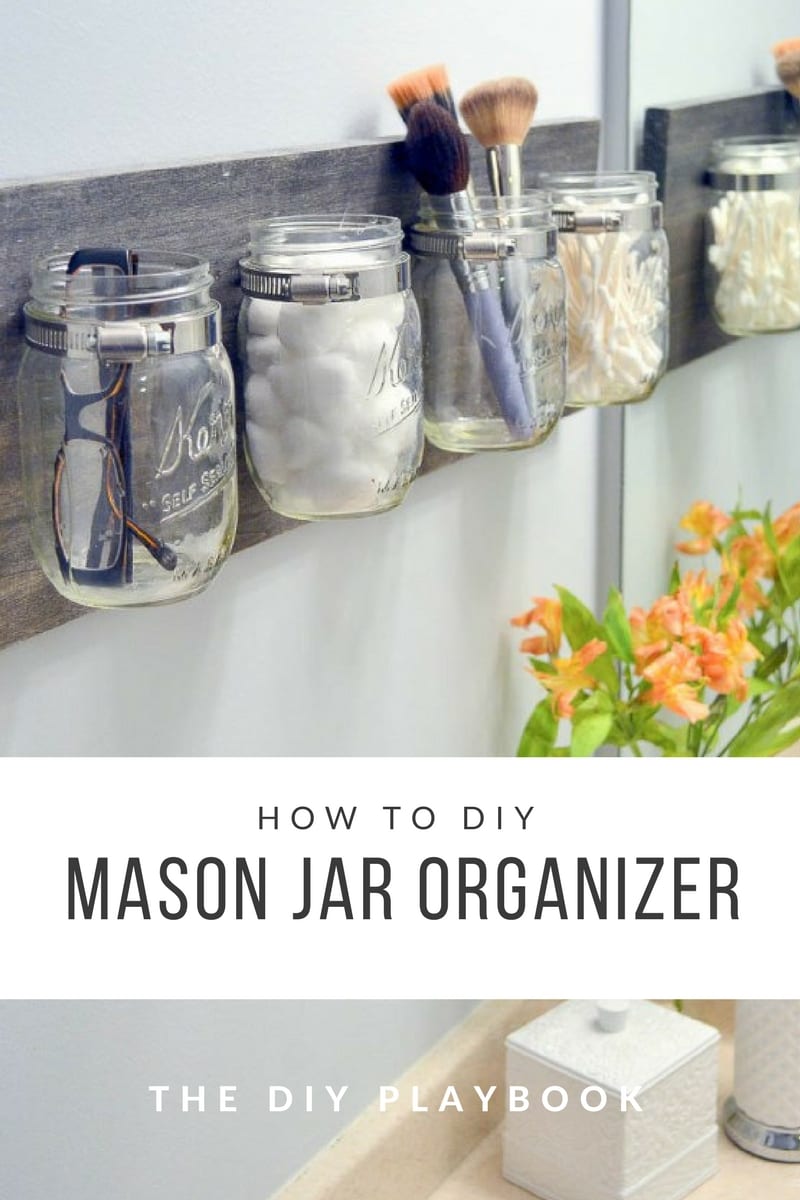
Mason jars, the jars for preserving foods, are also very versatile stuff. Depends on your creativity, mason jars can be anything you want –including as makeup holders like the picture.

It’s a combination of reclaimed woods and mason jars (also reclaimed). Hose clams are used to bind them together.
You don’t have to have any sophisticated makeup cases here, only reclaimed wood and mason jars.

8. Bookshelf for Large Makeup Organizer

Design Makeup Storage
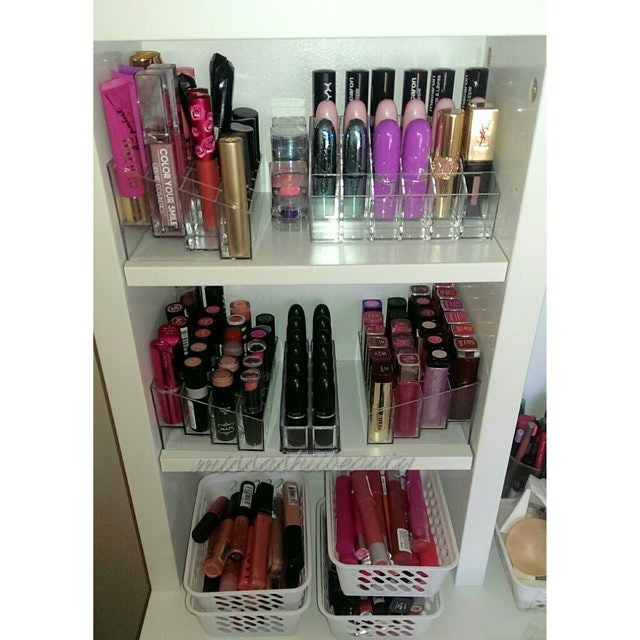
A large collection of beauty products or makeup tools need an ample makeup storage. Not just an ordinary makeshift storage system, but a more permanent one.

Like to have the affordable one? Then turn an open bookshelf into your makeup organizer.

All you need is adding the makeup tools shelves. This you can do by purchasing some smaller acrylic makeup holders and also some plastic trays (also small). Insert them into the bookshelf.

And you have an organized makeup storage system.

9. Unique Toilet Paper Rolls for Makeup Organizer

Makeup Storage Ideas
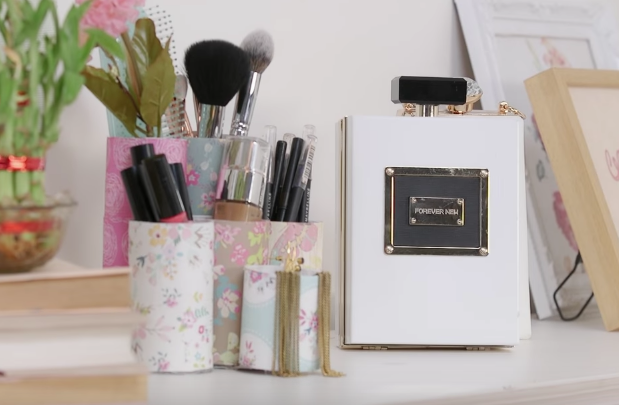
The recycling enthusiasts will love this makeup organizer. The core materials are made off repurposed materials. It’s made of toilet paper rolls.

We sure you can do it in a quick DIY project. For you only need several paper rolls, some printed papers, a sheet of cardboard, glues, and a sturdy scissors.

Then this unique paper rolls makeup organizer is yours.

10. Plant Pots for Makeup Tools Holders

Design Makeup Storage
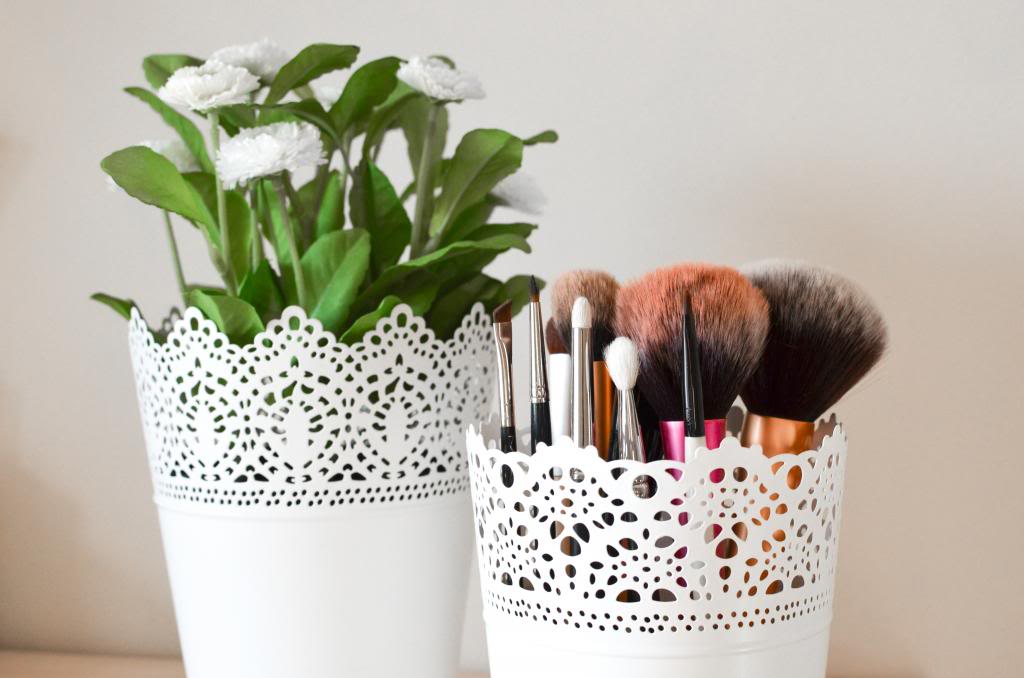
One of the more affordable way to have a chic makeup holder is by hacking an Ikea product. You even can turn an Ikea plant pot product into the holder.

Just find some SKURAR Ikea plant pots. And that’s it. You have your makeup holders by filling them with your favorite makeup tools. It looks chic and contemporary.

Your friend won’t even think that their real purpose are for plants.

11. Feminine Makeup Storage

Design Makeup Storage
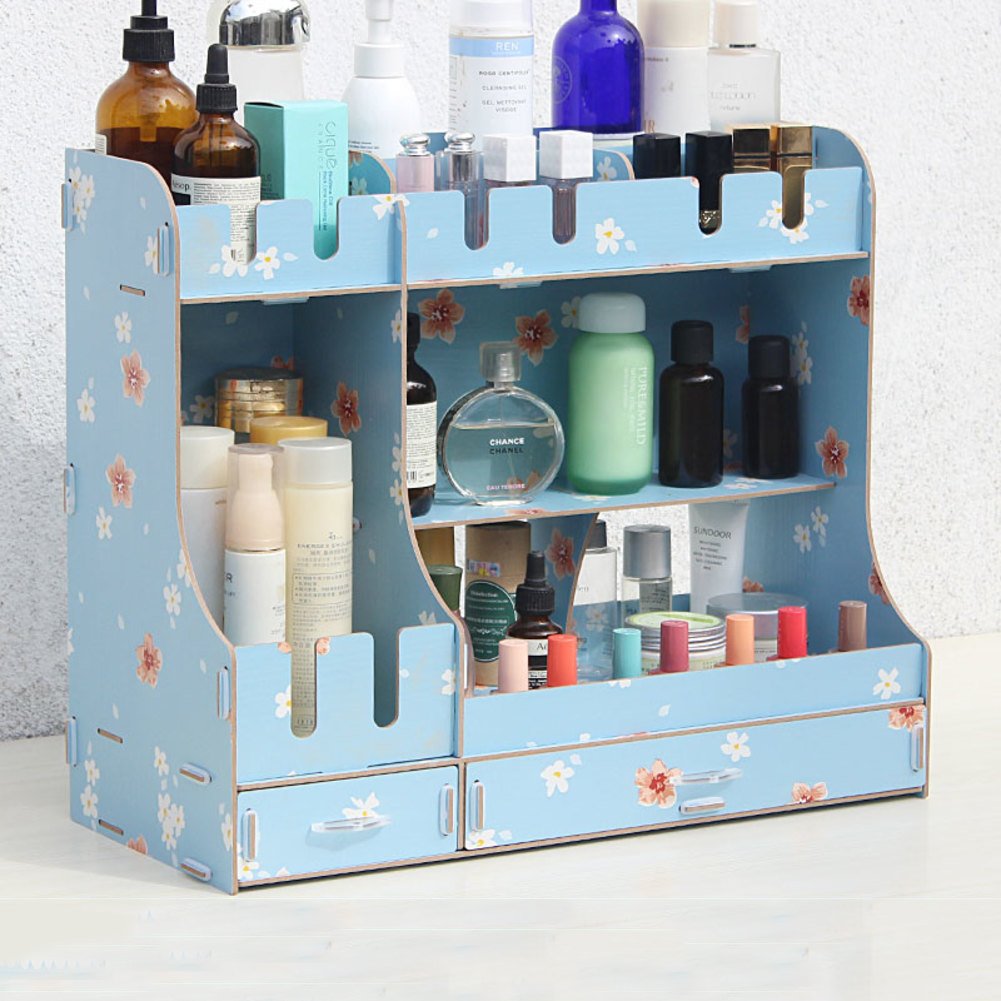
For most of us, the hardest job is keeping the dressing table clean. If you don’t want to always get this annoying problem, try to put a makeup organizer on it.

This desk makeup organizer is worth a try. It comes in a knock-down mode, so you need to assemble the organizer yourself. But, you need not to worry. It’s easy to assembly.

Put the desk on your dressing table, and no more a messy table.

12. Two Layers Plastic Bathroom Makeup Organizer

Makeup Storage Ideas
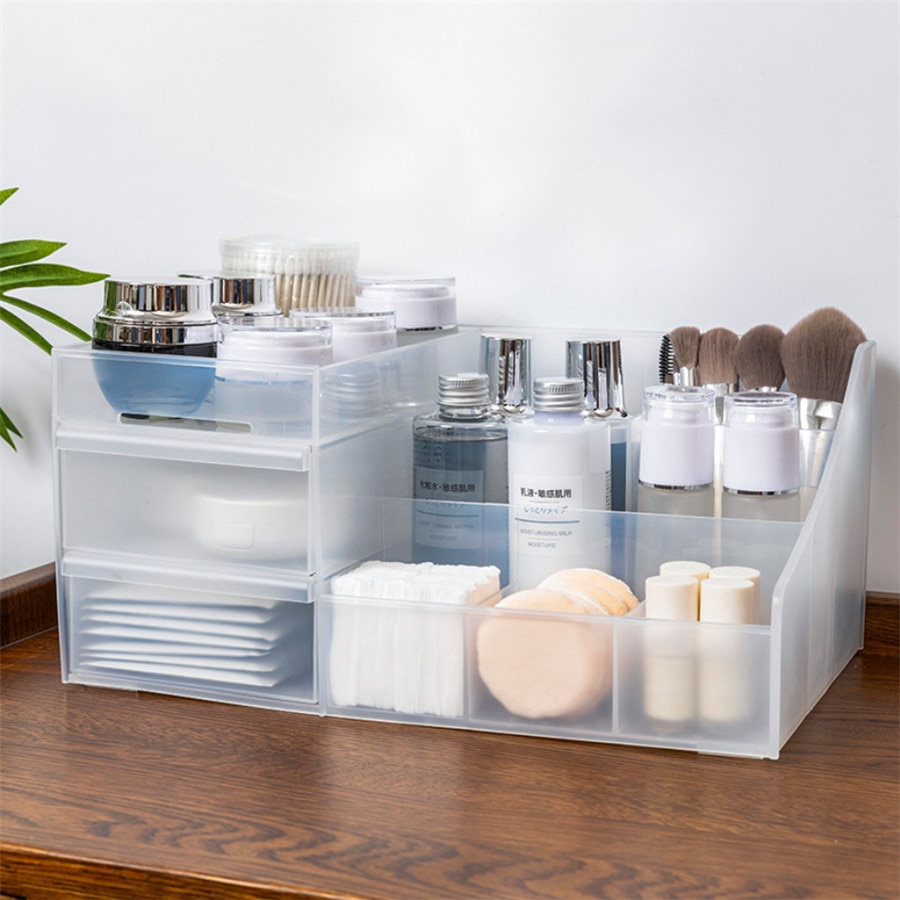
For practical reasons, a bathroom are often equipped with a bathroom vanity or even a bathroom dressing table. For the reason, you need a reliable makeup organizer for bathroom.

Find an organizer which is not only damp-proof, but which is also add coolness to the dresser.

This opaque plastic bathroom makeup organizer is a nice pick. It has two drawers and several open shelves. And it’ll cool on your dressing table in bathroom.

13. A Warm Hexagonal Wood Makeup Container

Makeup StorageNothing compares to the warm vibes offered by woods, real woods. And this wood container for makeup is also presenting the same kicks: warmness and pleasant air.

This octagon pine wood tray works well for almost of your dresser style, for the vintage to contemporary style.
Even, if you want to make it yourself, it’s easy to build.

14. Easy Makeup Storage from PVC Pipes

Makeup Storage
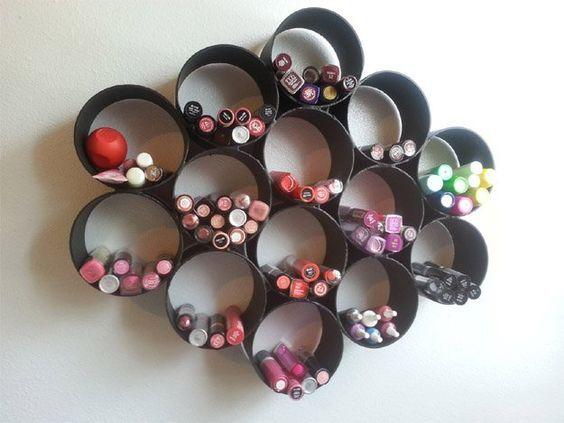
Easy to build and also cheap storage for makeup is possible. Mainly if you have fertile imagination and deft hands.

You find this makeup organizer is cool, right? And this organizer is made of several short-cut PVC pipes. Yes, the PVC pipes you often see in the construction sites.

You can build this makeup organizer easily just with a saw, glue, and your favorite paints.

15. Mirrored Acrylic Makeup Table with Shelves and Drawers

Design Makeup Storage
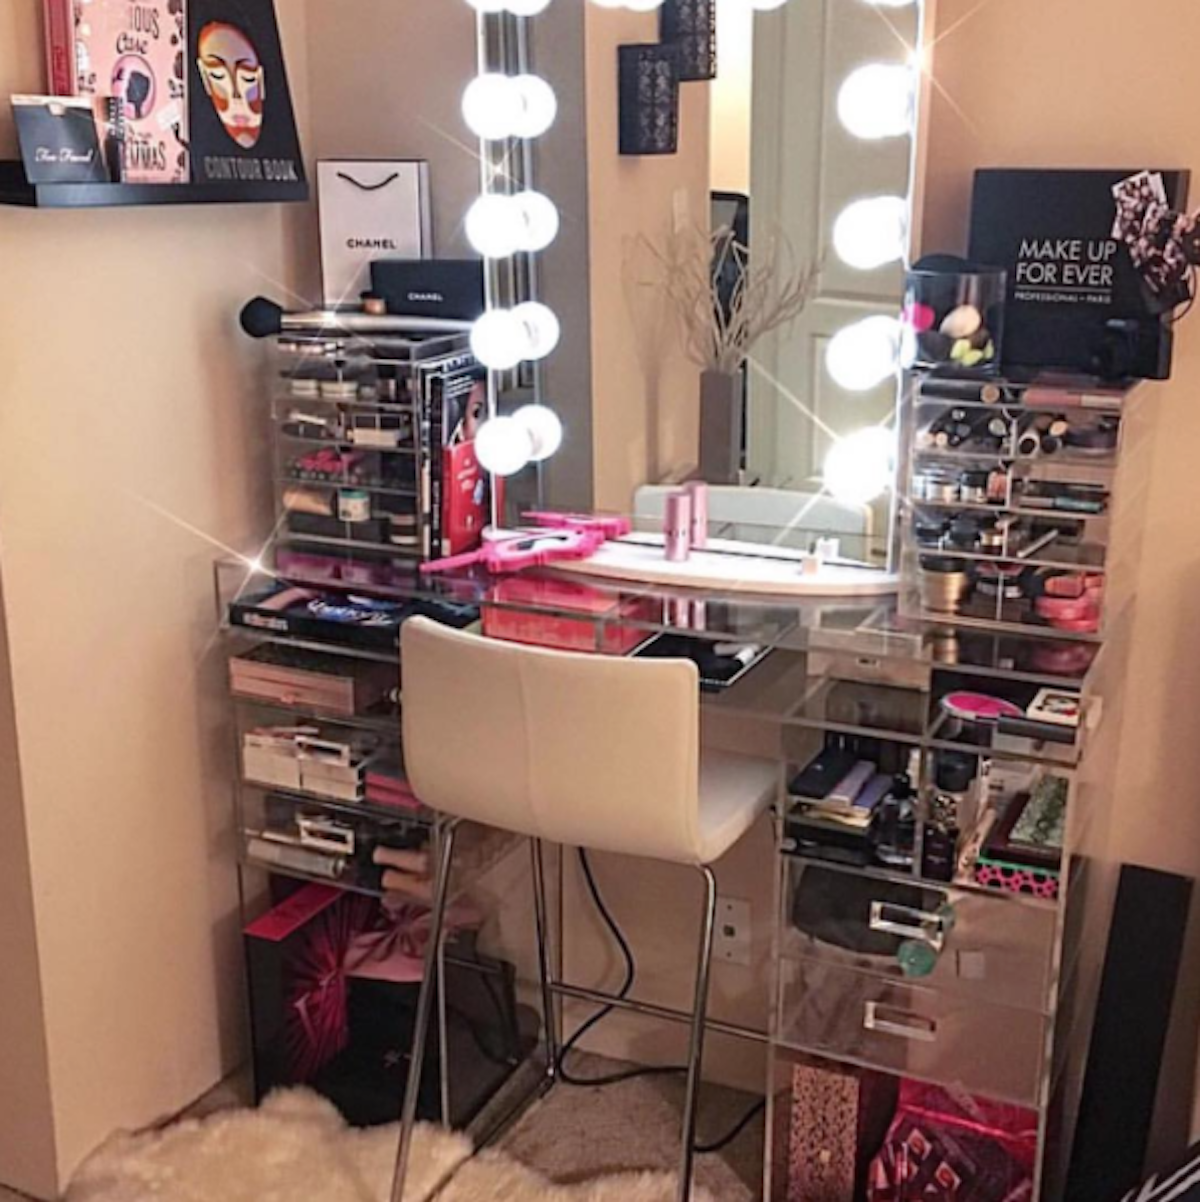
For the awesome you with all the talent of a makeup artist with all her tools and accessories, this acrylic makeup table is yours.

It made up of an acrylic table with drawers and several open shelves. On the top are other acrylics desk shelves, for more storage system.

To complete the setup, a mirror are added –complete with its light bulbs.

16. Shelve Wall Makeup Storage for Small Spaces

Makeup Storage Ideas
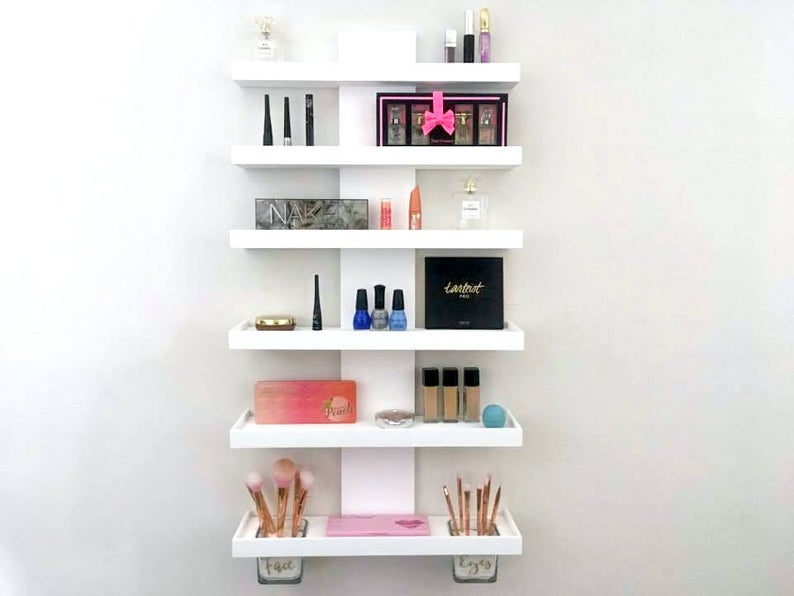
Small rooms need certain treatment for them to look larger and neat. And if you feel the makeup regular makeup tables are too big for the room, you can try this shelve wall makeup storage system.

It’s neat and won’t eat up the room, for it hugs the wall.

The wall shelve has six open shelves, generous enough to hold all your makeup collection.

17. A Smart Makeup Box Solution for Small Spaces

Makeup Storage
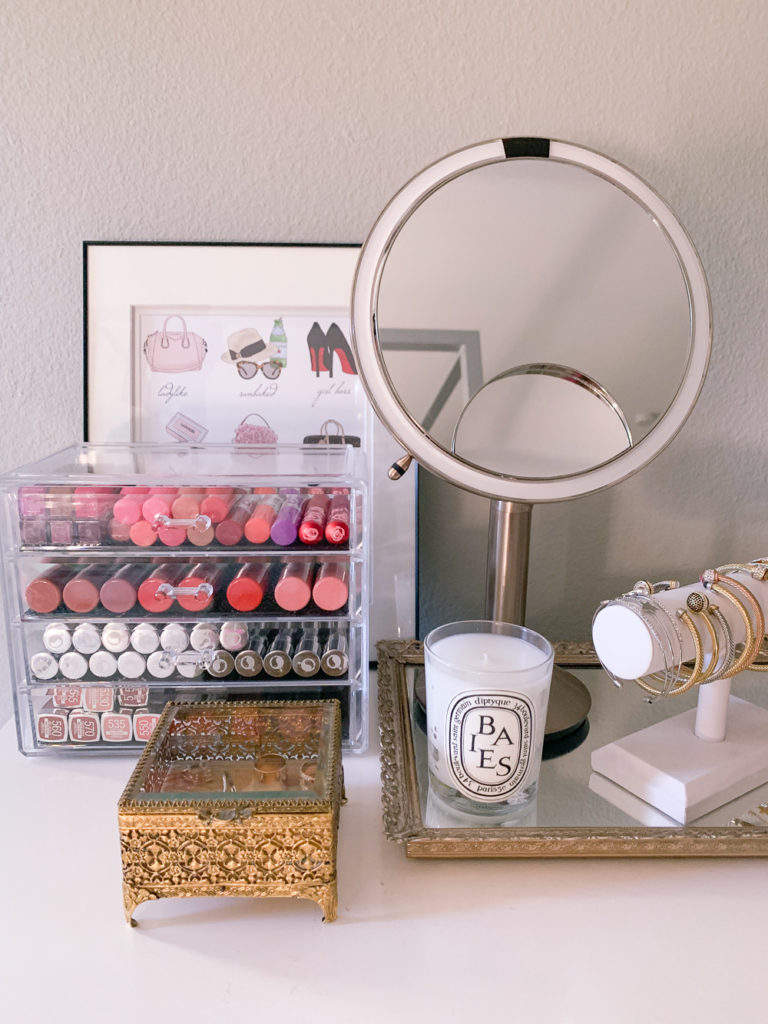
Still need another best idea for small room? This old and new makeup storage system suits well for your need.

The setup consists of an acrylic makeup box, and antique jewel box, a tray from mirror with old frame, and a mirror.

These combination of old and new makeup storage system give fresh atmosphere to the room.

18. Glass Jars and Ropes for Simple Makeup Holders

Makeup Storage Ideas
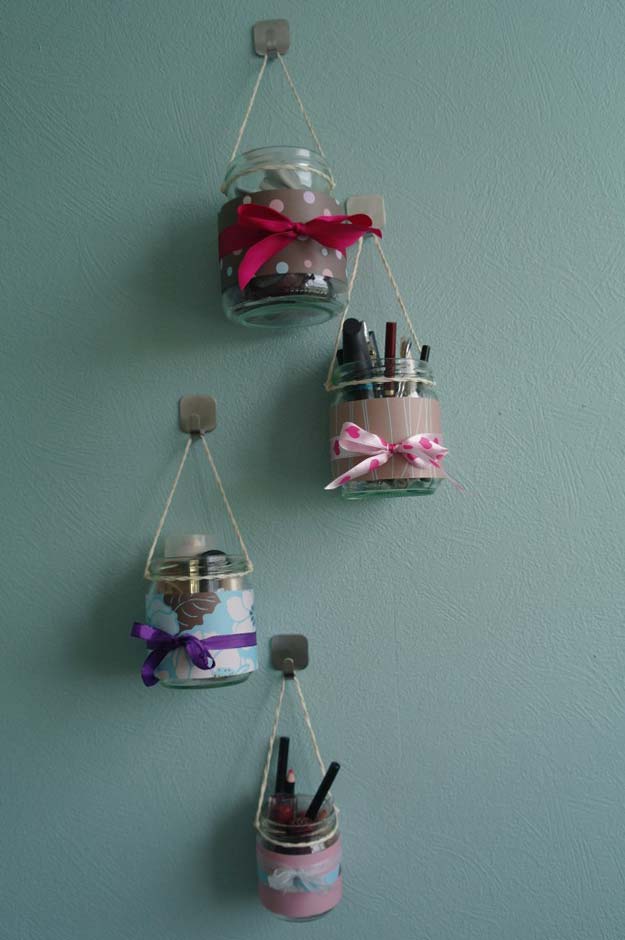
Sometimes you’ll not need large makeup tools organizer box. And if just want to store several makeup items, this make up holder idea should be on your to-try-list.

The holders are made of several mason glass jars. Sisal ropes string them together on the wall. Add printed papers and ribbons for cute appearances.

19. A Luxurious Looking Mirrored Makeup Organizer

Design Makeup Storage
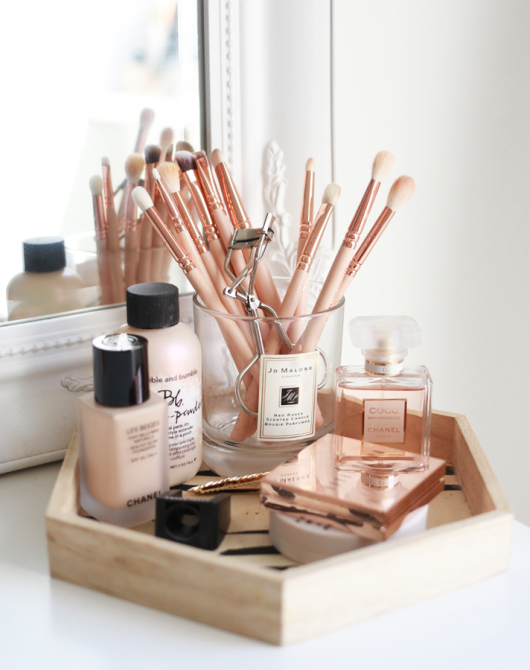
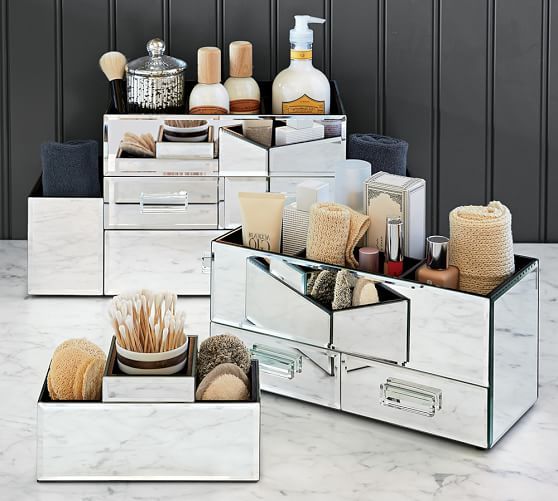
Almost nobody can resist beautiful look. It’s in our nature that we always love lovely stuff. And if the lovely stuff are accompanied with luxurious look as well, that will be even better.

So if you love this makeup organizer, we won’t blame you. This mirrored makeup organizer is totally awesome with its simple glitter and luxury. Like to have one?

20. Laser-cut Aluminum Vases for Makeup Holders

Makeup Storage
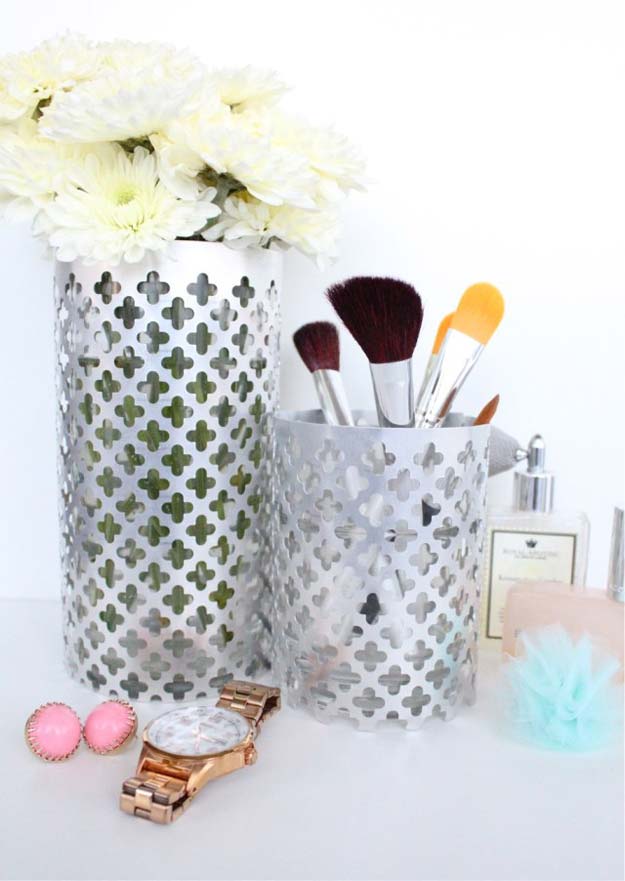
If you still remember the list number ten, about an Ikea plant pots which are also awesome for a makeup holder, here you have the other version.

This time you have aluminum vases. Their bodies are perforated with laser in geometric patterns. These vases-turned-makeup holders work well for contemporary bed room.

21. Makeup Tool Holder with a Picture Frame

Makeup Storage Ideas
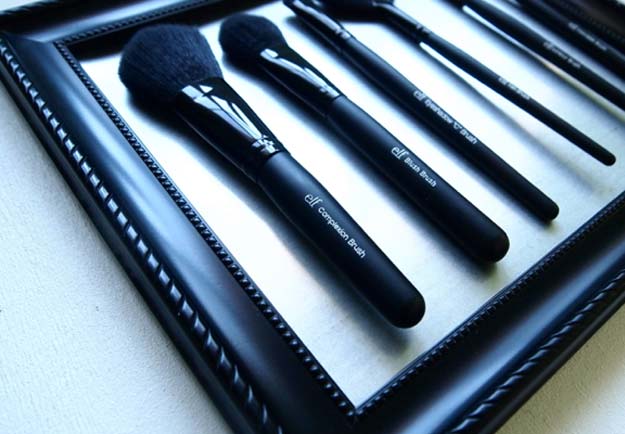
If you love you beauty tools, why not hang them like a work of art? This DIY picture frame makeup holder shows you how.

The trick that makes the tools stick to the frame is on the magnetic tapes rolled on them, while a magnetic board also substituted the existing board’s frame.

And the magnetic effects let them stick together.

22. A light and Portable Makeup Container Box

Design Makeup Storage
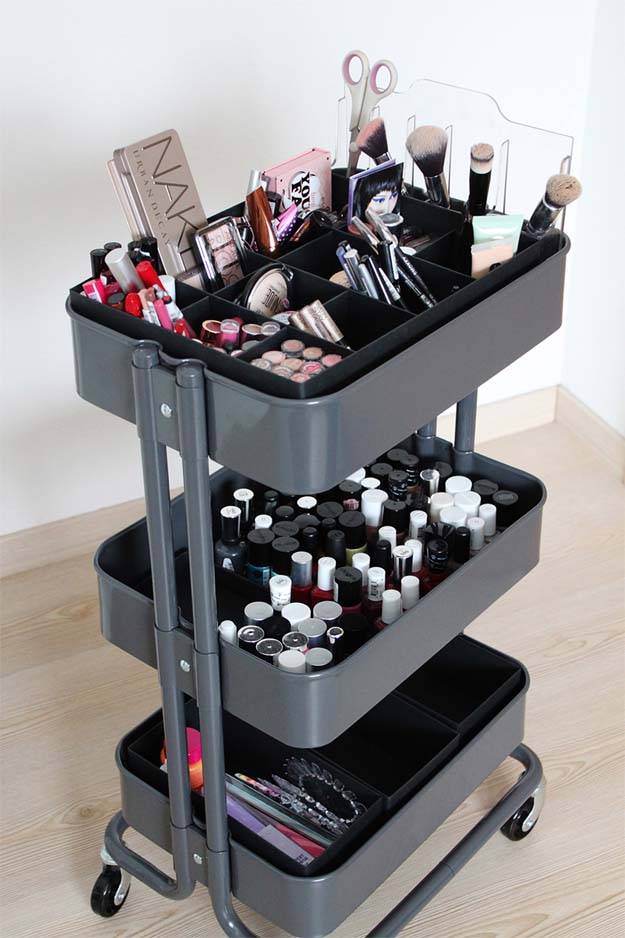
Always in the move and don’t have time to have a fixed makeup storage? Then you need this portable makeup container box.

The box itself is made of durable plastic material. It also light and easy to carry. It has 3 containers, which can be opened or closed easily by pulling or pushing each shelf.

It also has wheels, so you can move it on them freely.

23. Corner Slim Cabinet for Makeup Container System

Makeup Storage
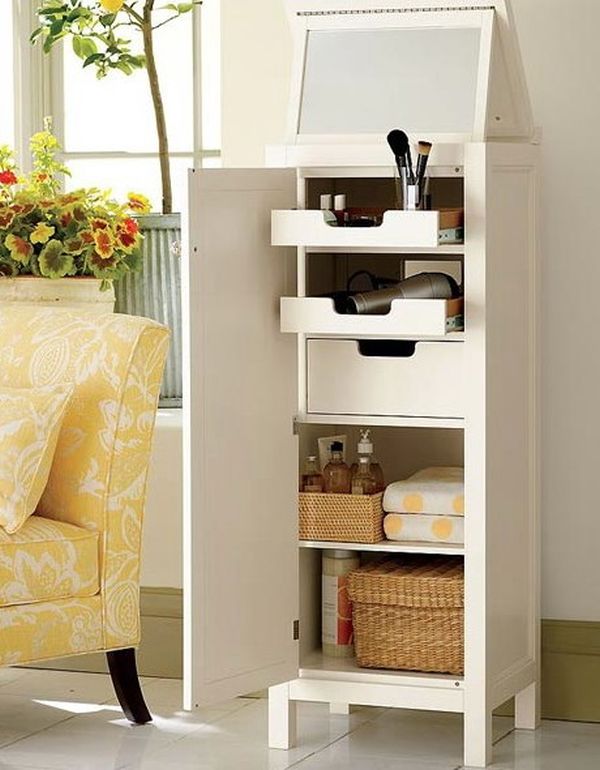
Don’t let a corner area lays unused. Make use of it by setting a makeup container system on it.

This slim cabinet will be a better for the spot. It’s slim and can add a cute accent into it. Your makeup tools are in the right place, and the corner won’t look empty again.

For storage, this cabinet has 2 semi open drawers, a drawer, and 2 open shelves –enough for you beauty things.

24. Vintage Candle Jars for Contemporary Makeup Organizer

Design Makeup Storage
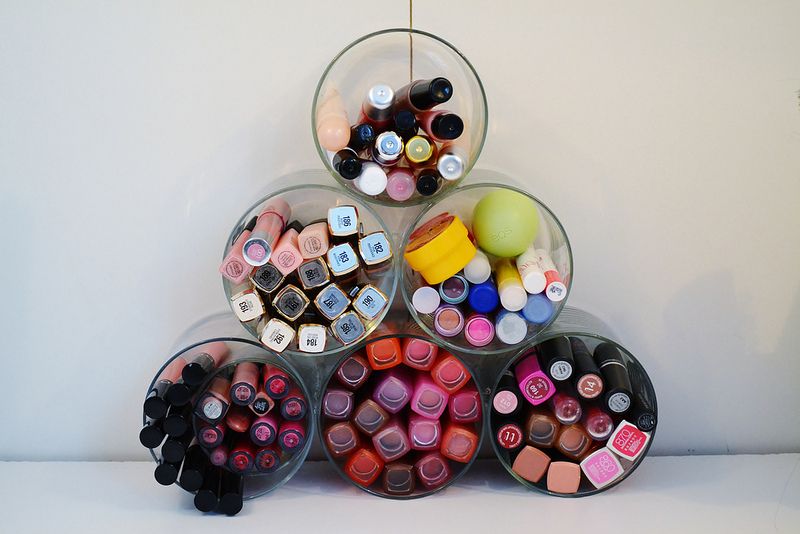
Feel familiar with this makeup storage inspiration? You bet. If you can do the DIY makeup organizer project with PVC pipes, you can build this organizer in a breeze.

You won’t cut or paint in this project. You only need to scour some vintage candle jars on thrift shops (or your own collection) plus some glues to fix them together on the wall.

25. Easy Glass Makeup Brush Container with Beads

Makeup Storage
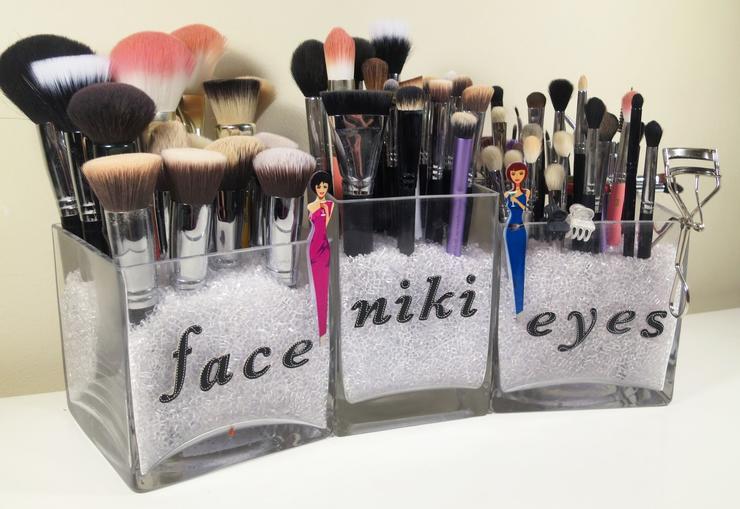
You don’t need large and intricate makeup holder to impress your friend.

With several square aromatic glasses, you can wow them. Find 3 or four (depends on amount of the tools) and fill them with plastic beads. Find the clear types for glitter effects.

Dive the tools into the glitter. And see your friend impressed.

26. On-the-go Makeup Storage from Glasses Case

Makeup Storage Ideas
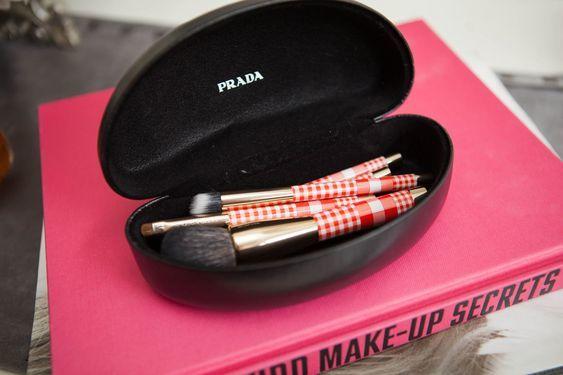
This unique makeup organizer is probably the easiest idea in this list.

All you need is this glasses case. Not only Prada, but any of your glasses case will work well. Fill the case with the most needed beauty tools. It’s easy and you can take it anywhere easily.

27. File Holder for a Makeup Holder

Design Makeup Storage
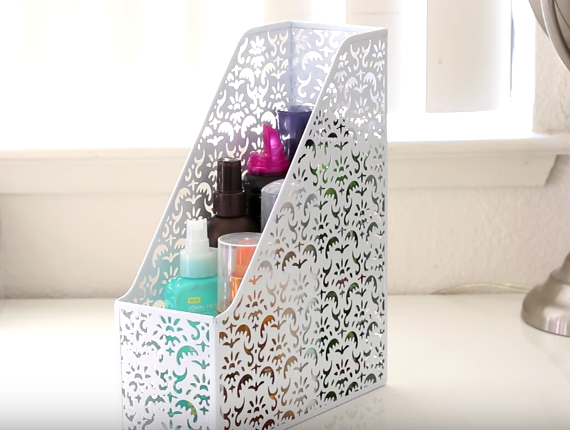
When all you have in the bedroom is a small dressing table, then you need this makeup holder, a makeup holder out of a file holder.

Find an elegant fil holder like this one (but you can always pick the one you feel ok for the table, not just this white holder) and that’s it.

Put it on the right place on the table, and your easy makeup holder is ready.

28. Glittering Makeup Organizer

Makeup Storage Ideas
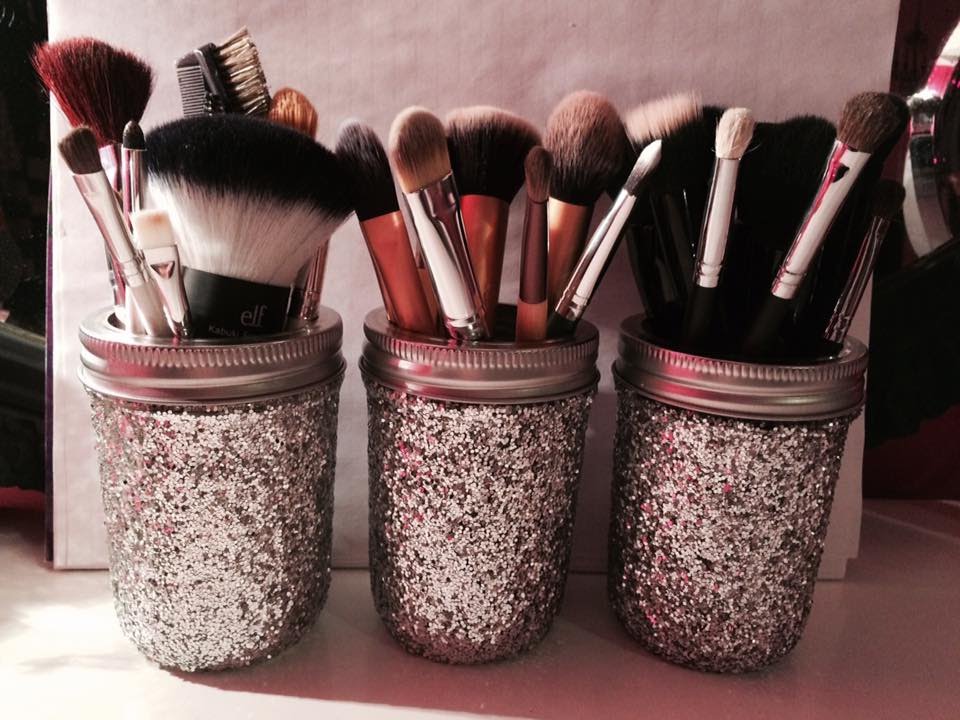
This desk makeup tools organizer should you have, if you love something glittering on your makeup desk.

If you have the time, you can even make it yourself in a DIY project. For the containers, as usual, you have the mason jars available. As for the glitter, try mod podge –the glittering stuff.

29. A Neat Makeup Storage for Bathroom

Makeup Storage
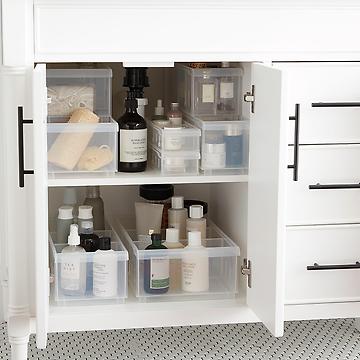
For this last list, we offer you makeup tool organizer for bathroom. Unlike the previous version (which is on the table), here you have the enclosed one.

The organizer lays in a bathroom cabinet. This way, your bathroom will always look clean and neat.

Read More: 30 Impressive DIY Plant Stands

From the easy to the easiest one, you have met some of our chosen compilation of makeup storage. Whether it’ll be in the form of organizer boxes, cases, or even an Ikea hacks, you can find them here.

For the reason, we sure that you can build one (or even more) of the storage here in your DIY projects. Lastly, success for you.

27++ Most Impressive DIY Plant Stands You Surely Can Build at Home

You have several ways to highlight potted flowers or plants. One of the most effective is by giving them the right plant stands. Don’t want the regular stands? Try to build yourselves in a DIY plant stand project.

In this small article, we have compiled some of impressive DIY plant stand designs. One or some of them, we hope, can be a starting point for your project.

Without further words, let’s check them out.

1. Wood-Copper DIY plant stand plans

DIY Plant Stand
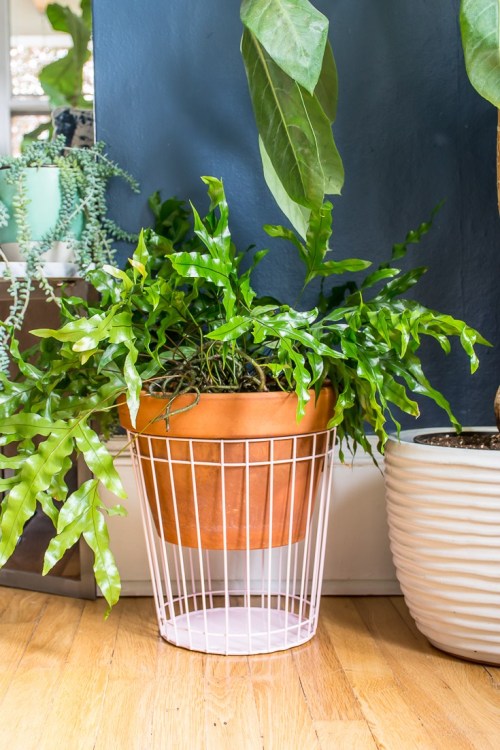
If you feel the living room feels empty and lack of greenery, you need to consider this DIY plant stand plan. As a DIY project, you can do it in a breeze.

For this DIY plant stand plan, you need the following stuff:

• Four round dowels
• Four copper steel pipe tee joins
• A copper pipe cross joint
• Eight copper caps

Tools

• A Wood saw
• Multipurpose glue

How to make:

• Cut the dowel into 8 sticks. These dowel cuts will be the vertical supports.
• Cut other 4 dowels for the horizontal supports
• Trim each of their tips, so that they fits in with the joints or caps
• Now it’s time to assembling the materials. For these step, by seeing the picture, we sure you can do it easily.
• The plant stand is ready. This plant stand is suitable for contemporary minimalist home.

2. Hacking an Ikea Plant Stand for a Cuter Nordic Plant Stand

DIY Plant Stand
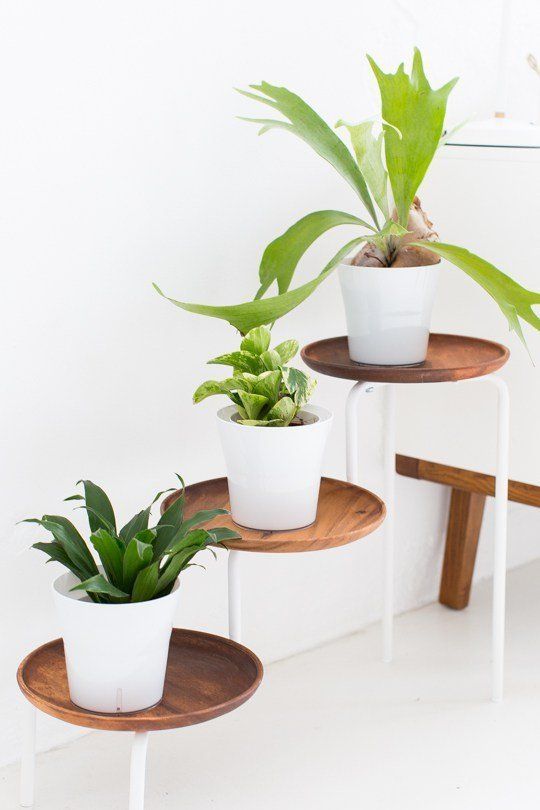
The Nordic/Scandinavian style brought by IKEA often gives you enough room for modification –to suit your tastes even better.

In this plant stand project, you modify an Ikea stand plant product (an IKEA PS 2014 plant stand). The product itself is excellent. But we want to make a small modification on the top.

In this project you put acacia wood tray on the existing top. And you can see the difference right away.

3. Outdoor Movable Log Slab Plant Stand

DIY Plant Stand
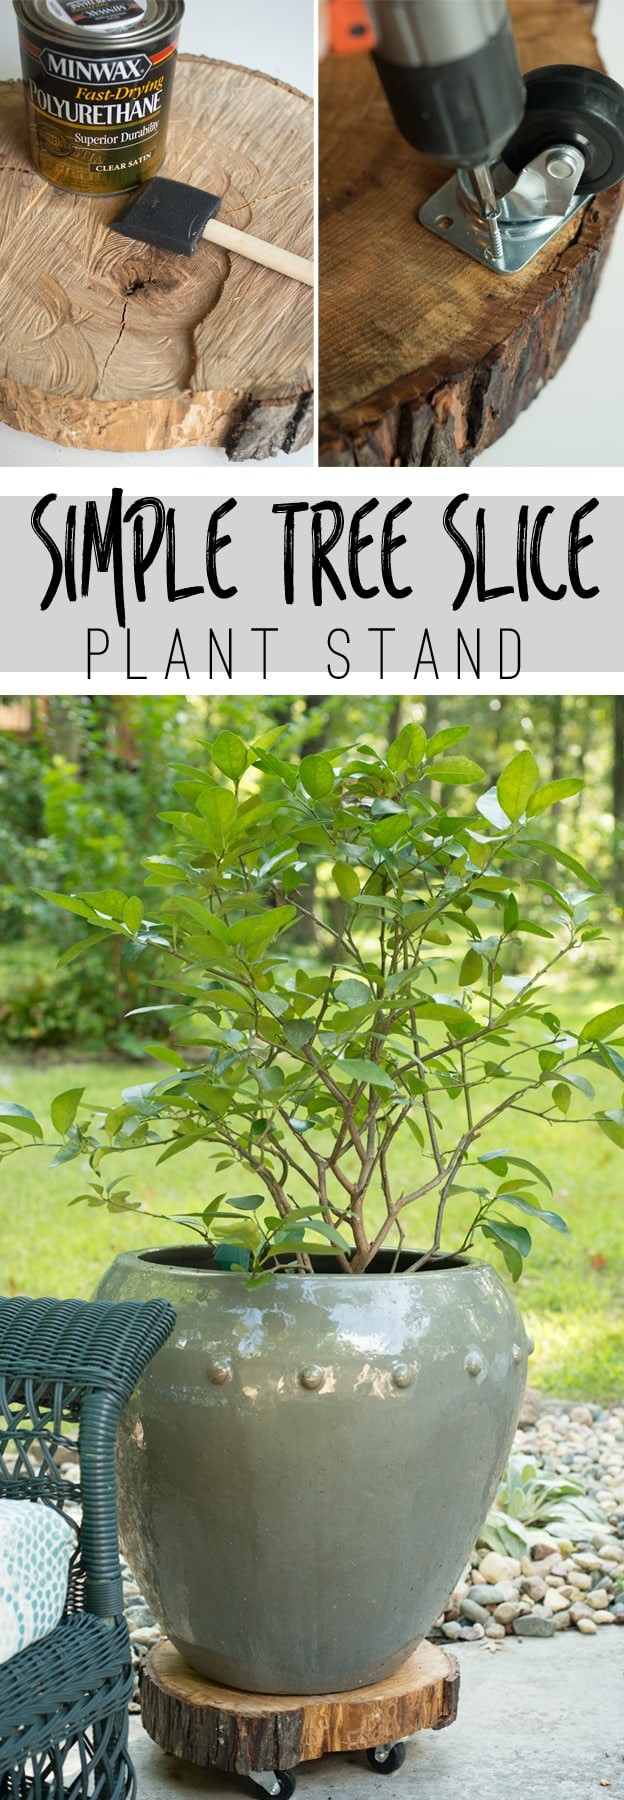
An ideal outdoor plant doesn’t make you sweat. Because you move it around easily, even with the pot (and its plants) on it.

If you wonder having one of such type, try this DIY plant stand project.

Materials you need:

• A slab of wood
• 4 heavy duty roller

Tool:

• Screw driver

How to make:

• Clean the slab. Layer its surface with clear weatherproof finishes.
• Screw the heavy duty rollers on one of its sides.
• Your plant stand is ready

4. Contemporary Wood Plant Stand, Pyramid Style

DIY Plant Stand
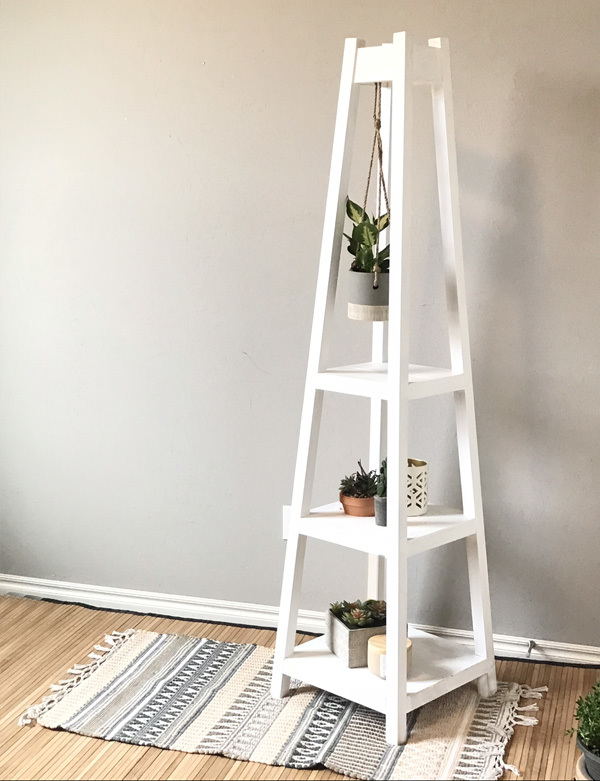
Small room also needs greenery. Whether potted cacti or other evergreen indoor plants, it helps to refresh your energy, by giving positive vibes and sucks any negative ions in the air.

To make your plants collection stand out, just be sure to choose the right plant stand. This white plants stand from Ana White should be perfect for your room.

The construction is light, and offers contemporary look to the room. Nice.

5. Hairpin Indoor Plant Stand with Rope Accents

DIY Plant Stand
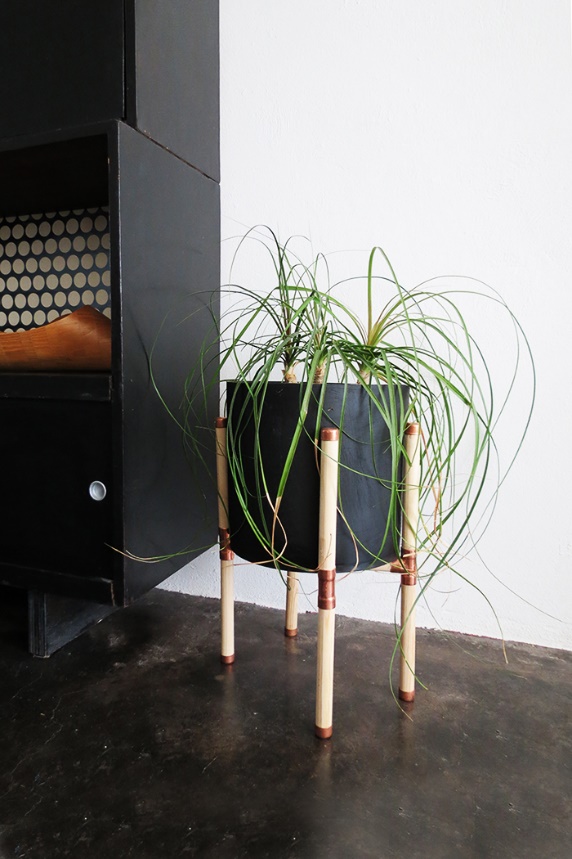
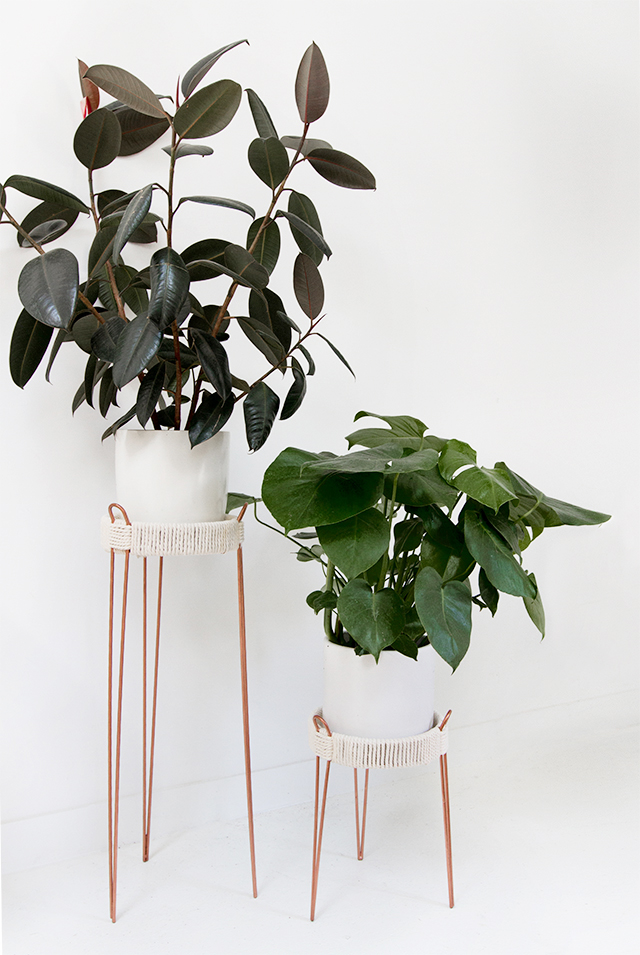
Only with ropes, you can make an ordinary plant stand looks elegant. These Amazon-found retro hairpin plant stands gets a little hack with a can of copper spray paint and simple rope works on their tops.

The original indoor black plant stands get copper paint spray treatments. The tops gets rope works.
And now they looks elegant –thanks for the white ropes and a can of copper spray paint.

6. Contemporary Wood-Metal Plant Stand

DIY Plant StandThis table plant stand used to have white shelves. The owner wants to redo it for a more natural look.

And she just does the follow. She removes the white shelves with plywood planks with natural wood patterns.

The simple hack transform her plant stand instantly. It feels warmer than before.

7. Retro Iron Wire Plant Stand with 50s Vibes

DIY Plant Stand
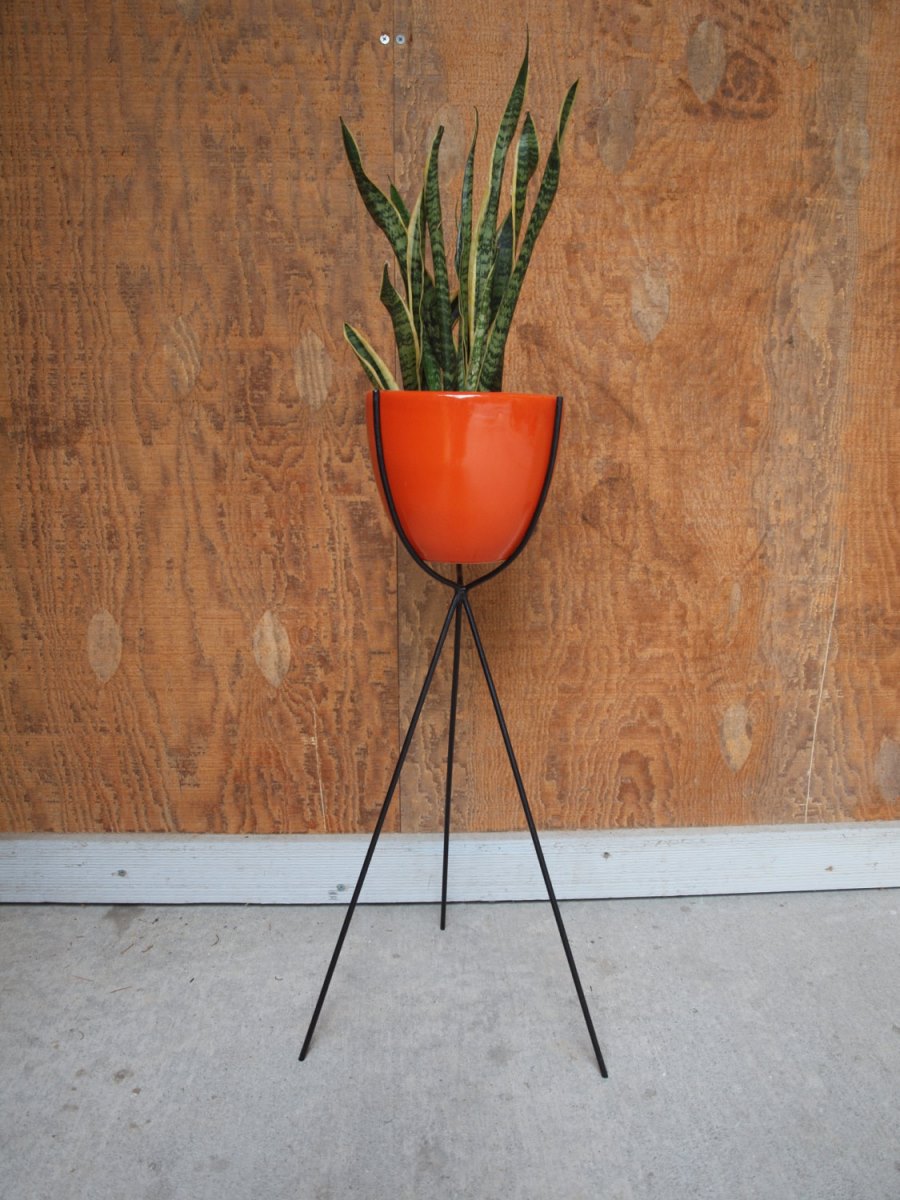
As the contemporary people love to have the 50s styles back, here’s a DIY plant stand that fits with a retro 50s style.

This plant stand only uses iron wire as its main materials. If you have basic welding skills, this project will be your next easy project.

Add an orange pot and snake plants on it. And you have a chic 50s plant stand.

8. Easy Raised Plant Stand with Dowels

DIY Plant Stand
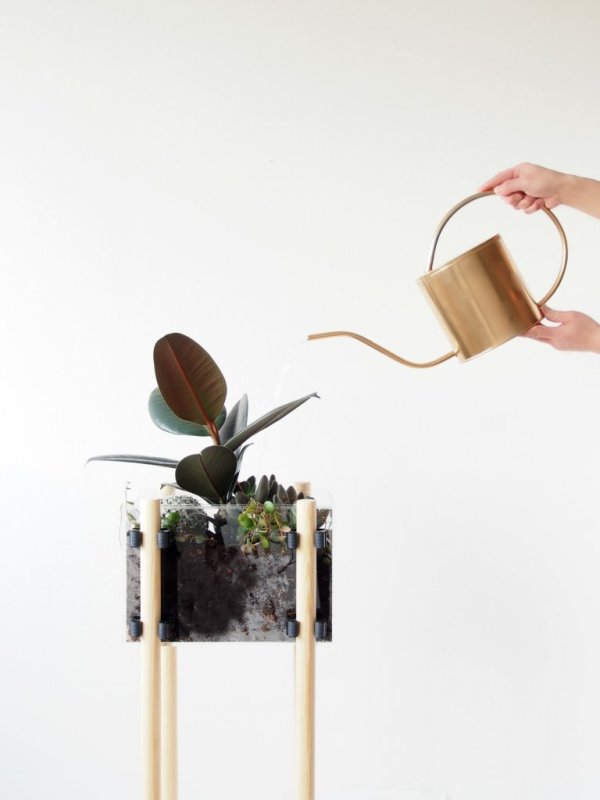
A combination of wood dowels and acrylic will satisfy your hunger for an awesome Scandinavian plant stand. Like to have one?

Materials you need:

• Four round wood dowels
• A sheet of acrylic. For practical purpose, any acrylic box will do. Better still, find a NOMESS acrylic box.
• Eight wall-mounted clips plus their bolt and washer

Tools:

• A driller

How to make:

• Drill two opposite sides of the box. The holes resulted are for the clips to hold.
• Set the clips on the previously drilled holes.
• Once the clips set, insert the dowels –just like the picture.
• And you have a chic Nordic plant stand.

9. Outdoor Folding Plant Stand Plans

DIY Plant Stand
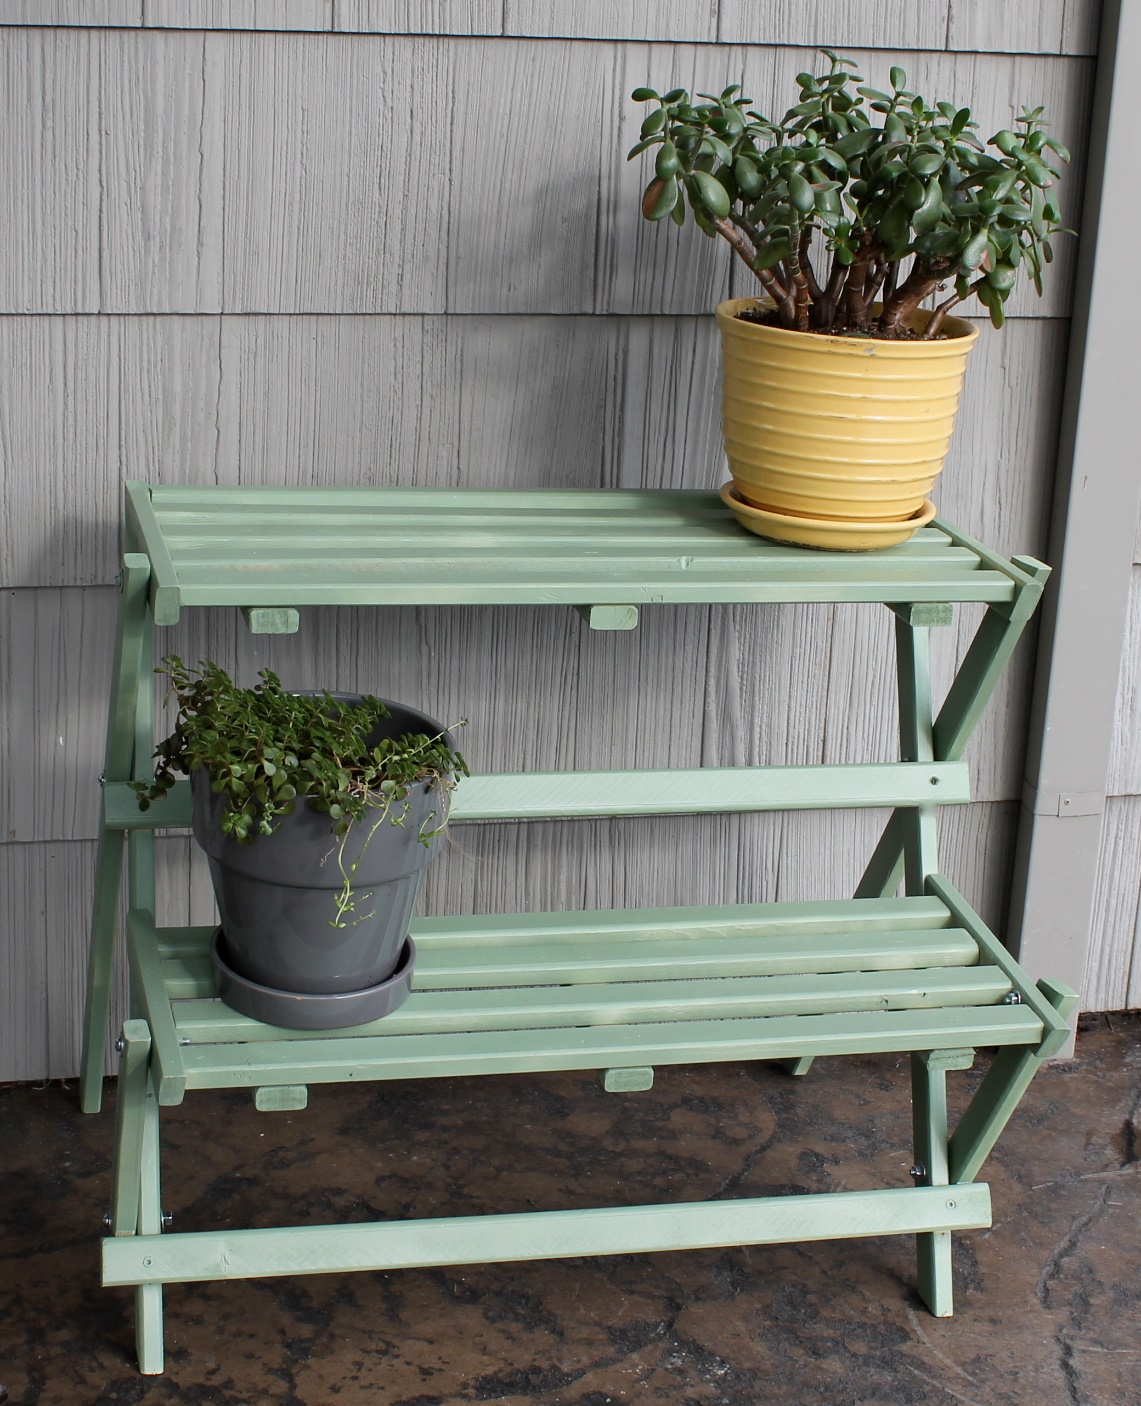
Don’t want to have a fixed plant stand? Easy. You need a portable and foldable. This Ana White collection is a good start.

Like to replicate it in your personal DIY project? Possible. Though this will be more challenging than other project in this list. But you like challenge, right?

10. Hack an Ikea Stool for Retro Plant Stand

DIY Plant Stand
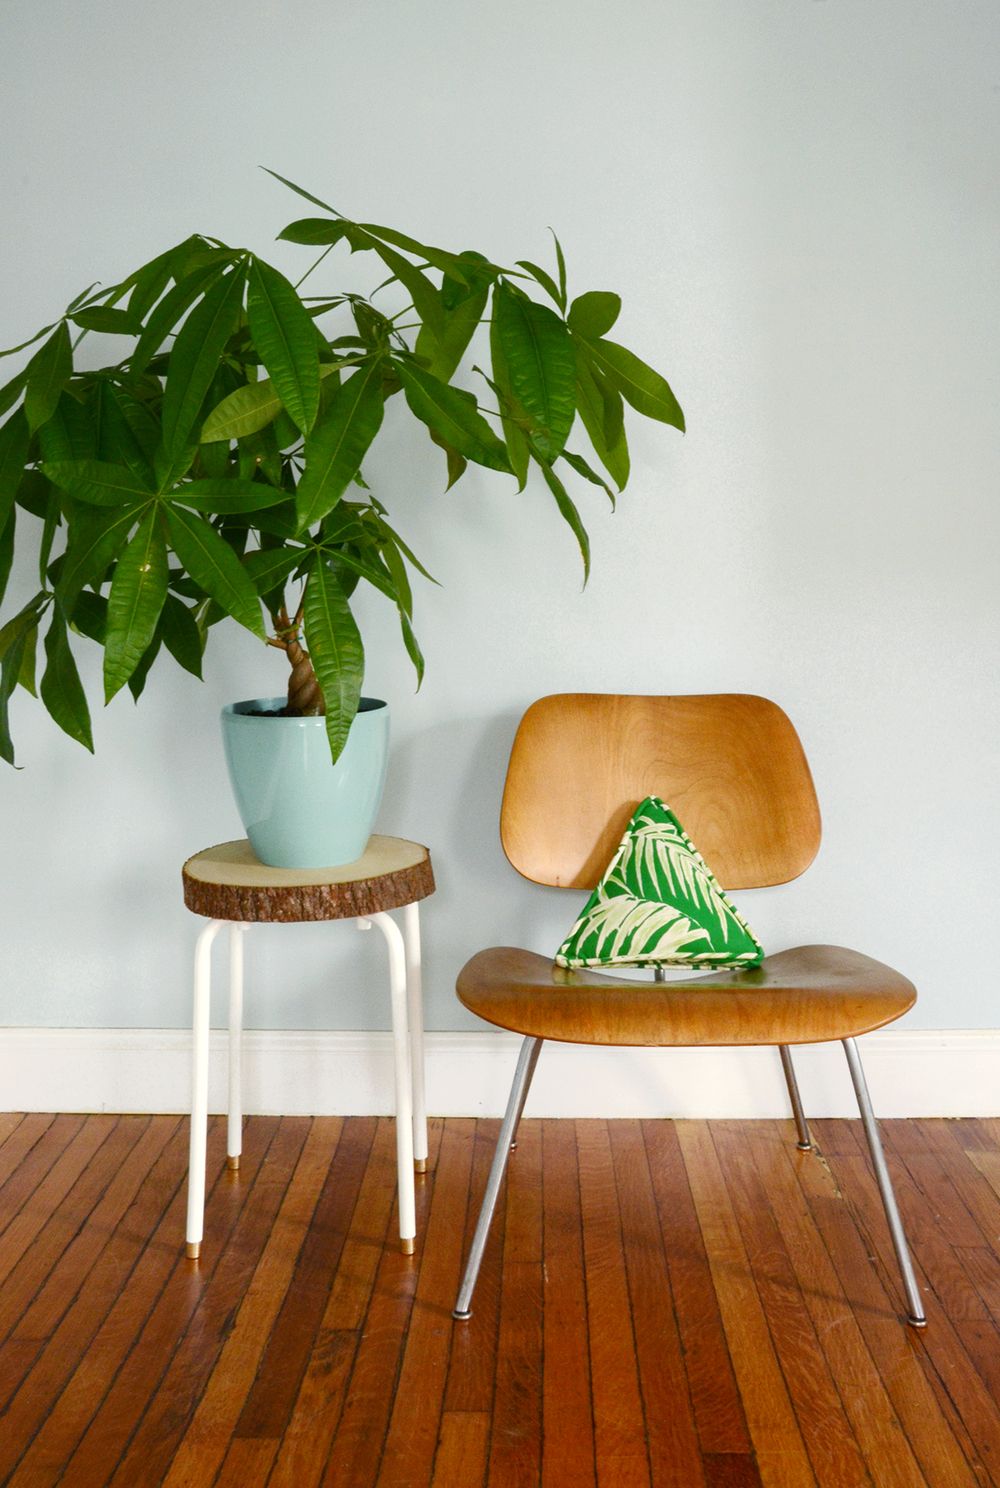
Meet a simple Ikea hack again. This time you want to makeover an Ikea product, the Marius Stool, into a piece of charming retro plant stand.

For this project, find a slab of wood cut with diameter just a little big than the stool’s top. No need the rough edge, just finish it with clear finishes.

Screw the slab onto the top stool. That’s it, your charming plant stand is ready.

11. Outdoor Storied DIY Plant Stand

DIY Plant Stand
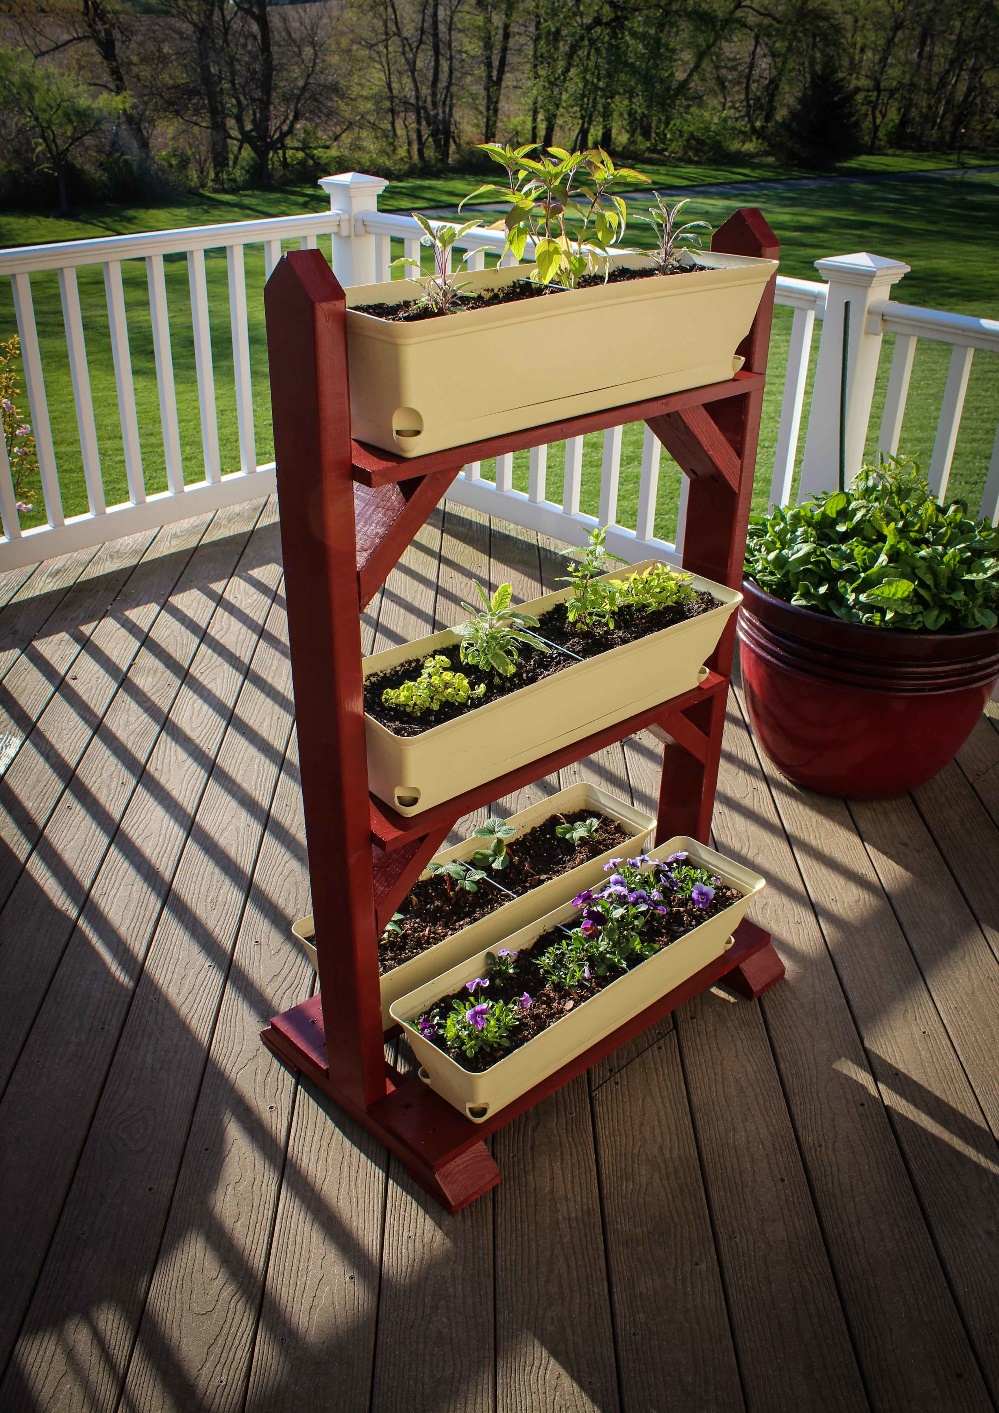
Not only a building has multi story floors, this plant stand also offers you a multi-story plant stand. Seeing the design, we sure you can build it yourselves.

Any woods, reclaimed woods, or even plywood should do you good in this project. Just find the right planter boxes.

12. Cheap Wire DIY Plant Stand

DIY Plant StandAll materials around you are sources of inspiration when it comes to making a plant stand. And so you make this plant stand from wire wastebasket.

Yes, it’s a regular waste basket you purchase from your favorite store. Add a pot of plant and, there it is. A chic minimalist stand plant.

13. Elegant Indoor Stand Plant with Three Legs

DIY Plant Stand
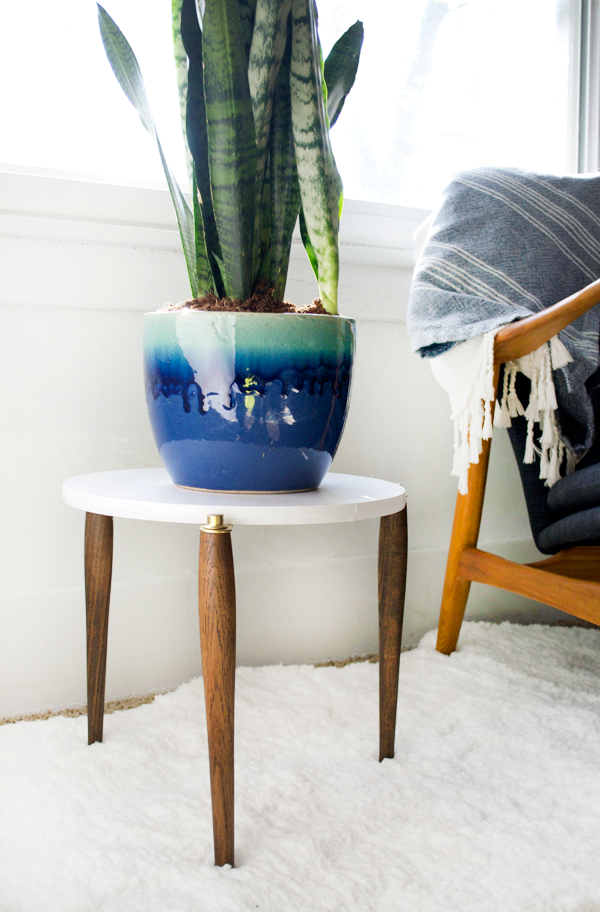
A rustic beauty promises warmness to an urban living space. Here’s how you add a splash of rustic-ness into your room: gives it this plant stand.

It combines round white marble-like top and three classic-sculpted legs. And you have and elegant rustic indoor stand plant.

14. Simple Bamboo Stick Hacks for an Exotic Plant Stand

DIY Plant StandNeed a calm serenity of Eastern atmosphere in your house? Bring in this bamboo plant stand. You can also build this stand as well.

It has simple design, and the materials are readily available on any craft store around you –or you could grab it easily via online.

15. Reclaimed Wood for Plant Stand, Table Style

DIY Plant Stand
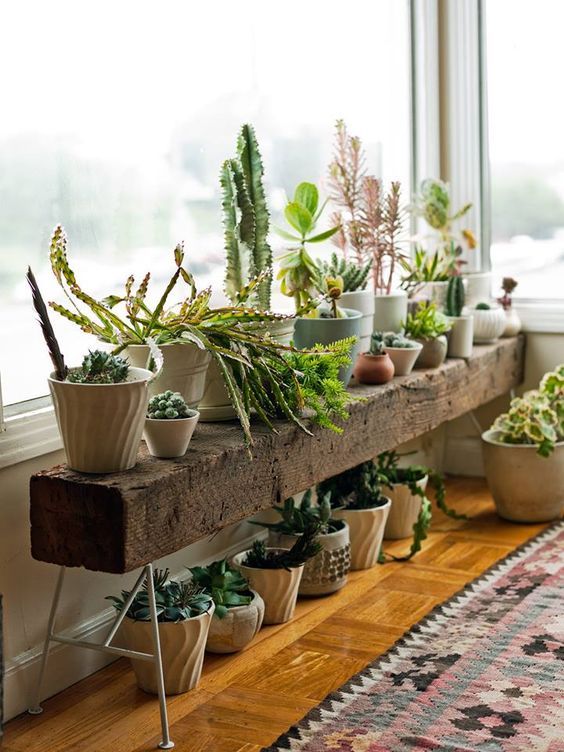
If you still in need of natural touches in the living room, then have the unused wood log in the barn works for you. Let it be your new barn style plant stand.

See? For this DIY plant stand project, all you need is 2 sturdy metal stands. You don’t even need to smooth the logs, for its naked beauty is enough for your barn style penchant.

16. White Plant Stand for Minimalist Living Room

DIY Plant Stand
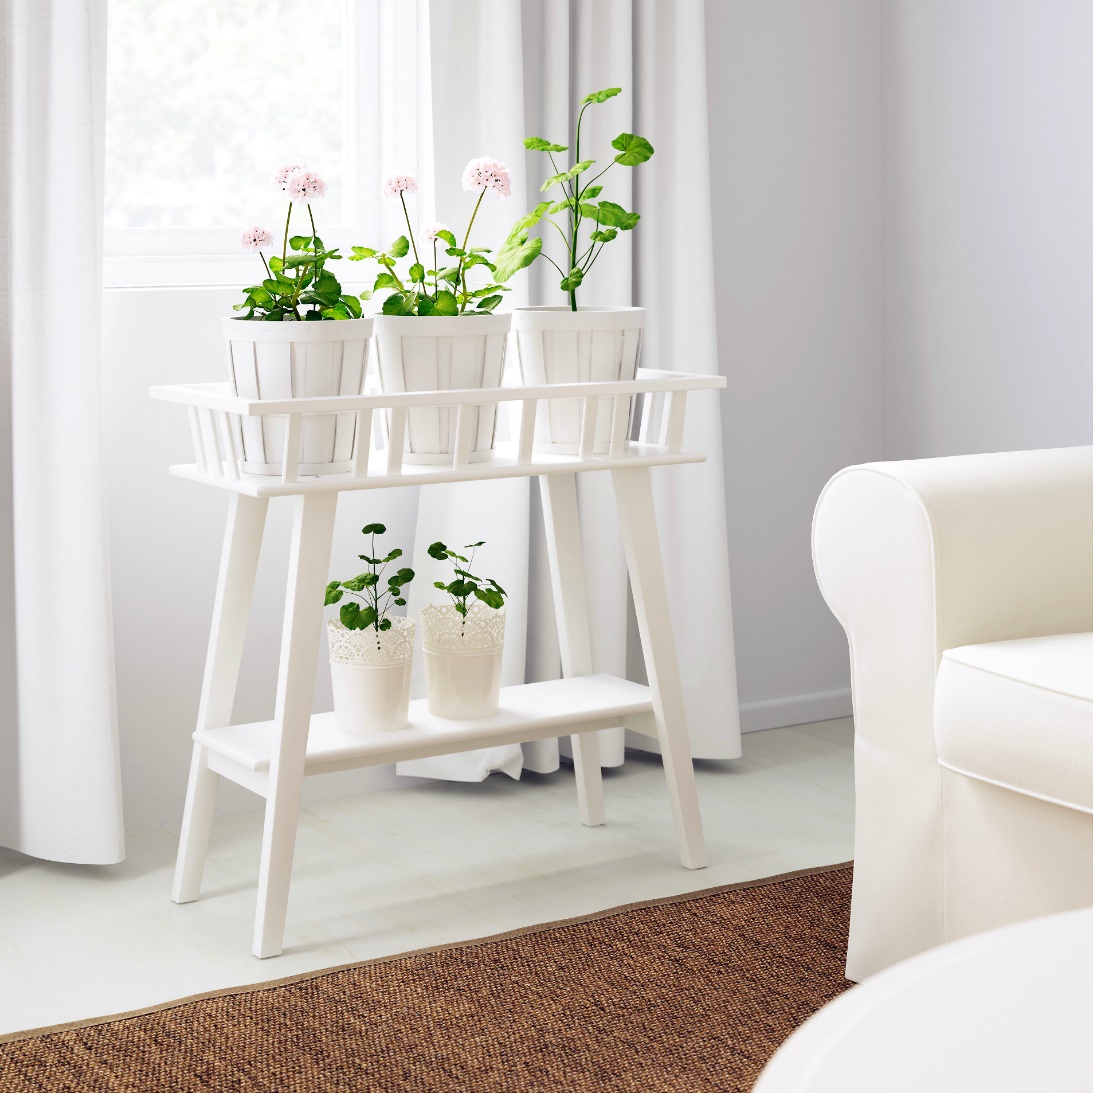
White is neutral. It also warms the heart, mainly if you have a better room lighting. The room looks larger and fresher as well.

And most of all, white provides great background for indoor plants. A right plant stand, like the picture, only complement to them.

No instructions needed for this plant stand, just paint it white for the plants to stand out stunningly.

17. Easy Retro Wood Plant Stand

DIY Plant StandAs retro 50s-70s styles combine well with almost of contemporary styles, these retro wood plant stands are no exception.

To thicken the retro look, these stand has various soft-toned colors which will remind you to a cottage living rooms atmosphere.

For the contemporary look, put glass or acrylic planter boxes on them.

18. Minimalist Plant Stand, Scandinavian Style

DIY Plant Stand
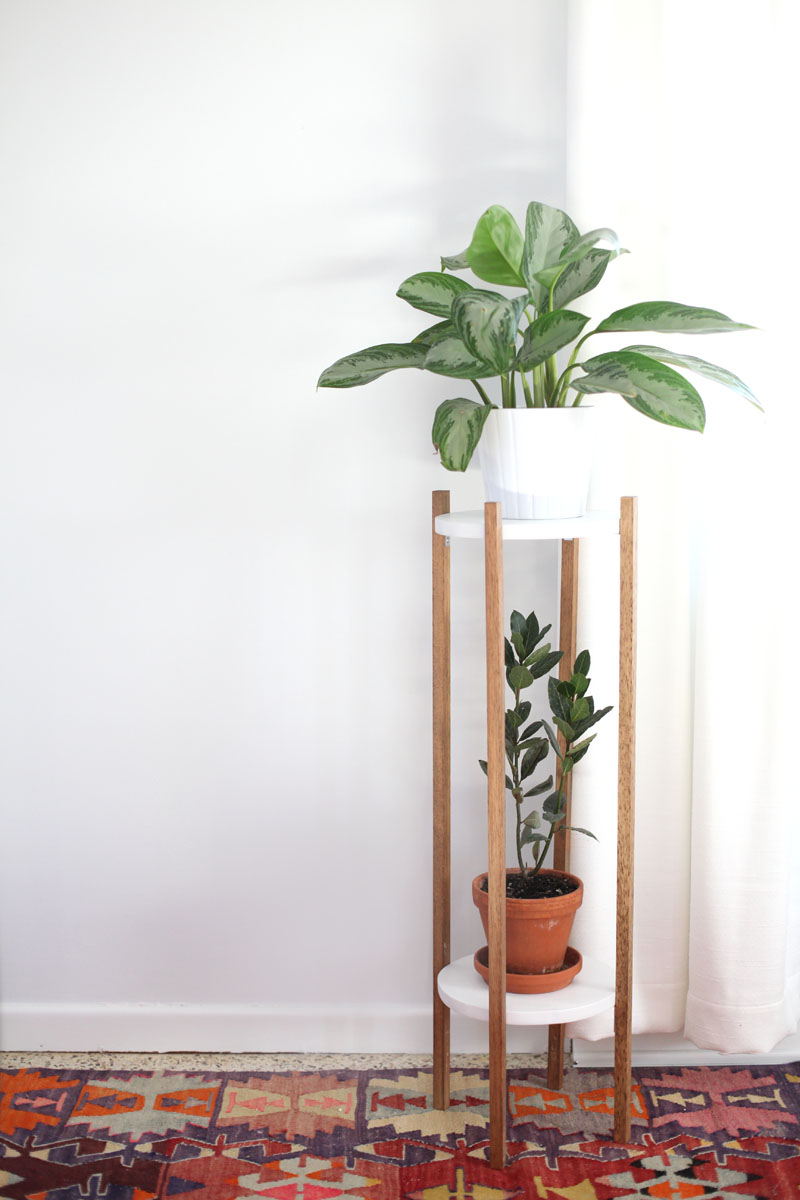
Don’t let the corner empty. Fill it in with this double deck plant stand. It’s slim and having two shelves for plant/flower pots.

Again, if you want to build it yourselves, you need the wood dowels. Other materials are 2 round woods for the

shelves and eight L joints to fit them onto the dowels.

19. Easy Wood Slice and Metal Pin Plant Stand

DIY Plant Stand
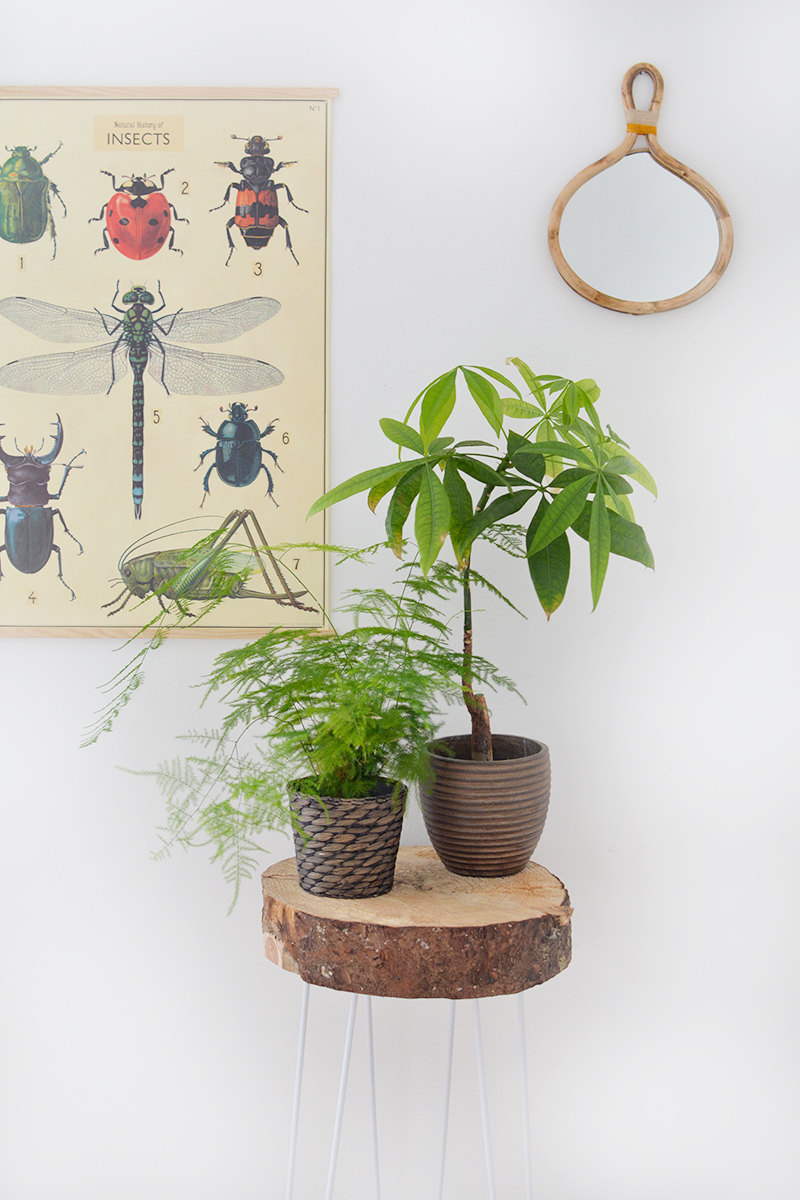
Now that metal hairpin structures in vogue, you should use them for the plant stand as well. Still remember the wood slab hack on the Ikea stool previously? The project will be similar.

The difference now is about its legs. For this project you need the hairpin legs, online stores provide them for you.
Screw them onto the slabs. That’s it, you have this chic Mid Century plant stand.

20. Minimalist Wire Plant Stand Plans

DIY Plant Stand
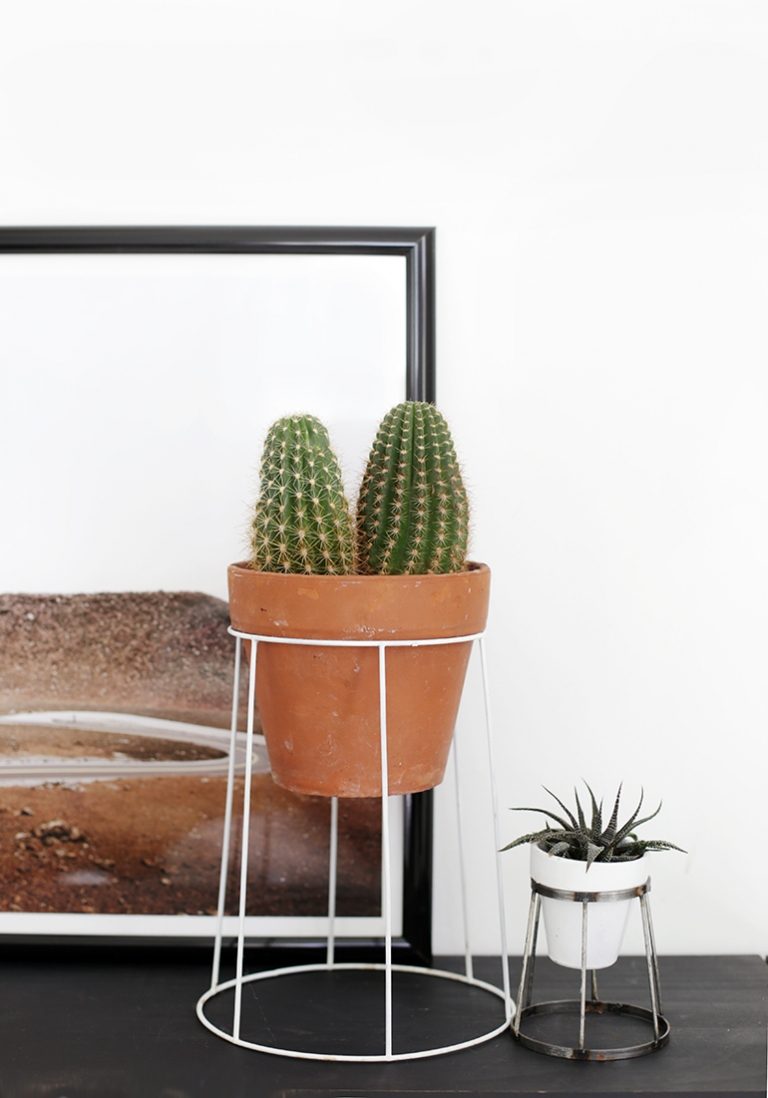
Potted cacti or snake plants should have their proper stand to maximize their presence in the room. These plants stand should enough for them.

These plants meet a minimalist requirement: the stands show off the plants without overwhelming them with their light constructions.

21. Tripod Adjustable DIY Plant Stand

DIY Plant Stand
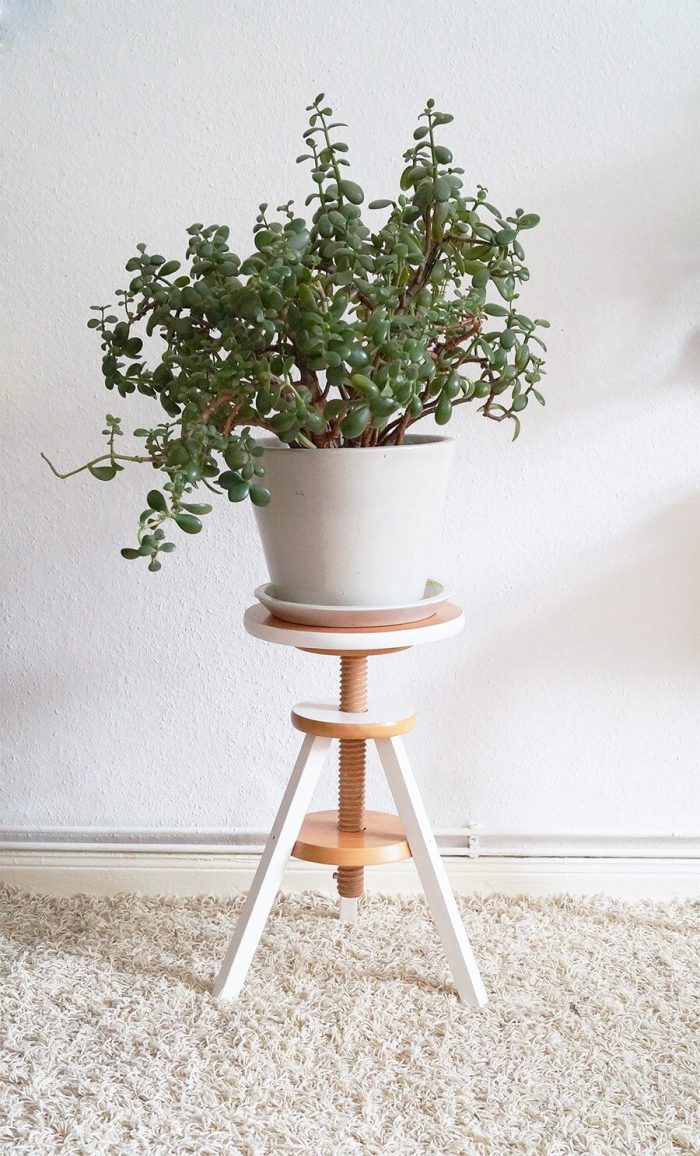
Just for an inspiration, this plant stand is adjustable. You adjust the height by turning its top. It will moves up or down, depends on the way you rotate it.

This indoor plant stand has a threaded stand, just like the grooves on a screw. This special features is the key of its movability.

That’s it. Turn the screw for the up and down movements.

22. Cheap Pallet outdoor Plant Stand, Table Style

DIY Plant Stand ideas
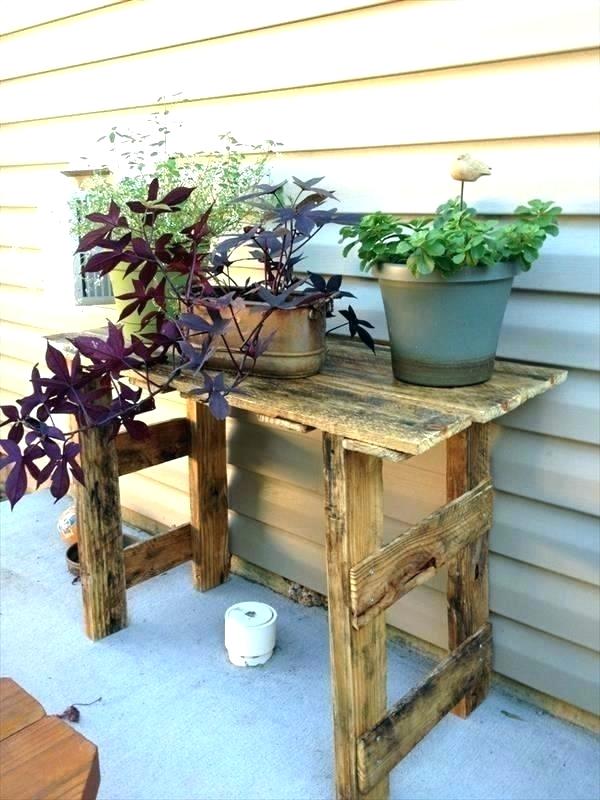
Pallet woods always present in almost any interior or outdoor projects. And now you meet them again in this DIY plant stand plan.

Get your saw, hammer, nails, and start working the pallets. No Instructions needed for this plant stand project, for we sure you’re already familiar with this kind of table plant stand construction.

23. Cheap Plant Stand from PVC Pipes in Copper Finish

DIY Plant Stand ideas
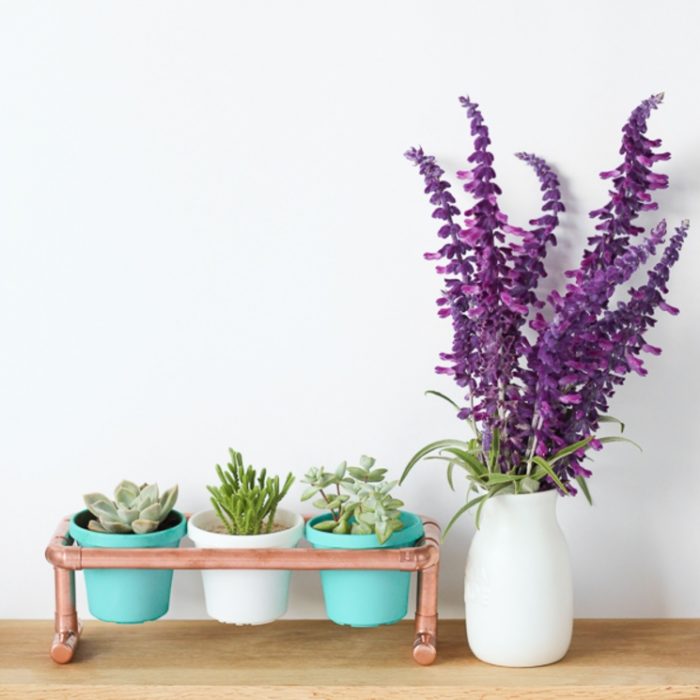
Yes, we know that copper materials gives a certain idylic and classical vibes to the room. But we also know that sometimes copper are unreachable for some of us.

Here’s the hack. Get a length of PVC pipe, don’t forget purchase the joints as well (these will be several 90 degree adapter elbows, standard T joints, and pipe caps).

And don’t forget the key ingredient, a can of spray can in copper color.

After some pipe cuttings, assembly them into the following picture. As finishing, spray the structure with copper spray paints. And you have this cheap copper plant stand.

24. Indoor Mini Plant Stand with Concrete Planter Box

DIY Plant Stand ideas
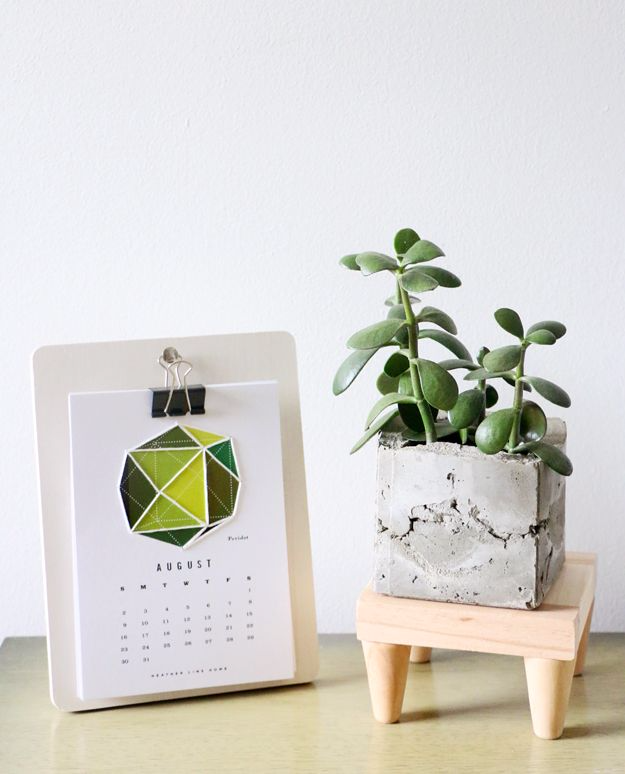
This elegant minimalist DIY plant stand should sits next to your bed, on top of your reading table. It’s just cute.

A piece of hardwood, wood stands, and strong wood glues should be enough for this project. For a stronger touch, choose a concrete planter box for the indoor plant.

25. Corner Plant Stand Classic Country Style

DIY Plant Stand ideas
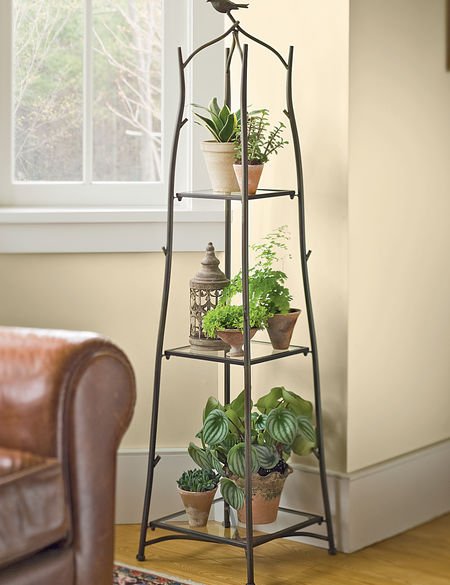
Still in need an elegant plant stand for a room corner? Here we have one with classic country style vibes for you.

This corner plant stand has rustic branch-like features (though the materials are of metals), with a calm bird perches on it.

Glass shelves offset the dark heavy construction, and they works well for a retro corner stand.

26. Minimalist Wood Plant Stand with Cone Plant Container

DIY Plant Stand 
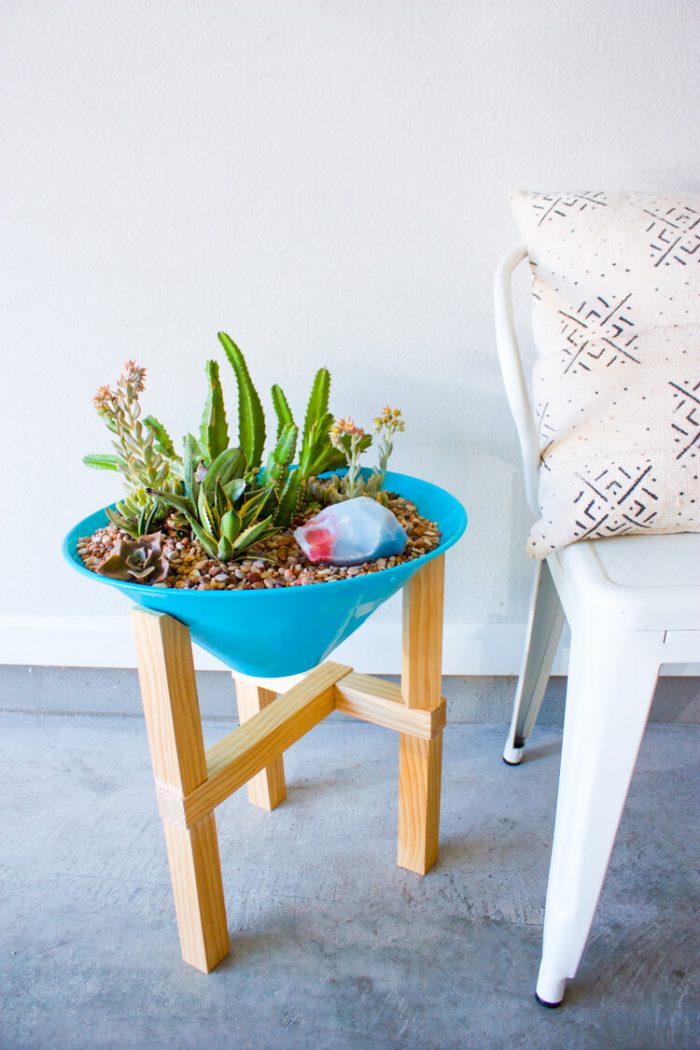
Now if you want to inject a warm air into the room, add stuff from pine woods. Just e small part of the woods can make your room cozy and warm.

Here you have a three-legged pine wood plant stand. The unique part of this stand is its plant container, it’s in a contemporary cone shape.

27. Rustic Plant Stand in Ladder Style

DIY Plant Stand 
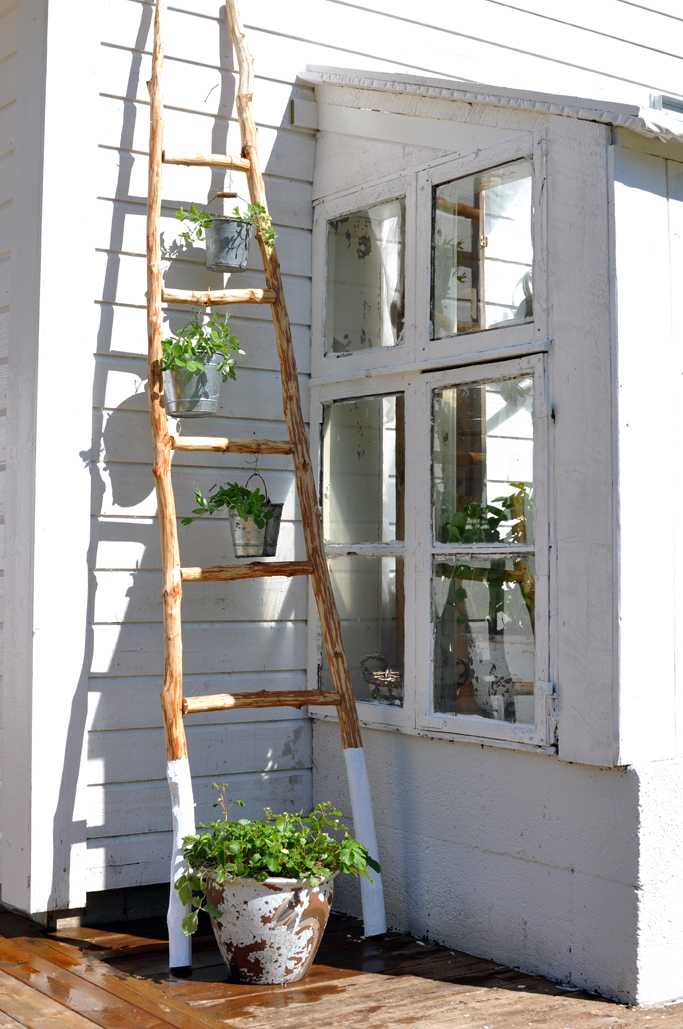
Rural style, country style, or urban style are almost synonymous. They often offer basic and raw beauties.
This outdoor stand plant is a perfect example.

You have plant stand out of raw branches. You don’t need to smooth or paint all its parts. The raw finish only makes this plant stand prettier.

28. Slim DIY Plant Stand Wood with Copper Pipes

DIY Plant Stand 
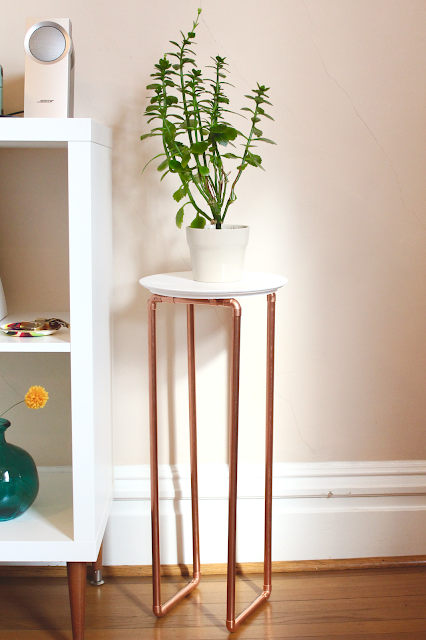
This DIY plant stand project is similar with the PVC plant stand project (see no.23). Only now you use the real copper pipes.

The reason for the material choice is that it’s far stronger for this slim and tall construction, aside of looking better as well.

Put a round white top on the structure to finish this project.

29. Metal Plant Stand, Also for Room Partition

DIY Plant Stand
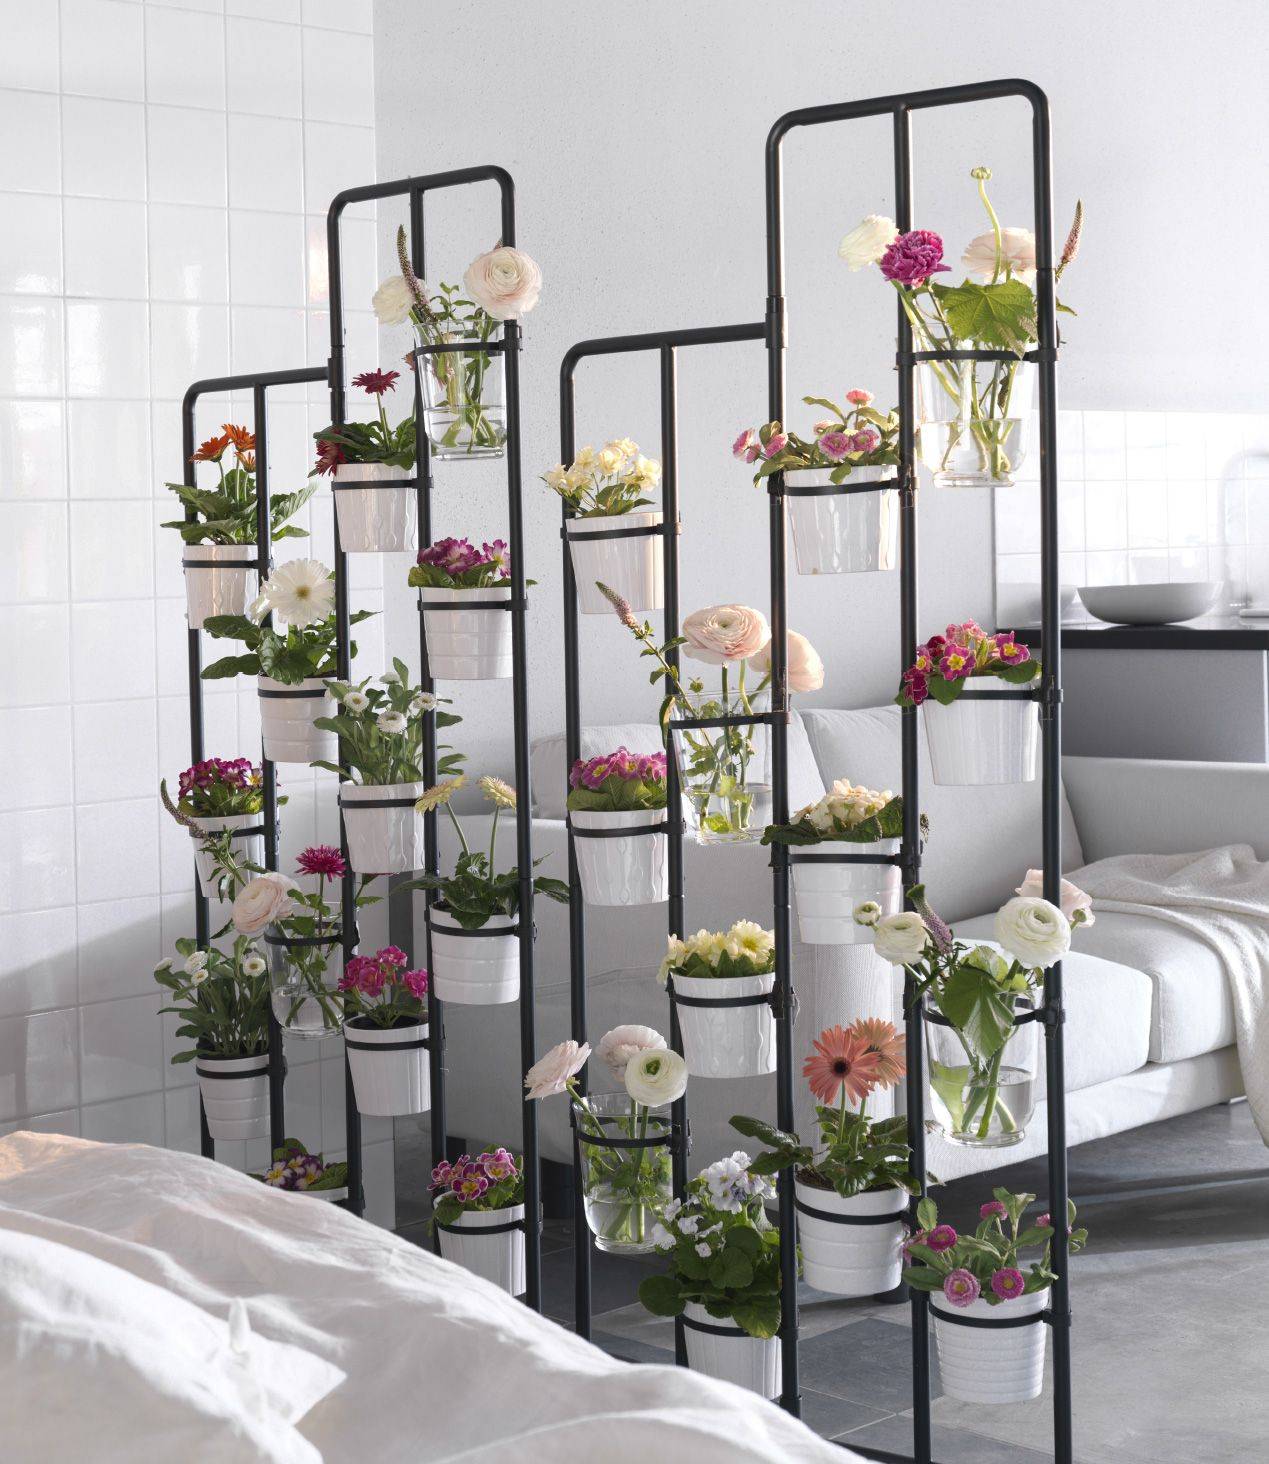
You won’t only have this plant stand for shake of a plant stand. This plant stand also works as an open room partition.

This vertical metal plant stand can holds several potted plants/flowers at once, resulting a natural screen which divides a particular area with other areas.

Its black finish add strong accent to the room.

30. Industrial Plant Stand for Indoor and Outdoor Uses

DIY Plant Stand ideas
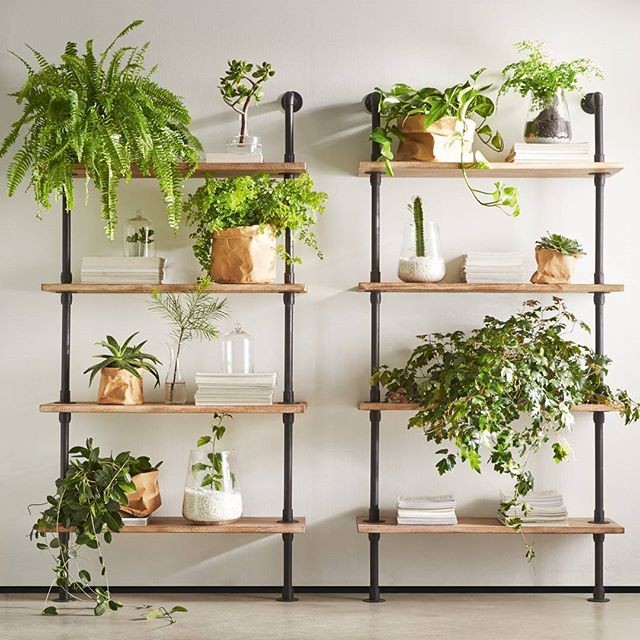
We cannot leave this list without adding an industrial style plant stand into it. And here it is. We offer you here a simple industrial plant stand with multiple racks.

The rugged style makes this stand works well for indoor or outdoor uses. It has no problem in handling various sizes of planter pots and a variety of plants.

Read More: 25++ Simple and Easy DIY Hat Rack Inspiration

We do sure that a list of 30 DIY plant stand is not enough to satisfy all your wants. But we sure that we have offers you some of the best plant stand plans.

We carefully pick them according its materials, finishes, designs, and its usage. As for the styles, this we also strive to cope almost all the styles that the contemporary people love.

Lastly, we do hope that you can enjoy this list of DIY plant stands.